Contents
- Intro to Hardware Wallets
- Security features of your Ledger Nano X
- What is "Ledger Live?"
- Setting up Your Ledger Nano X
- Unboxing your Ledger Nano X
- Getting Ready to power on your Ledger Nano X
- Download Ledger Live on your computer
- Accept the Legal Terms
- Select your device model
- Nano X setup options
- Let's set up your Nano X!
- Learning how to navigate your Nano X
- Configure your PIN
- Confirm your PIN
- Generate your Recovery Seed Phrase
- The importance of backing up your Recovery Phrase
- Carefully write down your recovery phrase words
- Confirm your Recovery Phrase words to your Nano X
- Start using your Nano X
- Import an existing Recovery Phrase
- Entering an existing Recovery Phrase into your Nano X
- Pair your Nano X with Ledger Live
- Pairing your Nano for iOS and Android
- Pairing your Ledger Nano with Bluetooth or USB
- Finishing Pairing your Nano X with Ledger Live
- Pairing your Nano for Desktop - Windows, Mac OS, and Linux
- Using Ledger Live to update your Firmware
- How to use your Ledger Nano X
- Generating public wallet addresses in Ledger Live
Welcome to Vault12's step-by-step guide to securely configuring the Ledger Nano X, the high-security hardware wallet created by Ledger. This guide will walk you through creating a new wallet, or initializing an existing wallet by importing a recovery phrase.
This guide focuses on the security choices you can make when setting up your wallet; if you are looking for the official Ledger Nano X setup guide, please click here.
Let's dive in and walk through how to use your Ledger Nano X securely.
TL;DR
Hardware wallets are widely considered to be the safest way to store your cryptocurrency.
The Ledger Nano is a very popular and well-reviewed cryptocurrency hardware wallet.
The Ledger Nano X offers more storage space for Apps and more connectivity options than their first-generation hardware wallet model (the Nano S).
The Nano X keeps your private cryptographic keys safely off of the Internet, and connects to a separate application called Ledger Live on your computer or mobile phone to perform some functions.
The Nano X interoperates with a wide variety of cryptocurrencies and even other wallets.
This guide complements the official Ledger documentation by walking you through each setup step.
Intro to Hardware Wallets
Many cryptocurrency wallets on the market today are software wallets running on computer systems that are connected to the Internet. This is convenient, since the blockchain itself is software, and a few mouse clicks in a software wallet can quickly execute a transaction. However, a potential threat emerges that is present in all applications: software is hard to keep secure. Not only is the wallet application itself susceptible to attack, but the operating system of the host computer, and even the hardware of the host computer can be the target of attack. This is why specialized secure hardware exists - the smaller the set of tasks that a device performs, the smaller the "attack surface," and the less likely that bad actors can find a way to compromise its security.
For a software wallet to be secure, the application has to be built without security flaws, the operating system hosting the application has to be hardened (configured) to thwart attacks, and the computer hardware must be kept physically secure. Security evolves, and every day reveals new unexpected vulnerabilities discovered by creative hackers. To keep internet-connected computers secure, a choreographed set of application developers, system administrators, and network monitoring engineers must constantly be aware of security threats and defend online applications against them.
Hardware wallets have emerged as a solution to these threats. Hardware wallet manufacturers design security features into purpose-built, customized hardware that protect your private keys by keeping them inside the device and permanently isolated from the Internet. No matter what new vulnerabilities are discovered in software, if your private keys are stored in an offline specialized hardware device, your keys are safe.
Security features of your Ledger Nano X
The Ledger Nano X has a number of built-in security features.
Ledger Nano X uses a special, tiny chip called "Secure Element" that stores cryptographic data. It is tamper resistant and was designed for high-security applications that need to store highly-sensitive data. Your private keys are isolated, encrypted, and stored in the Secure Element chip. You have likely used Secure Element before without even being aware of it: your banking card chip, SIM card or electronic ID card with PIN codes all contain Secure Element chips that allow providers to remotely and securely authenticate your access to banking, mobile, or government services.
All modern Apple smartphones and top Android phones are using Secure Enclave - the stronger brother of Secure Element, to store safely your biometric information.
The core concept of Secure Element is that there is no function or capability to read private keys out of the chip - stored keys can not be read or physically removed from the secure hardware ever. When you want to sign a cryptocurrency transaction, you request Secure Element to sign it with the keys stored inside it. To confirm that you are the authorized owner of the keys and that the proposed transaction is genuine, you identify yourself to your device with the PIN code. This is similar to how smartphones store your biometric data in a Secure Enclave chip, decrypting data when requested via an app, but they never expose the decryption keys.
Ledger Nano X also runs its own, custom Operating System named "BOLOS" - Blockchain Open Ledger Operating System. BOLOS is specifically designed to run each cryptocurrency wallet isolated from the others. For example, your Bitcoin wallet will run completely isolated from your Ethereum wallet. You can think of it as a bank vault, with each safety deposit box in the vault representing a wallet.
The security of the Ledger Nano X is certified by ANSSI, France's National Agency for the Security of Information Systems. ANSSI ran multiple attacks against the Ledger Nano X in their lab to confirm that they could not break the Nano X's security protocols.
Security is front and center with Ledger products. The company has an in-house security research team, named donjon, made up of specialists in cryptography, software, and hardware security. This team is constantly testing and attacking Ledger wallets, and they publish all of their attack tools as open-source software, opening them up to analysis and testing by all developers and security experts.
Additionally, to guard against any security flaws that might go undetected by the ANSSI security certification process and the internal security team, Ledger operates a bug bounty program for security researchers, through which they welcome reports of security weaknesses in their hardware, software, and third-party Ledger Live apps. Exceeding the scope of most bug bounty programs, the Ledger bug bounty program also includes a 10 BTC fund that pays for information that leads to the arrest of phishers.
What is "Ledger Live?"
Ledger Live is an open-source, cross-platform wallet management tool, designed for your Ledger Nano X.
Although you can use your Ledger Nano X with compatible 3rd party wallets, you will still need to use Ledger Live to complete the setup of your device, activate and install wallets, and keep your device up to date. Additionally, Ledger Live is used to update the firmware of your Nano X, and to verify that your Nano X has not been tampered with.
The proprietary Ledger Nano X operating system BOLOS isolates each wallet application from the others. When you start the Ledger Nano X for the first time, no wallets exist on the device. Ledger Live is the tool that is used to install and activate the wallets. This is done by first installing Ledger Live "Apps." For example, when you install the Ethereum App, what you are installing is the functionality needed for an Ethereum wallet to run in its own isolated space.
After setting up your Nano X, initializing and backing up the seed phrase, and installing a wallet App, Ledger Live prompts you to create an Account that uses the wallet. When you add an Account, the public (not private!) key from your Ledger Nano is copied to Ledger Live. This allows Ledger Live to use the public key to generate "receive addresses" where you can receive cryptocurrency. You can create as many Accounts and receive addresses as needed, and all of them are managed by your hardware wallet.
To send and receive funds, you use the Ledger Live application to initiate the transaction, and then it will prompt you to verify and confirm the transaction on your Nano X hardware device.
Ledger Live is under continued development and continues to expand its functionality. Today, Ledger Live users can:
- Buy crypto with a credit card and bank transfers with partner service Coinify
- Swap one type of coin for another (e.g., Ethereum to Bitcoin) through integration with Changelly
- Use Nano X as a hardware 2FA device for your sensitive accounts. There are even reports that it works over Bluetooth Low Energy (BLE) in Windows, which is a pretty unique feature.
- Earn funds through staking. Ledger Live supports staking with:
- Polkadot
- Tezos
- Algorand
- Cosmos
- Tron
Ledger Live is available on iOS and Android, as well as Windows, Mac OS, and Linux. It is important to note that firmware updates are only supported via desktop, so it is a good idea to download both the mobile Ledger Live and the desktop Ledger Live.
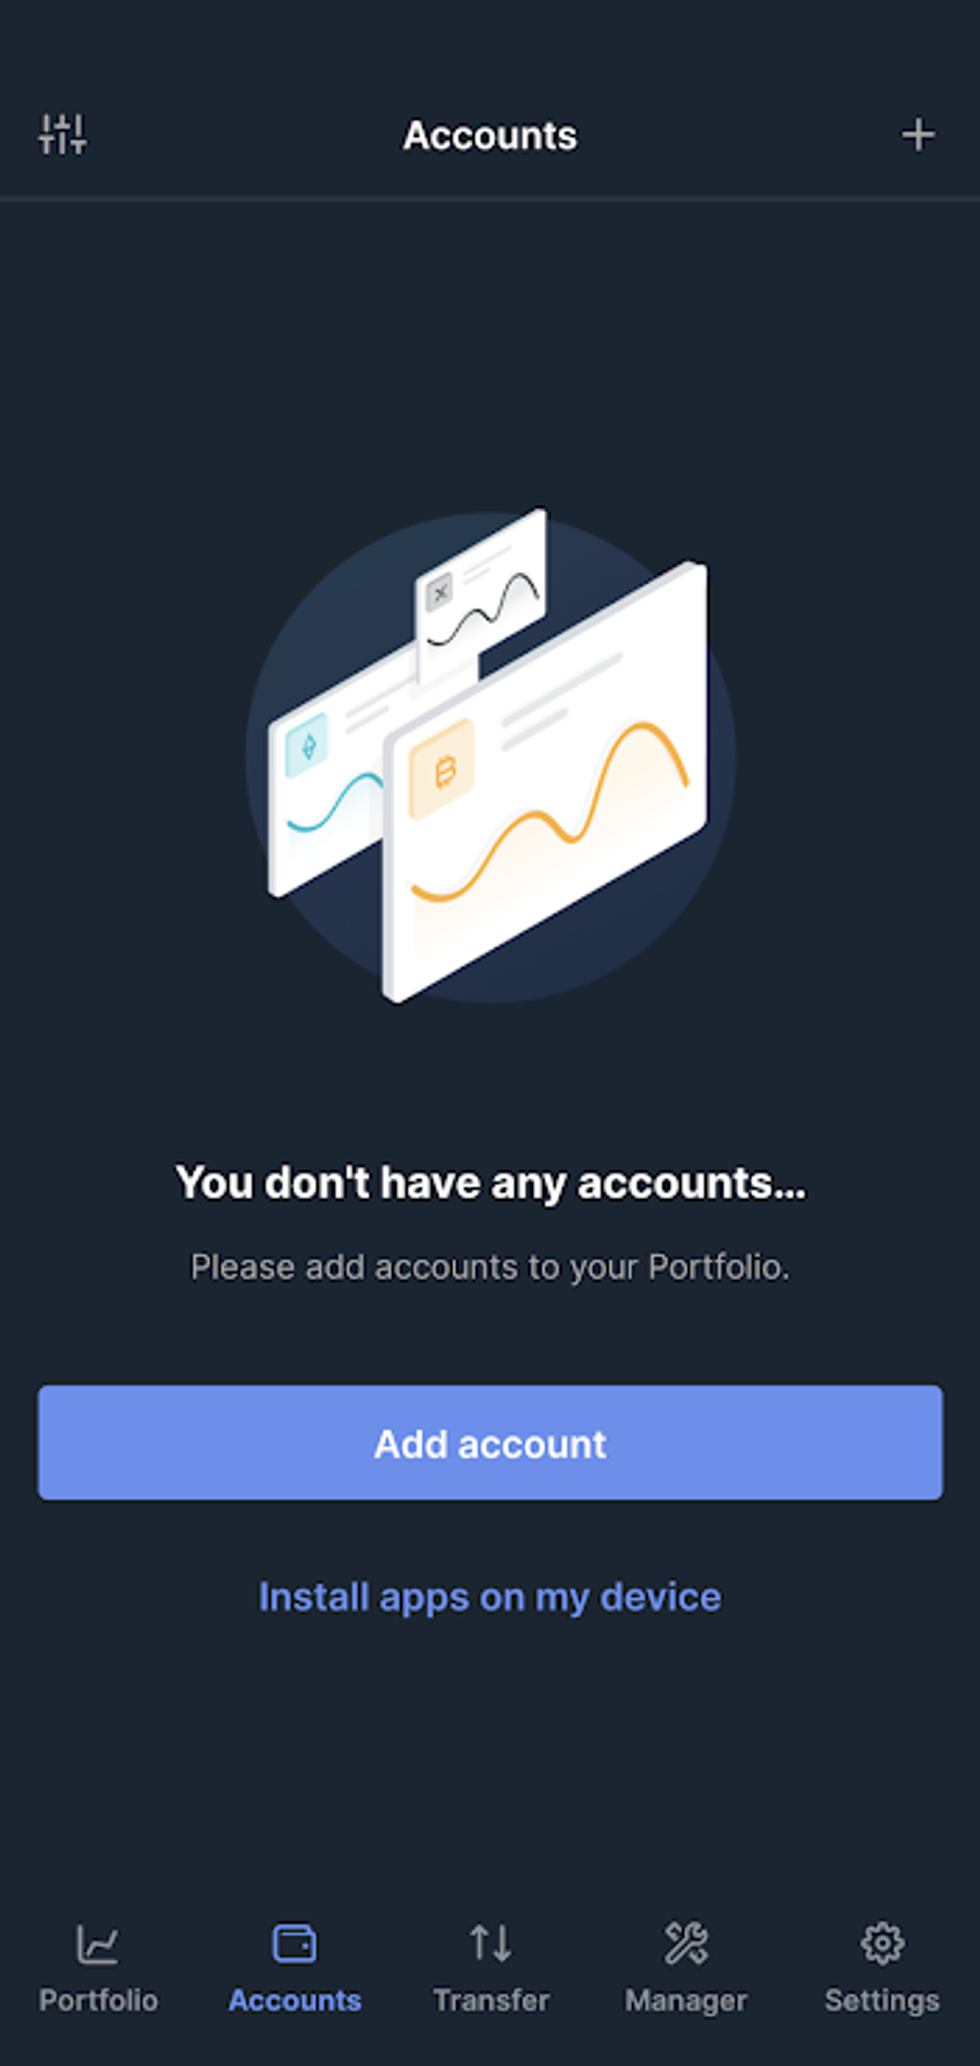
Setting up Your Ledger Nano X
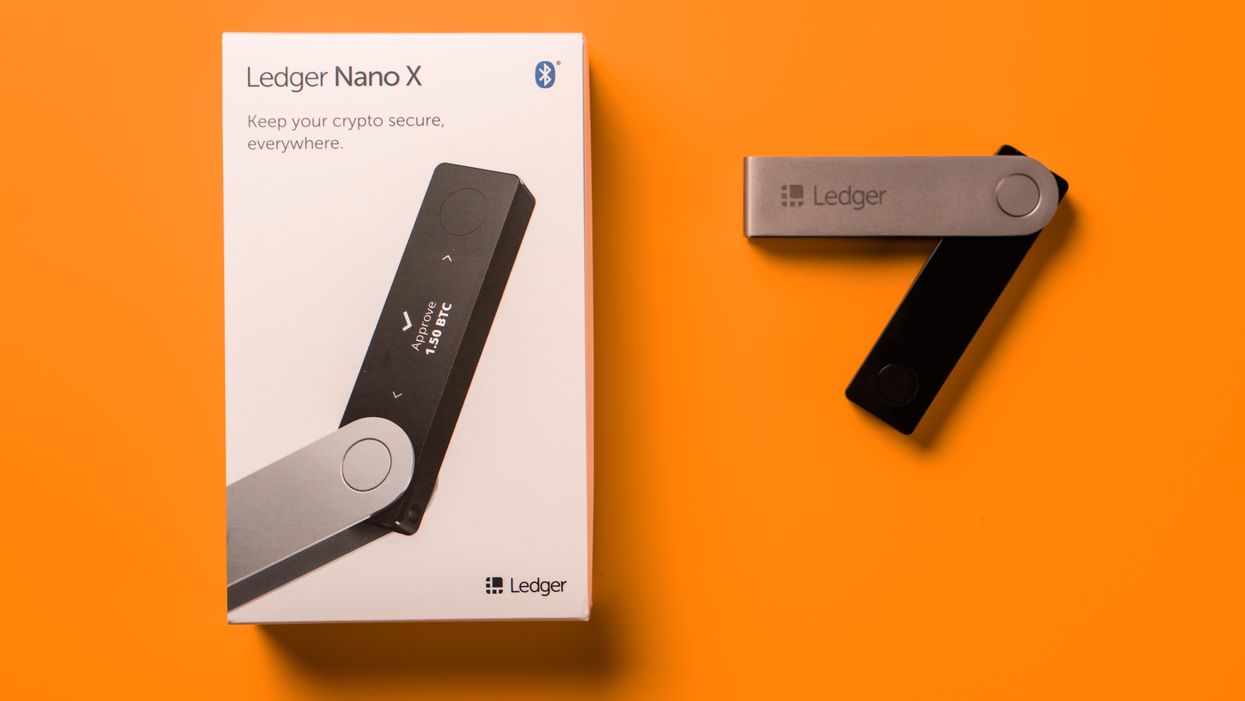
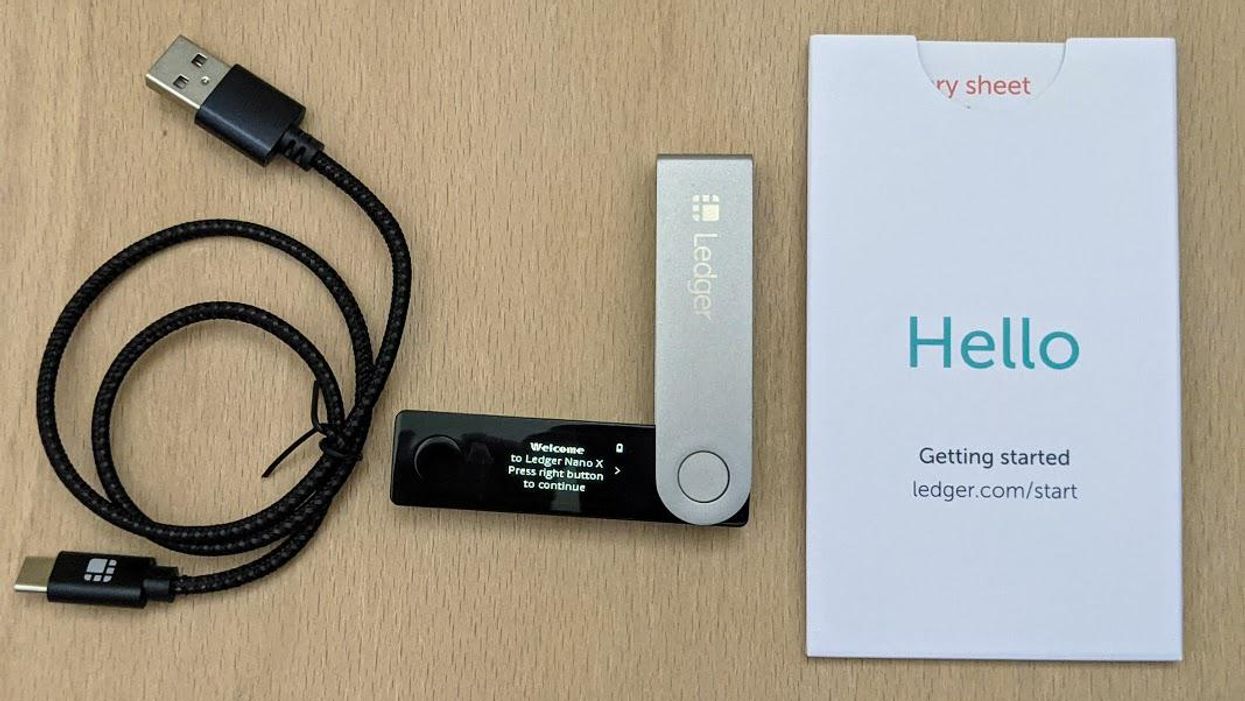
The first step in setting up your Ledger Nano X is to unbox it! Carefully open the packaging and inspect everything included with your Nano X.
Your Ledger Nano X comes with the Nano X device, a USB cable, and documentation, including a 24-word sheet to write down your recovery phrase.
Unboxing your Ledger Nano X
Getting Ready to power on your Ledger Nano X
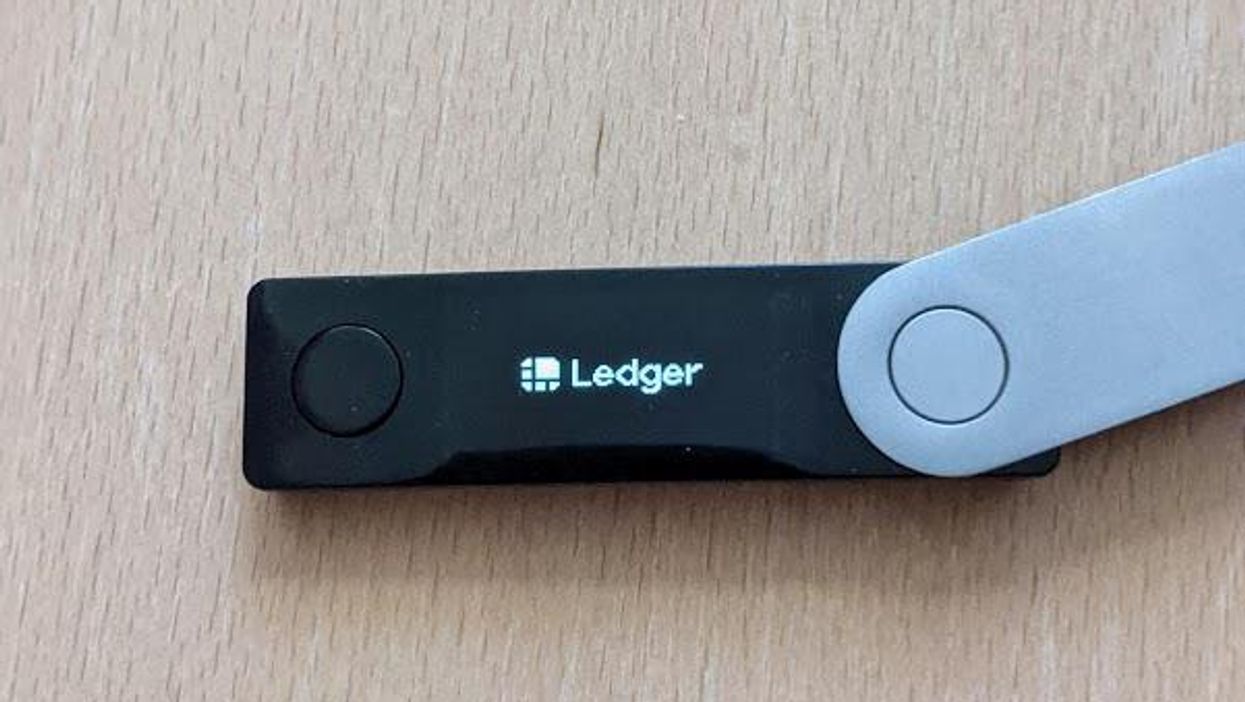
Your Ledger Nano X looks at first glance like a high-quality USB flash drive. There is a protective barrier around the device, connected with a swivel. Open your Ledger Nano X by sliding the swivel open.
The two buttons on the device, one black and one silver, are used to navigate your device. We will talk about them more in a moment.
If you are powering on your Ledger Nano X for the first time, check the status of your battery in the upper right hand corner of the screen. Before proceeding with setting up the device, you will want a fully charged battery.
The next step involves downloading Ledger Live, so take this time to charge your Ledger Nano X, and let's download Ledger Live.
Download Ledger Live on your computer
To download Ledger Live, navigate to https://ledger.com/start and select the operating system you will be using. Ledger Live is cross-platform, running on iOS, Android, Mac OS, Windows, and Linux.
To download the iOS version of Ledger Live, you can search for "Ledger Live" in the App Store, or follow this link. Always verify the developer - in this case it is Ledger SAS. You can find it by locating the "Seller" field in the description.
To download the Android version of Ledger Live, you can search for "Ledger Live" in the Play Store, or follow this link. Always verify the developer - in this case it is Ledger. You can identify the developer by locating the "Offered By" field in the description.
For those using the desktop version of Ledger Live, it is recommended to take the extra step to verify the authenticity of the download. This is because desktop apps do not come from a centralized store where this information can be verified. Ledger releases the SHA-512 hashes of the desktop Ledger install to make it easy.
You can find the SHA-512 hash released by Ledger here: https://www.ledger.com/ledger-live/lld-signatures
If this sounds complicated to you, don't worry; it's simple. You are simply going to copy and paste a string of text into the terminal on your desktop, then compare the result with the published results from Ledger. In fact, Ledger publishes the exact command you are going to copy and paste, along with the results.
For Windows
In Windows, open the File Explorer and navigate to the folder that contains your Ledger Live download ... this is usually the "Downloads" folder. Once in the Downloads folder, click on "File" in the upper left hand corner, and choose the menu option to "Open Windows Powershell."
Once in Powershell, copy and paste the following command:
$ Get-FileHash ledger-live-desktop-2.24.0-win.exe -Algorithm SHA512
The result returned will be a string of 128 letters and numbers. Compare the result with the results published by Ledger Live. If they match, you have just verified your downloaded file as authentic, and you are good to go:

For Mac
If you are using Mac OS, open the Terminal by searching for Terminal. Once in your Terminal, you will need to navigate to the folder that contains your Ledger Live download ... this is usually the "Downloads" folder.
$ cd Downloads
Once in your Downloads folder, run the following command:
$ shasum -a 512 ledger-live-desktop-2.24.0-mac.dmg
For Linux
In Linux based systems, open your terminal and navigate to your downloads folder:
$ cd Downloads
Once in your Downloads folder, run the following command:
sha512sum ledger-live-desktop-2.24.0-linux-x86_64.AppImage
The result returned will be a string of 128 letters and numbers. Compare the results with the results published by Ledger.
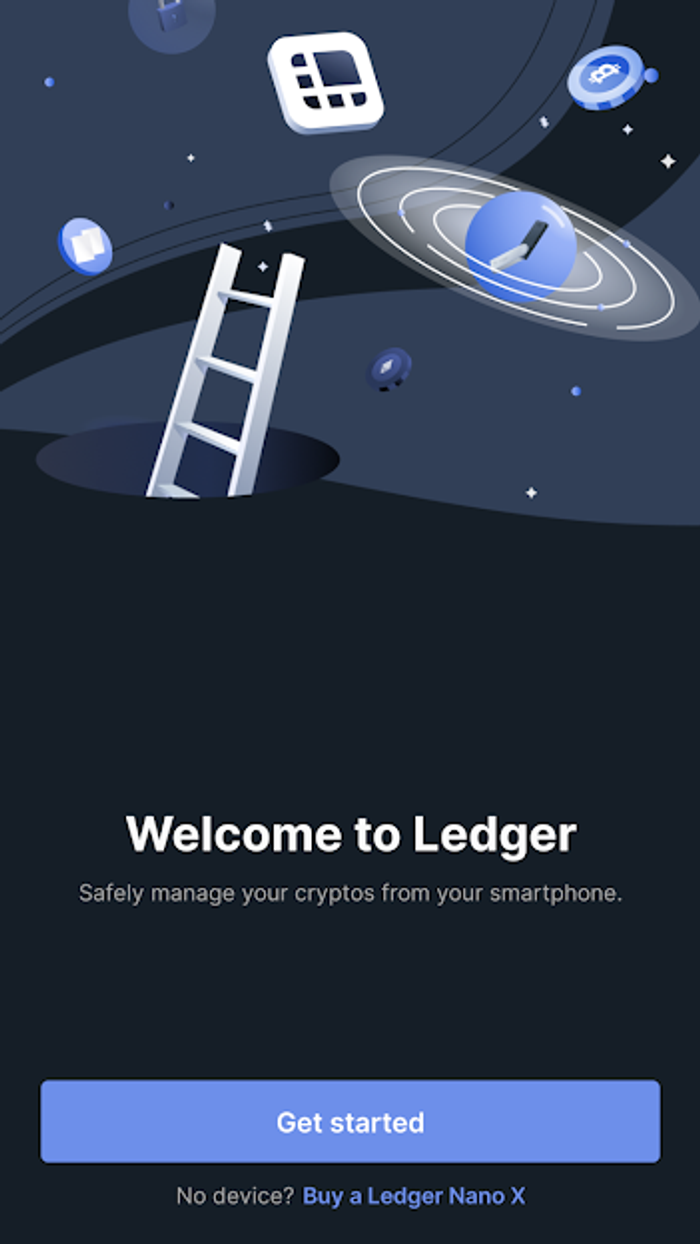
Now that you have verified your Ledger Live download, finish the installation process and let's get started. Open Ledger Live, and you will be greeted by a Welcome Screen. Tap on "Get Started."
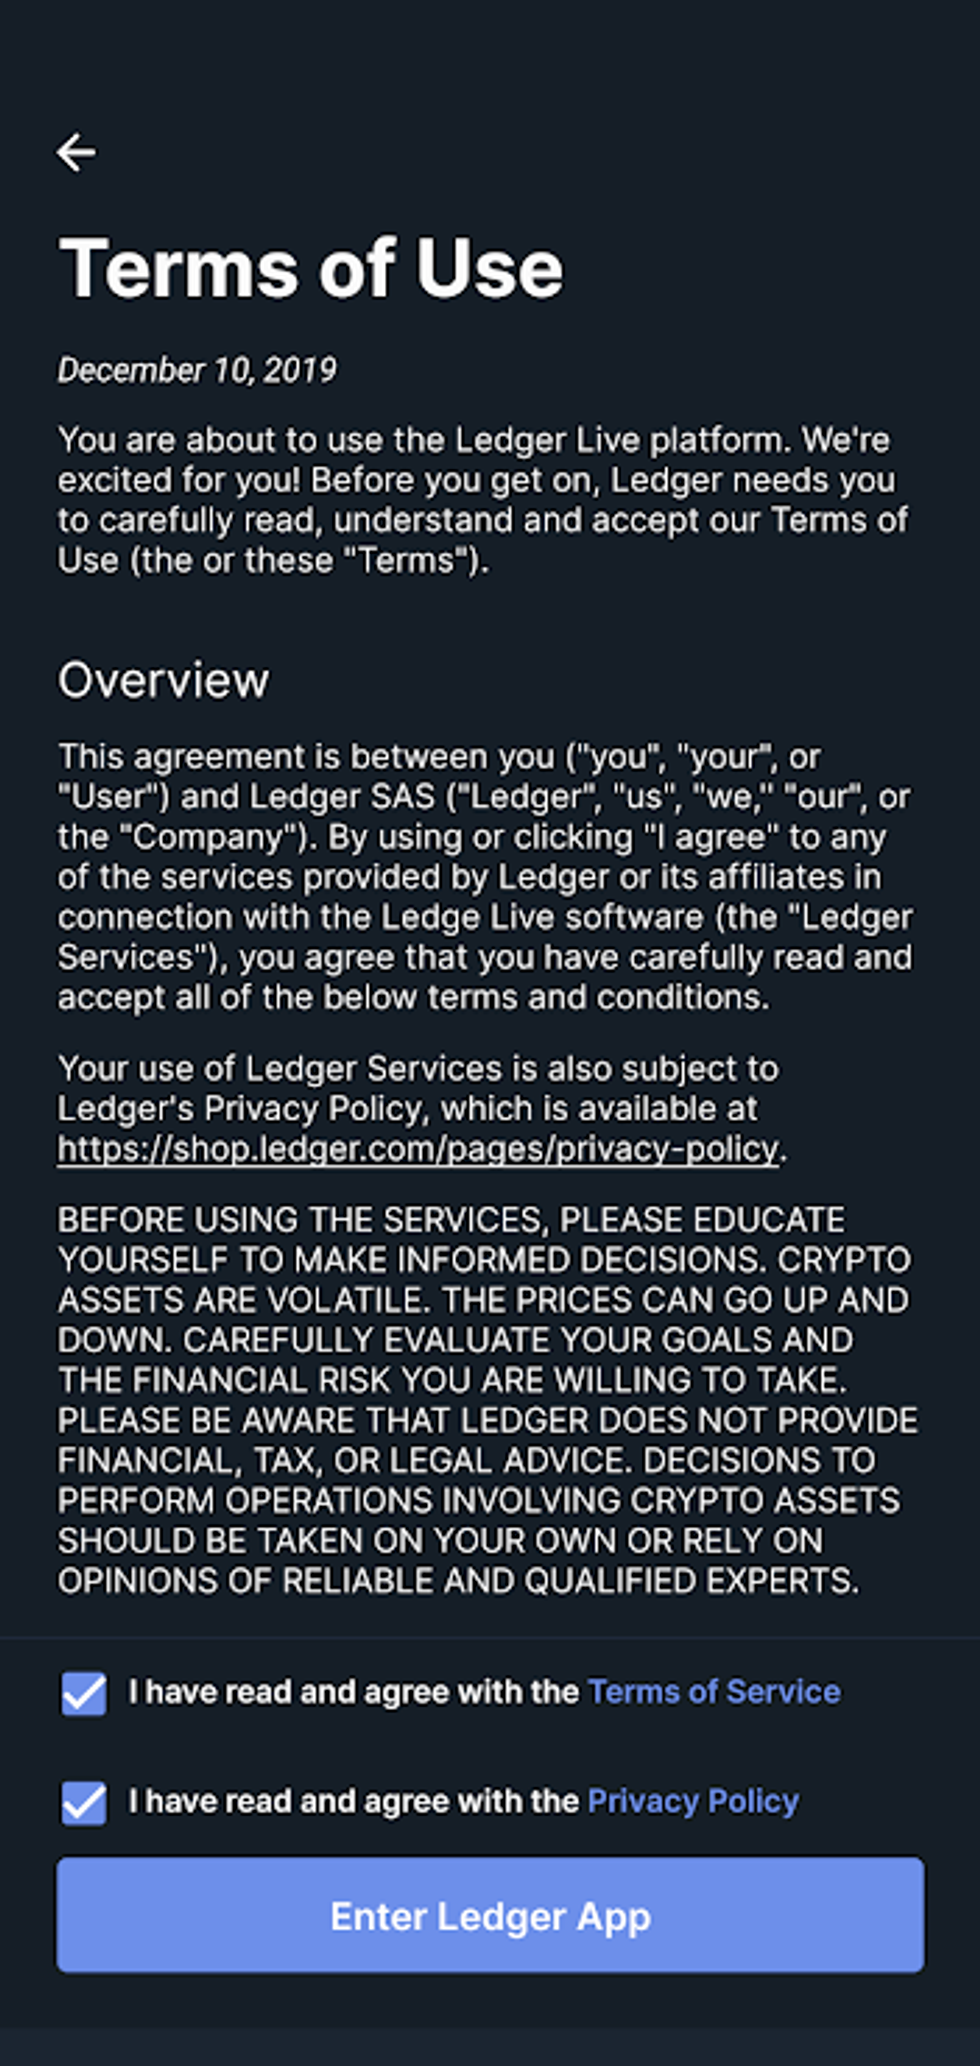
Accept the Legal Terms
It is time to take care of the legal stuff. Ledger will display their "Terms of Use" and Privacy Policies on the screen. Read over the policies, and check both boxes at the bottom of the screen when you are ready to proceed.
Now the fun part begins - tap on "Enter Ledger App."
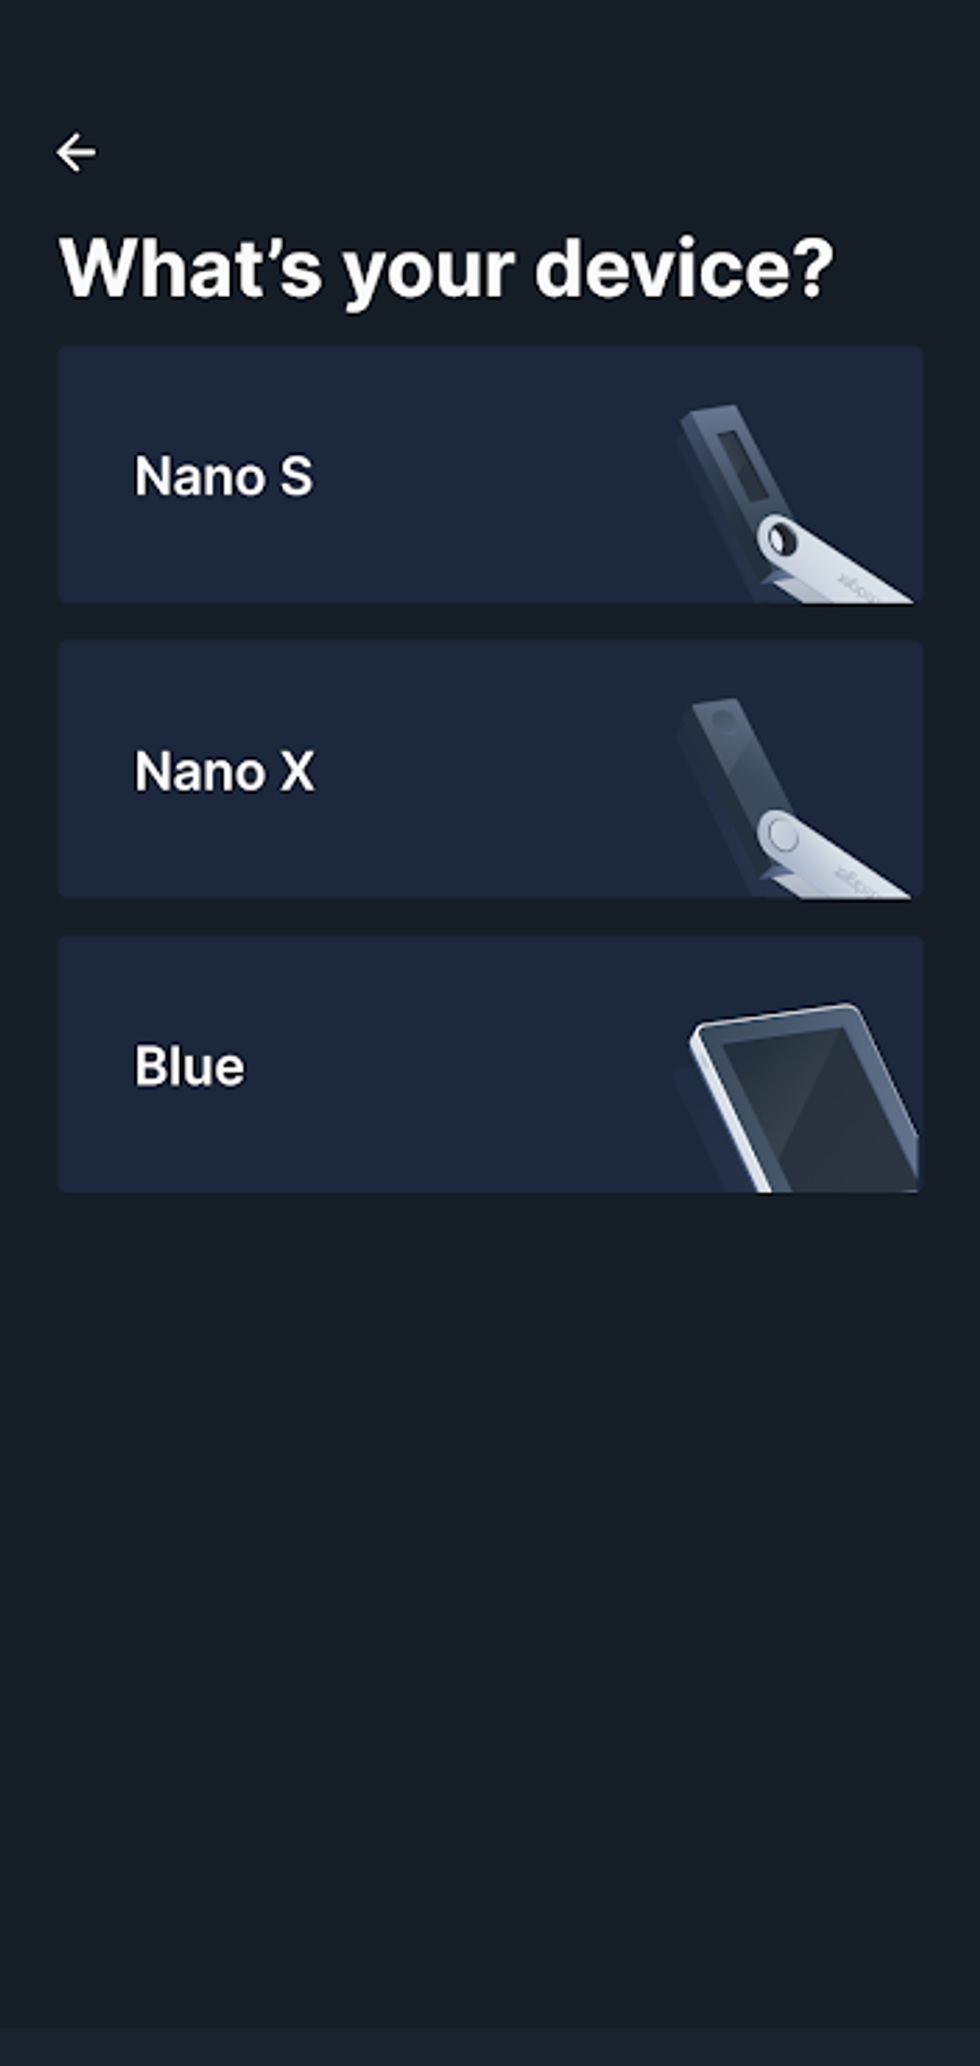
Select your device model
You are now in Ledger Live, the management tool for your Ledger Nano X. Ledger Live works with all Ledger hardware wallets. Here we will make a selection to let Ledger Live know our device model.
Select your device from the listed options. This guide is for the Ledger Nano X, so select "Nano X."
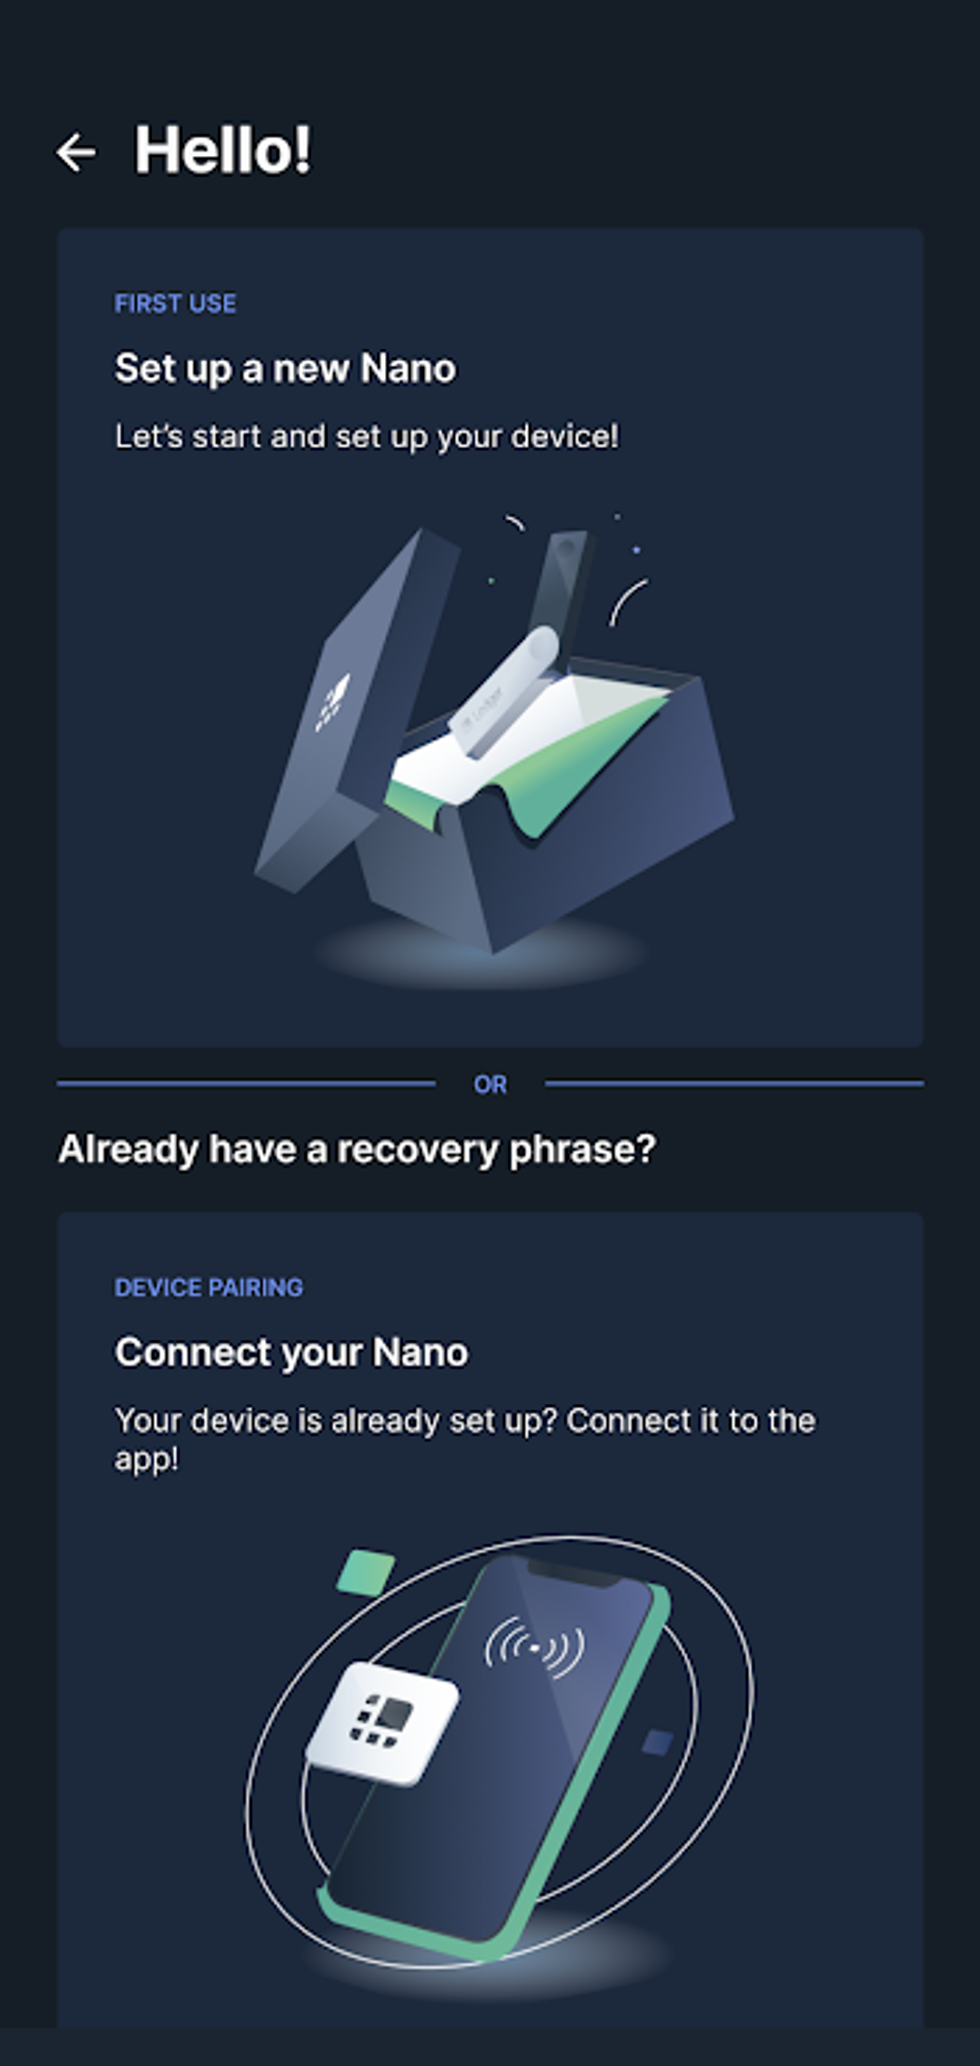
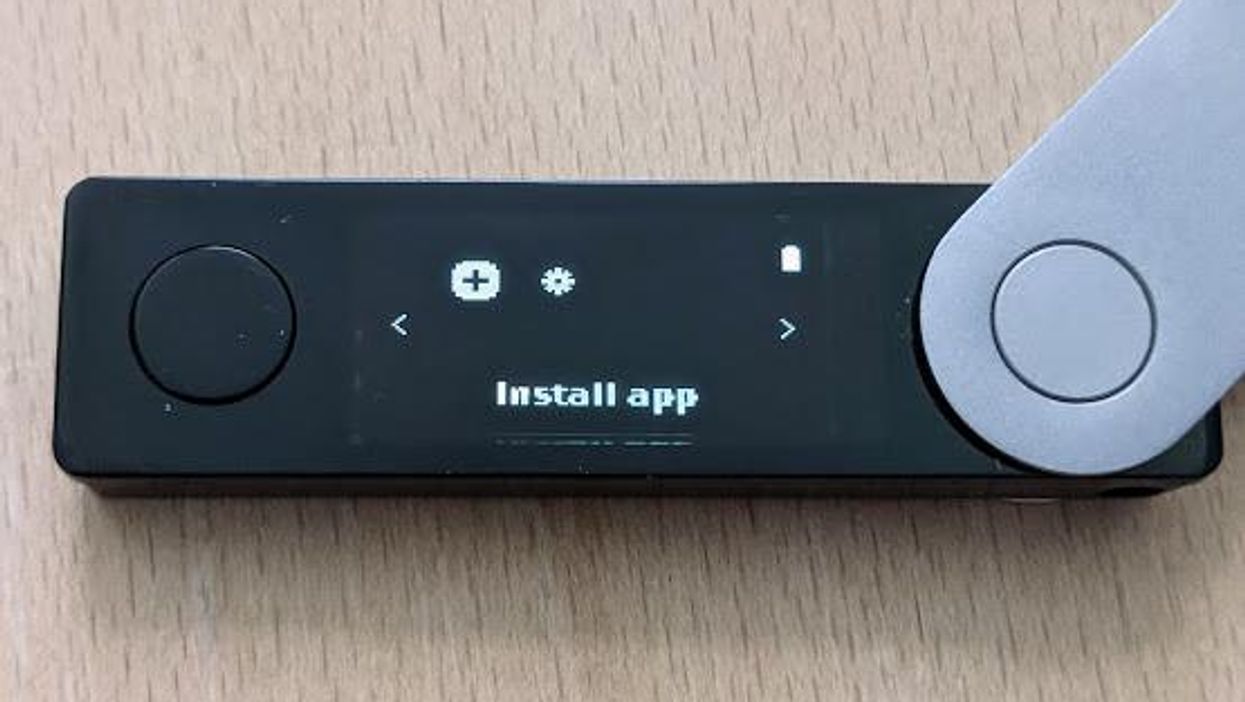
Nano X setup options
Next, Ledger Live is going to display the available options for setting up your device. There are 4 options:
- First Use - Set up a new Nano
This option provides on-screen instructions for setting up a Ledger Nano X. - Connect Your Nano
This option creates a direct connection to your Nano. - Desktop Sync
This option will synchronize an already-existing Ledger Live instance running on a desktop computer with an already-configured Ledger Nano X. (Also, after your initial installation, Ledger Live will be needed to perform firmware updates on your Nano device) - Restore Device
This option is for initializing your Ledger Nano X with an already-existing recovery phrase.
After you select "Connect your Nano," we will return to the Ledger Nano X and begin the setup process. When it is time to "Connect your Nano", we will return to Ledger Live and establish the connection.

Let's set up your Nano X!
It is time to set up your Ledger Nano X. Check again to be sure that your Ledger Nano X is nearly fully charged, because if you run out of battery during setup, you will have to start over later.
Take a few moments to familiarize yourself with the device. Open your Nano X by opening the swivel.
Notice the two buttons: the silver button and the black button. These buttons are how you will control the device. An individual button press of either button will navigate through the on-screen options. Pressing both buttons together will select or confirm your action.
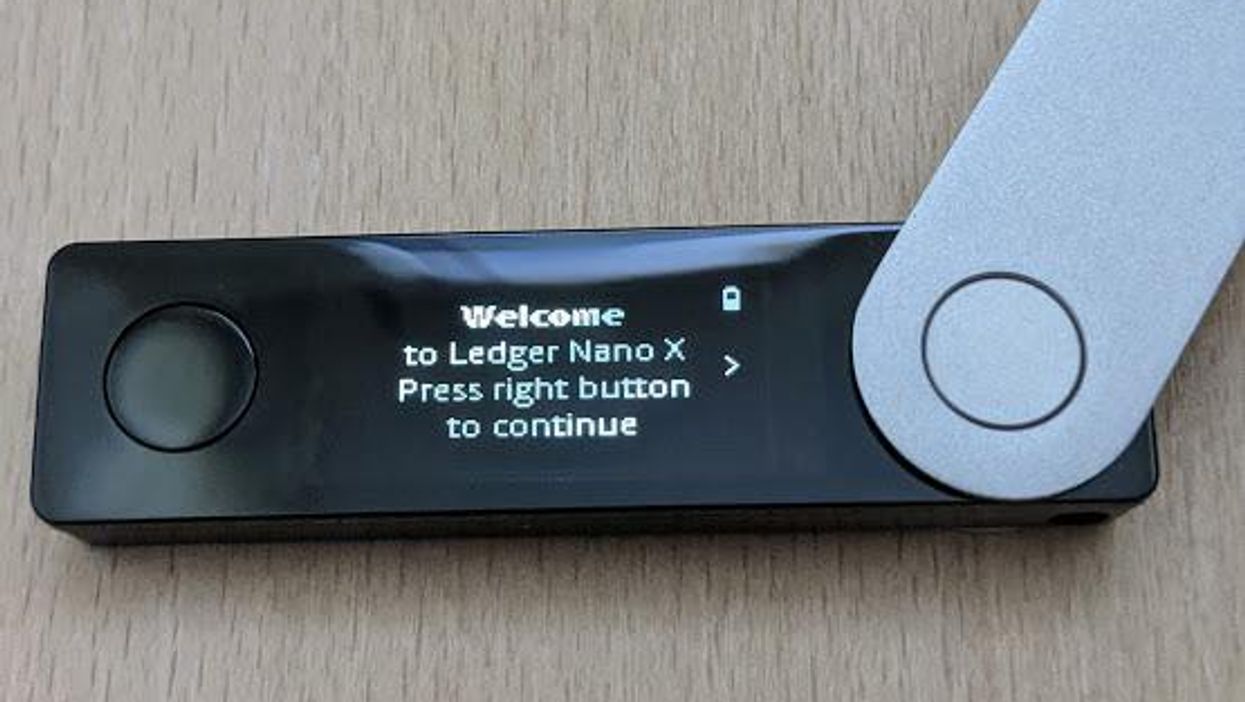
Press and hold the black button to power-on your Ledger Nano X. When the device powers on, you will be greeted with the Ledger Logo, and then a welcome screen.
Notice the arrow on the right side of the display: this is instructing you to press the silver button to continue ....
Learning how to navigate your Nano X
Using the black and silver buttons, navigate through the messages displayed on-screen, and read each one.
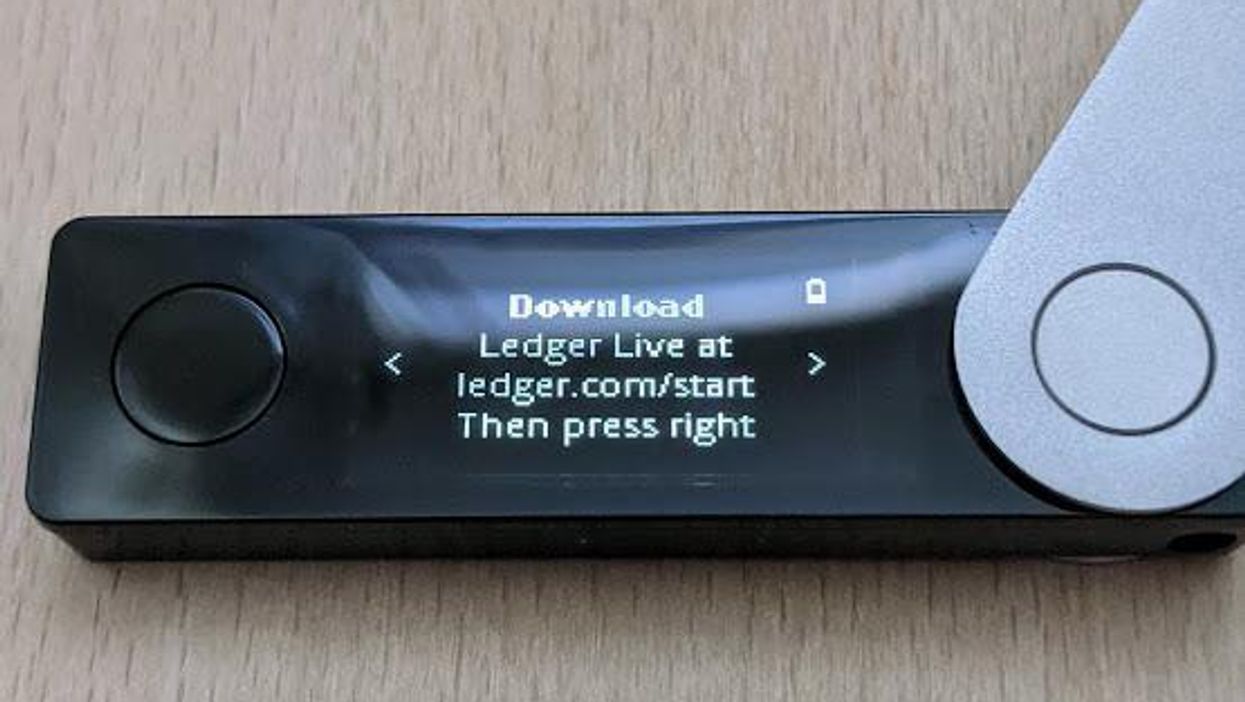
The first message will instruct you to visit ledger.com/start and download Ledger Live. You should already have Ledger Live installed and awaiting a connection from your Nano X. So go ahead and press the silver button to continue.
The next screens walk you through the basic navigation of your Ledger Nano X. You will notice little arrows on the left side of the screen and the right side of the screen. When the arrow is present, there is another menu item or list item you can navigate to. When there is no menu item to navigate to, the arrow will not appear on the screen.
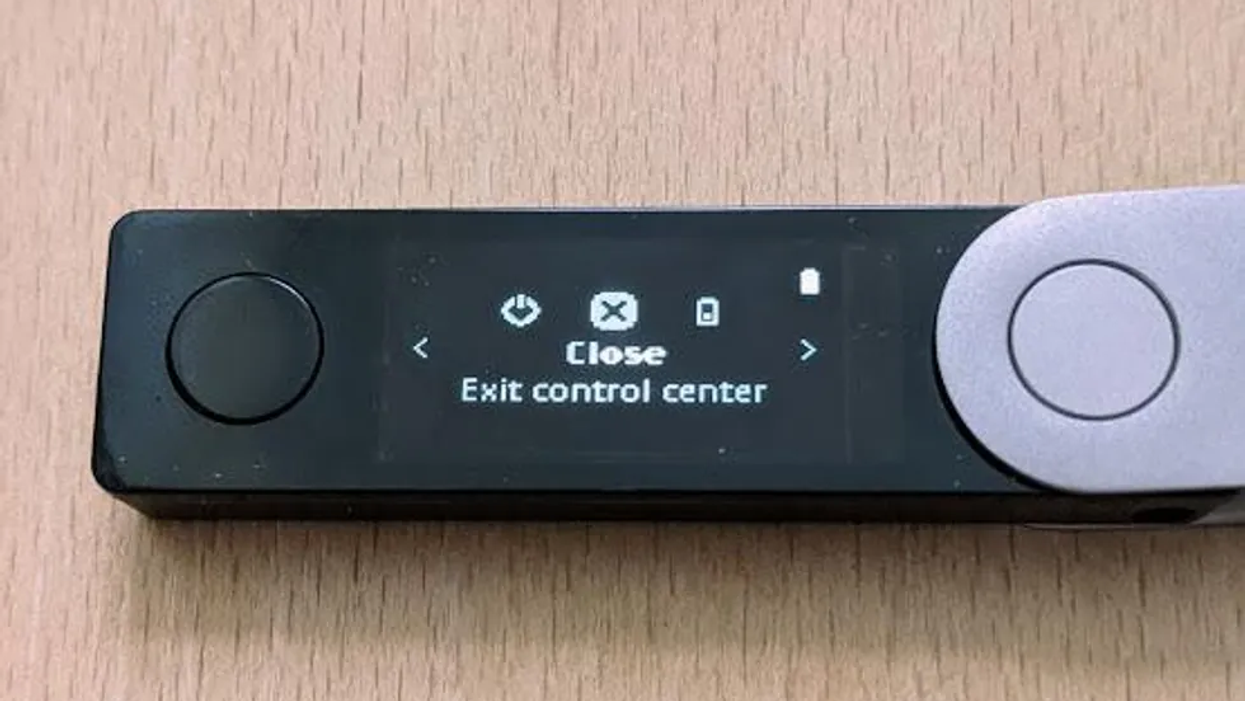
Individual button presses navigate, and double button presses select highlighted items. A long hold of both buttons will bring you to the Control Center, where you can access device settings, or power the device off. Try it:
- Long-press both buttons at the same time to access the Control Center.
- While in the Control Center, navigate around the options, and locate where the power-off option is. (This is how you would turn off your Nano X.)
- Return to the main screen by locating the "Close" option, and press both buttons to confirm your selection.

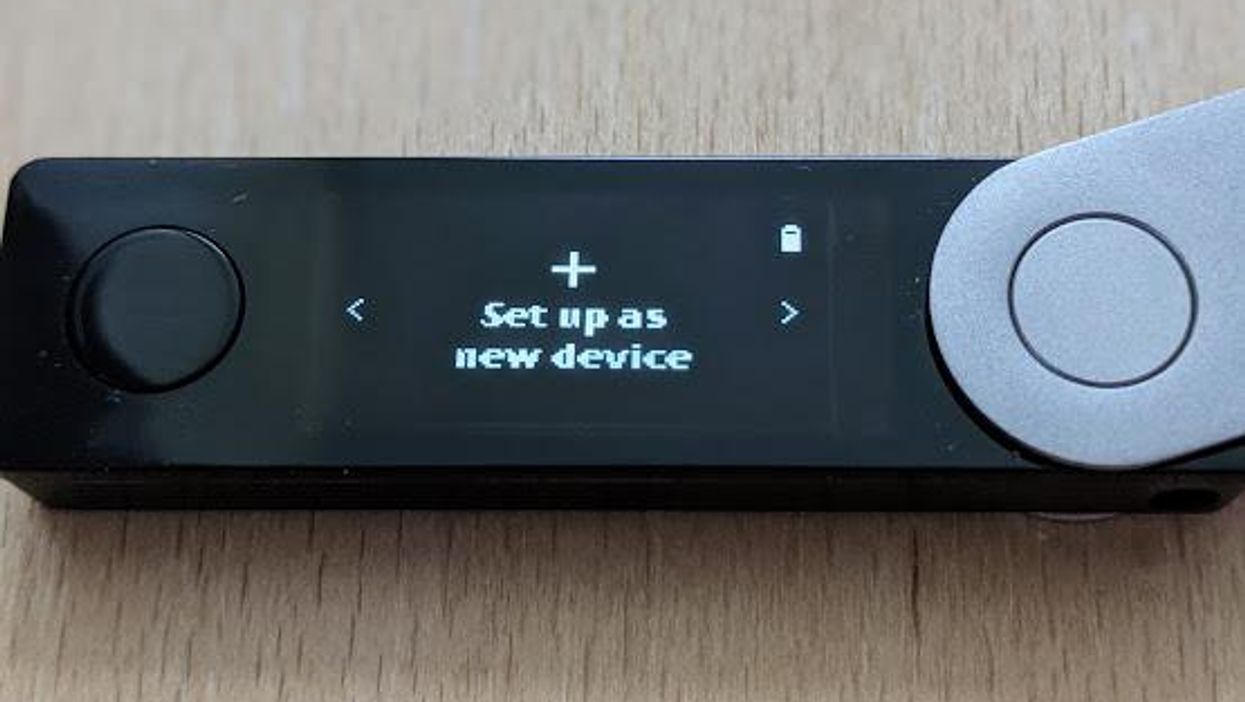
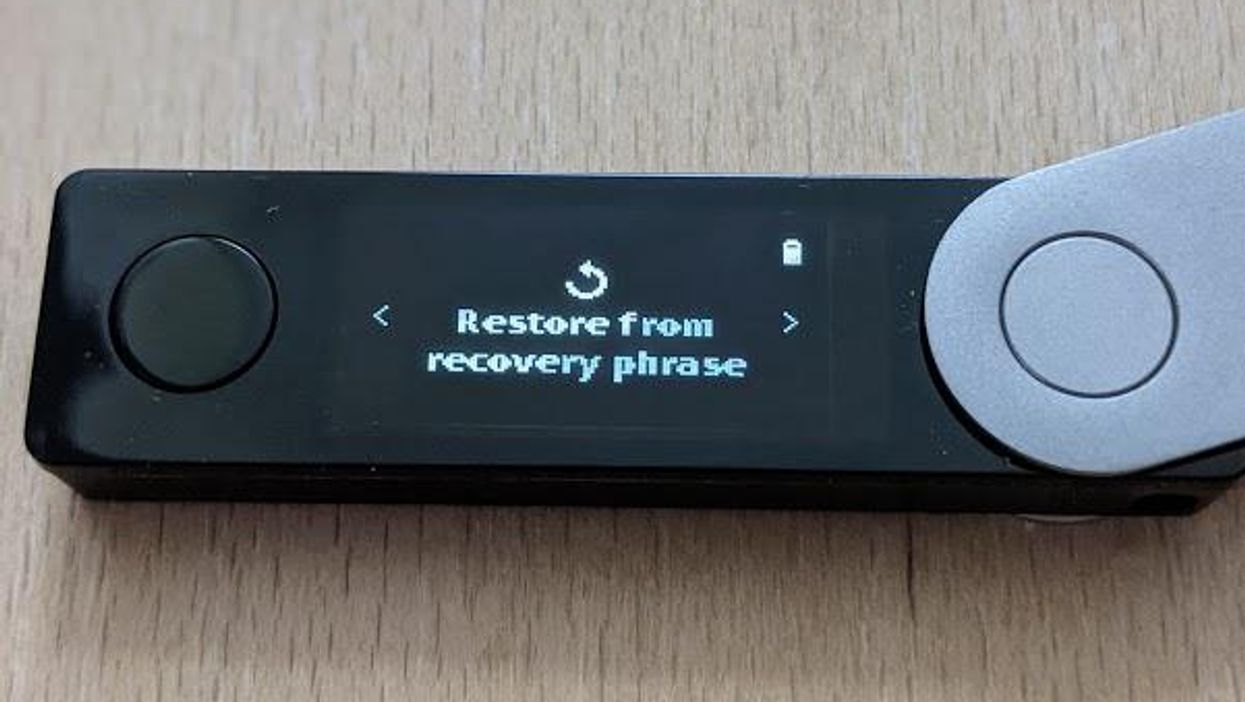
As you navigate through the Nano X, you will notice that there are only two available selections for setting up your device:
- Set up as a new device. This option will generate a new wallet with a new recovery phrase.
- Restore from the recovery phrase. This option will initialize a wallet by importing and using your already-existing BIP39 recovery phrase.
This guide will cover, step-by-step, both options of setting up your Ledger Nano X.
Let's start with "Setup as a new device." (If you already have a recovery phrase that was manually generated or from backup, jump to "Restore wallet from recovery phrase" instead.)
- Navigate to "Set up as a new device," and confirm your selection by pressing both buttons.
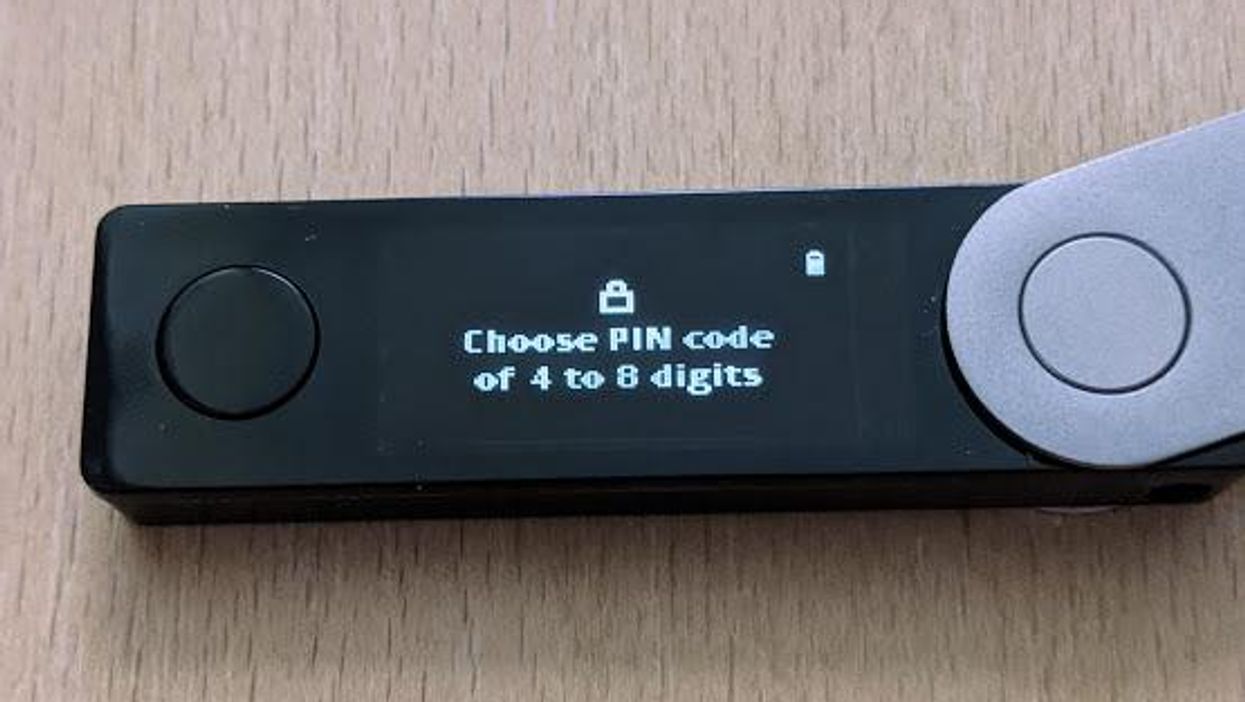
Configure your PIN
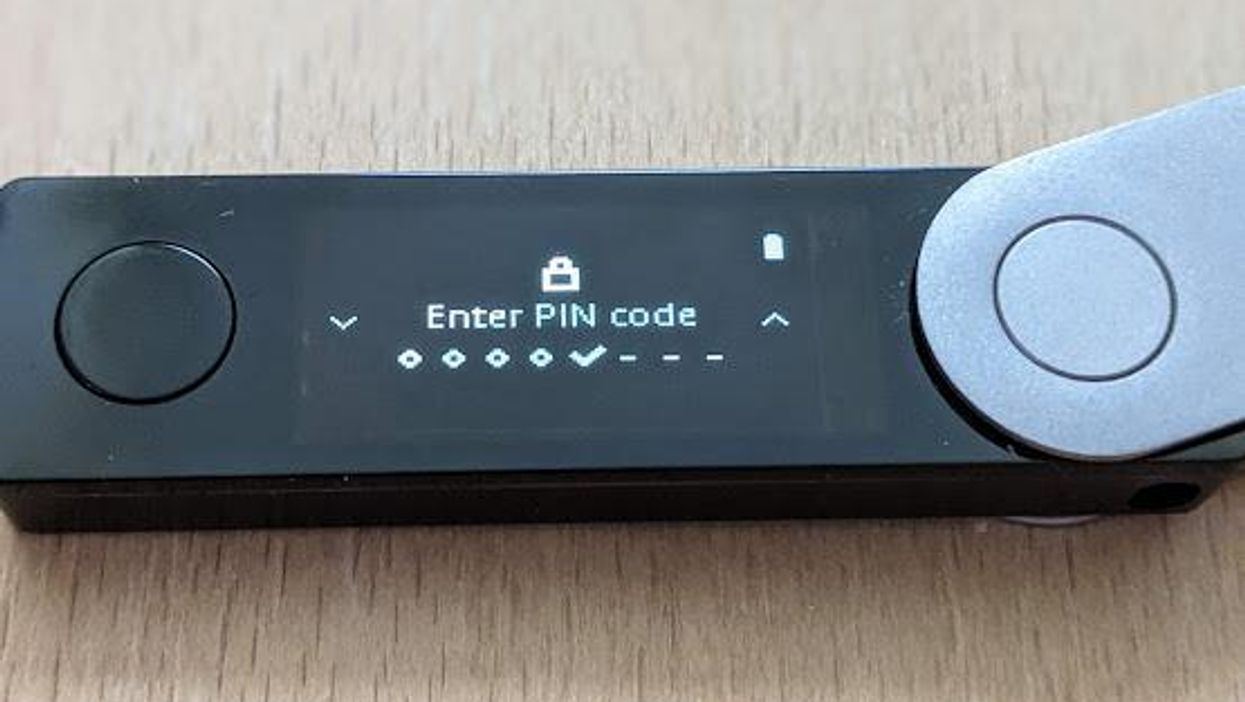
Your Nano X will now ask you to create a PIN. Your PIN secures your Ledger Nano X, and you will have to enter it often when using the device. Your PIN can be from 4-8 digits long. Press and hold both buttons at the same time to create your PIN.
IMPORTANT: At any time you will have only 3 attempts to enter your PIN, and afterward the device will erase private keys for security reasons. Be careful both with having a backup of your seed phrase, and remembering your PIN!
You will be selecting one digit at a time, using the black and silver buttons to increment by 1 or decrement by 1. To confirm your digit selection, press both buttons at the same time.
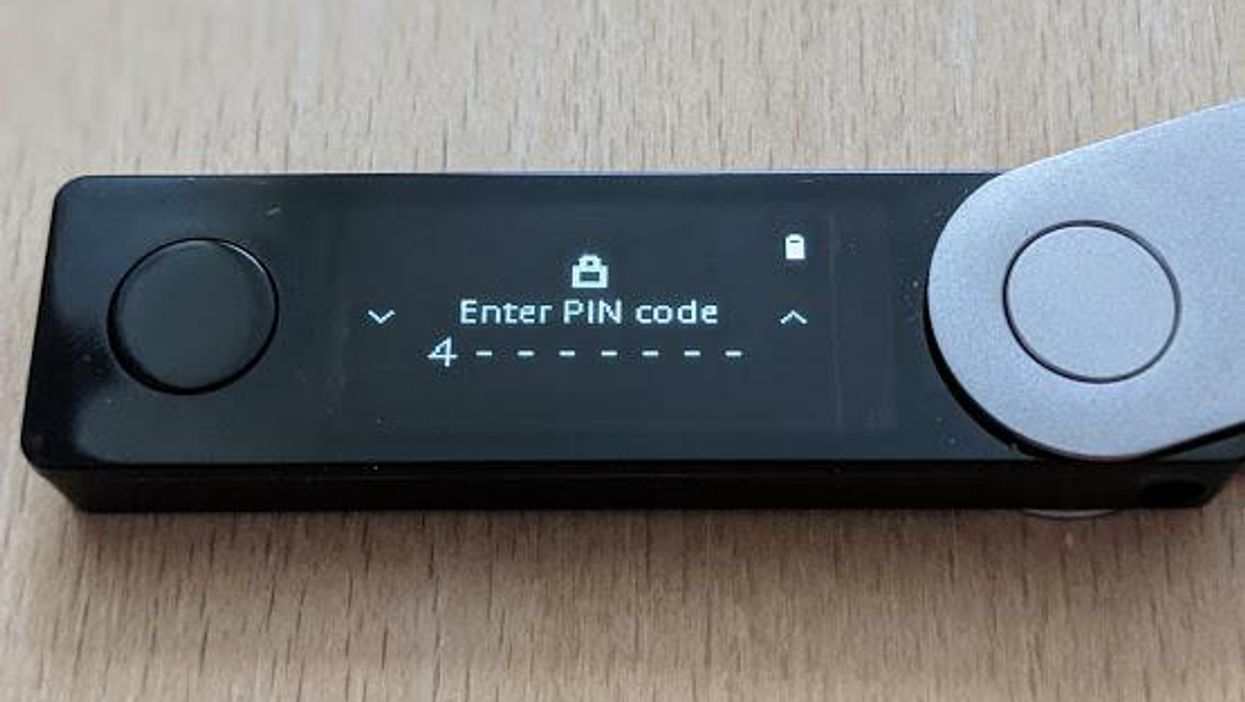
While creating your PIN, if you need to go back to the previous digit, use the black and silver buttons to cycle through the digits until you see a backspace/cancel symbol. Press both buttons to confirm your selection, and you will be returned to the previous digit.
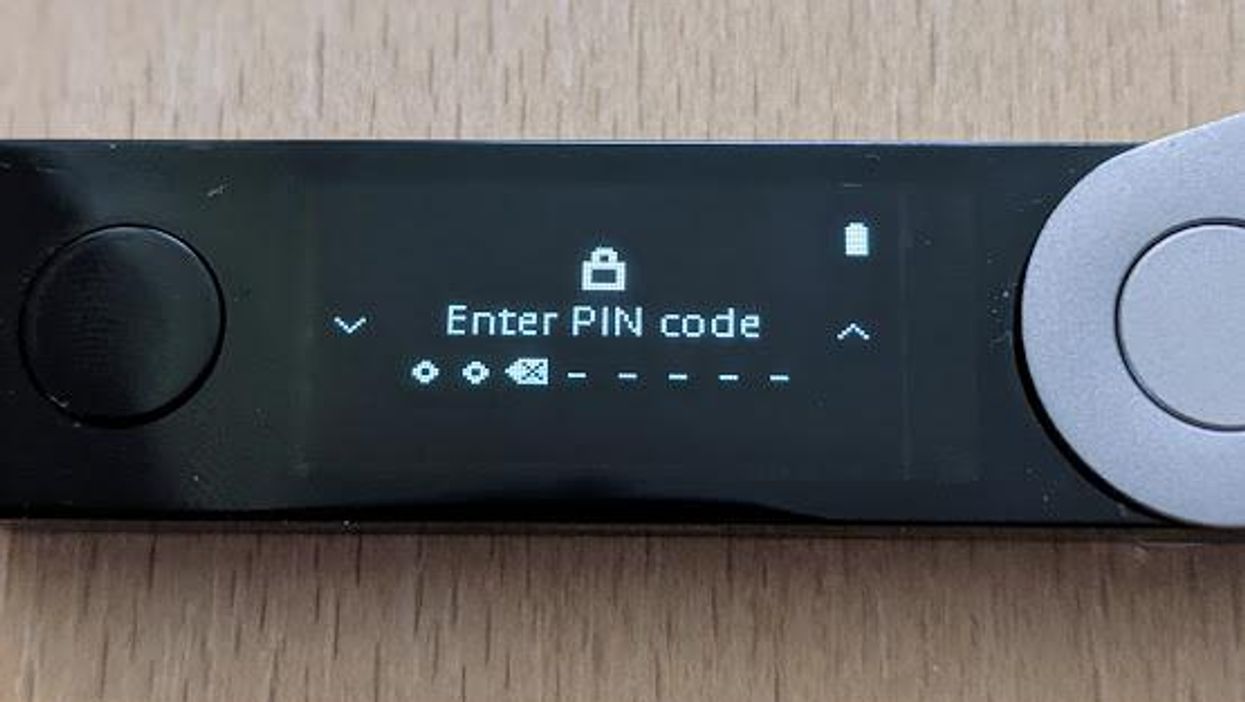
When you reach digit 5 in your PIN, a checkmark symbol appears as you add any more digits. If you want to choose a PIN length of fewer than 8 digits, navigate to the checkmark and press both buttons to submit your PIN. If your PIN is exactly 8 numbers, your Ledger will automatically process your PIN when you confirm the 8th digit.
Confirm your PIN
Now your Nano X will make you confirm your PIN. This is an important step, because if you enter the wrong PIN three times in a row, your Ledger Nano X will reset as a security precaution.
The display on your Ledger Nano X should read "Confirm your PIN code." Press both buttons to begin the process of confirming your PIN code.
- Enter your PIN code to confirm it, following the same instructions as the previous step.
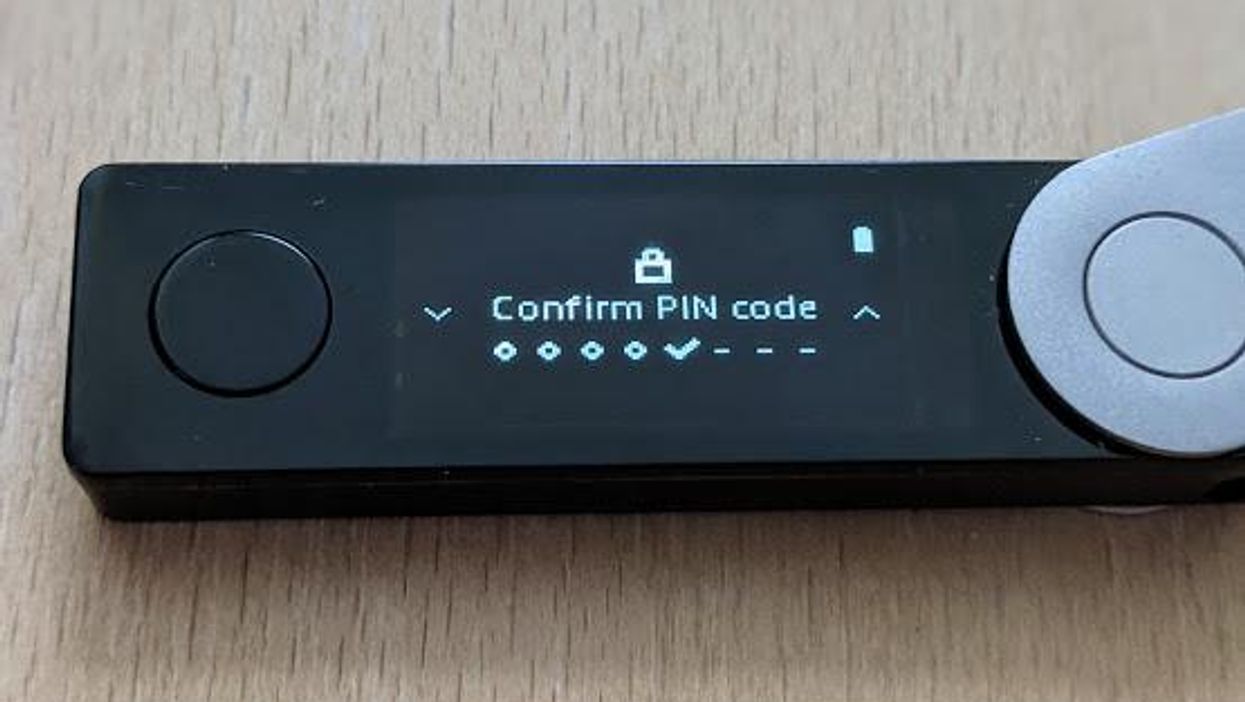
Your PIN code is now set up and confirmed. The PIN is now required for every single action that you take on your Nano X.
You can think of your PIN code for your Nano X as similar to the PIN code of your debit card - with one important exception. Unlike your debit card PIN, if you forget the PIN code for your Nano X, your only option is to restore your wallet using your recovery phrase. Remember: the Nano X has a built-in safety protocol that wipes the device if the wrong PIN is entered 3 times in a row.
Generate your Recovery Seed Phrase
If you already have a seed phrase, jump to "Import Recovery Phrase."
Reminder: The terms Seed phrase, Recovery phrase, and Mnemonic phrase mentioned throughout this article and website all have the same meaning: it is your private key represented as words, and this is what you should carefully secure and back up. For a refresher on the importance of the recovery phrase, the Vault12 article "What is a Seed Phrase or Mnemonic Code?" is worth your time.
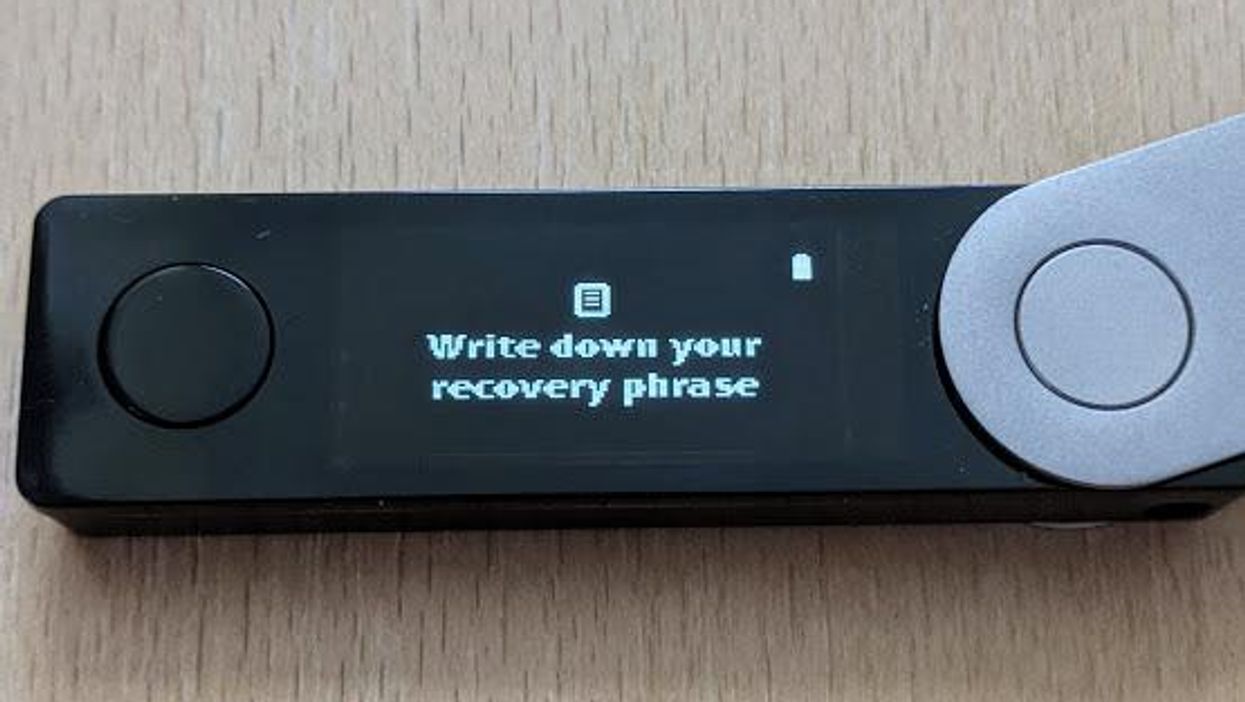
Now, your Nano X is going to create and show you your Recovery phrase. Be sure that you will not be interrupted!
Creating a backup of your recovery phrase is the most important step in creating a wallet. In this guide, we will prompt you to create a long-term backup of your recovery phrase. The first step, however, is to have your Nano X create your recovery phrase for you.
Displayed on the screen of your Nano X is "Write down your recovery phrase." Press both buttons to proceed.
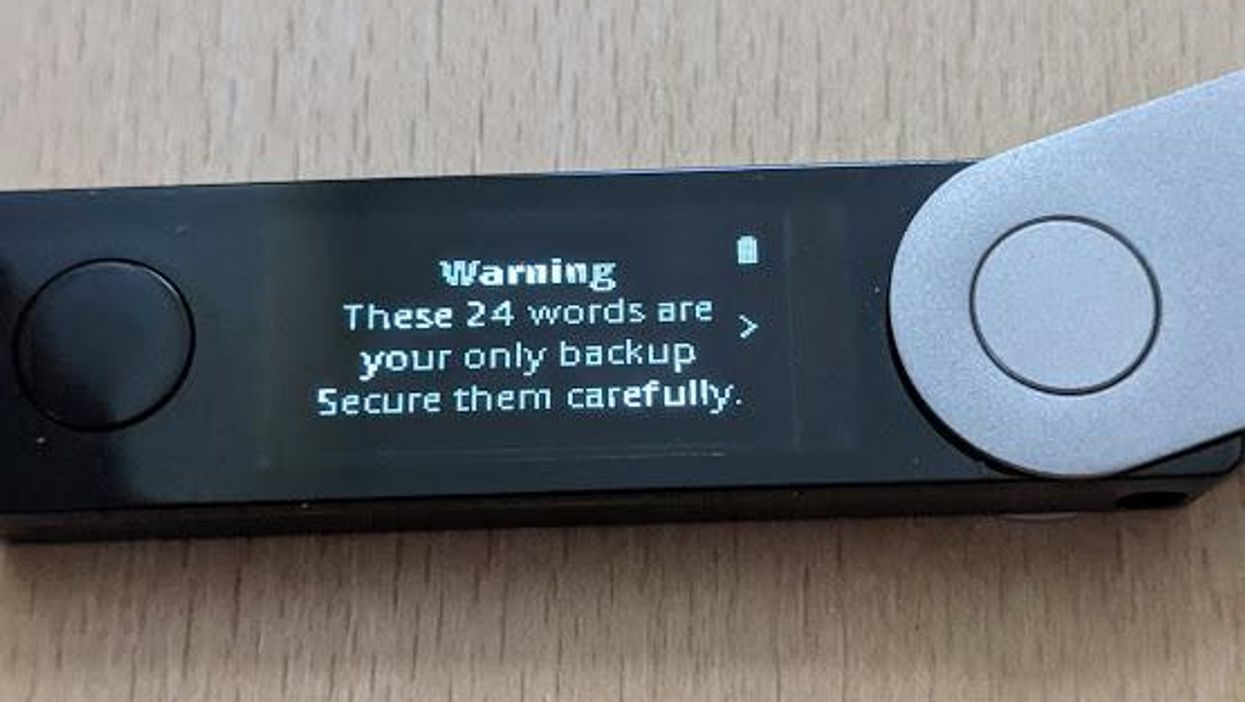
Before showing you Word #1, a warning will appear on the screen, informing you that your 24-word recovery phrase is your only backup.
IMPORTANT: Your Ledger Nano X may not make it clear to you that your seed phrase will be shown only once, ever. You can't skip this step, or go back to it later. Take care of creating your backup right now.
Press both buttons on your Nano X to start the process of generating your recovery phrase.
The importance of backing up your Recovery Phrase
The Ledger Nano X includes in the packaging three pieces of special paper designed for writing down your recovery phrase. In the Ledger documentation, it is suggested to make multiple copies of your recovery phrase, and store the paper in different locations. However, this is not the best suggestion for a long-term backup.
Writing your recovery phrase on any piece of paper leaves it vulnerable to loss and theft, which is inherently risky. A blank piece of paper with words on it, if discovered, could be overlooked - the thief will likely figure out that it is some type of password, but may not be certain what it will unlock. The Ledger recovery sheet has the Ledger logo on it, along with a link to ledger.com. For a curious thief, not much research has to be done to figure out this recovery phrase is a BIP39 phrase.
Writing your recovery phrase on paper is best used as a temporary step before you transfer your recovery phrase to a more secure backup medium. Many types of backups exist - we did a ton of research and distilled all of the best options for backing up your recovery phrase.
You have invested your time and money in buying and setting up a hardware wallet to secure your cryptocurrency, so you know how important it is to protect your recovery phrase. Using next-generation encryption tools like Vault12 to back up your recovery phrase gives you the highest level of security on the market today.
Carefully write down your recovery phrase words
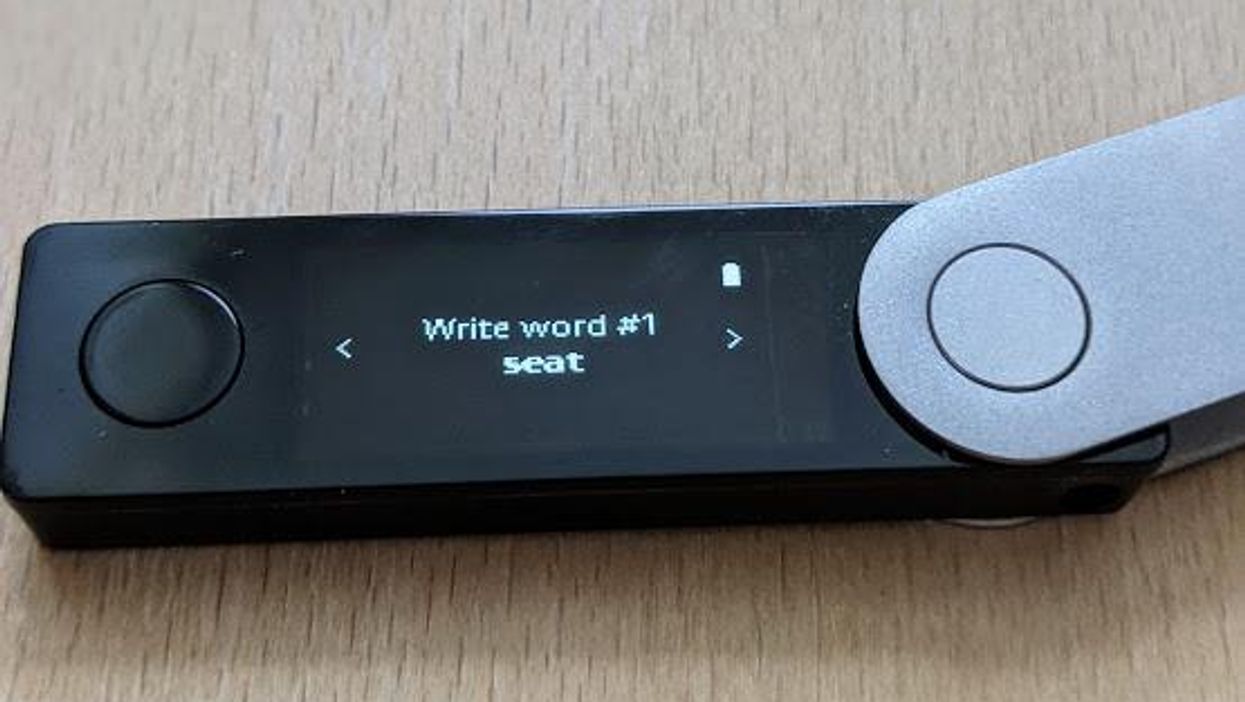
When word #1 appears on the display of your Ledger Nano X, write down word #1, and then press both buttons to proceed to word #2. Repeat this process until you have written down all 24 words of your recovery phrase.
When you reach the last word, the Ledger Nano X will prompt you to review the words you have written down. Using the buttons for navigation, double-check each word for accuracy - including the spelling and the order of the words.
When you are finished double-checking your recovery phrase words, navigate back to "Press left to verify your 24 words. Press both to continue," and press both buttons to continue to the next step.

Confirm your Recovery Phrase words to your Nano X
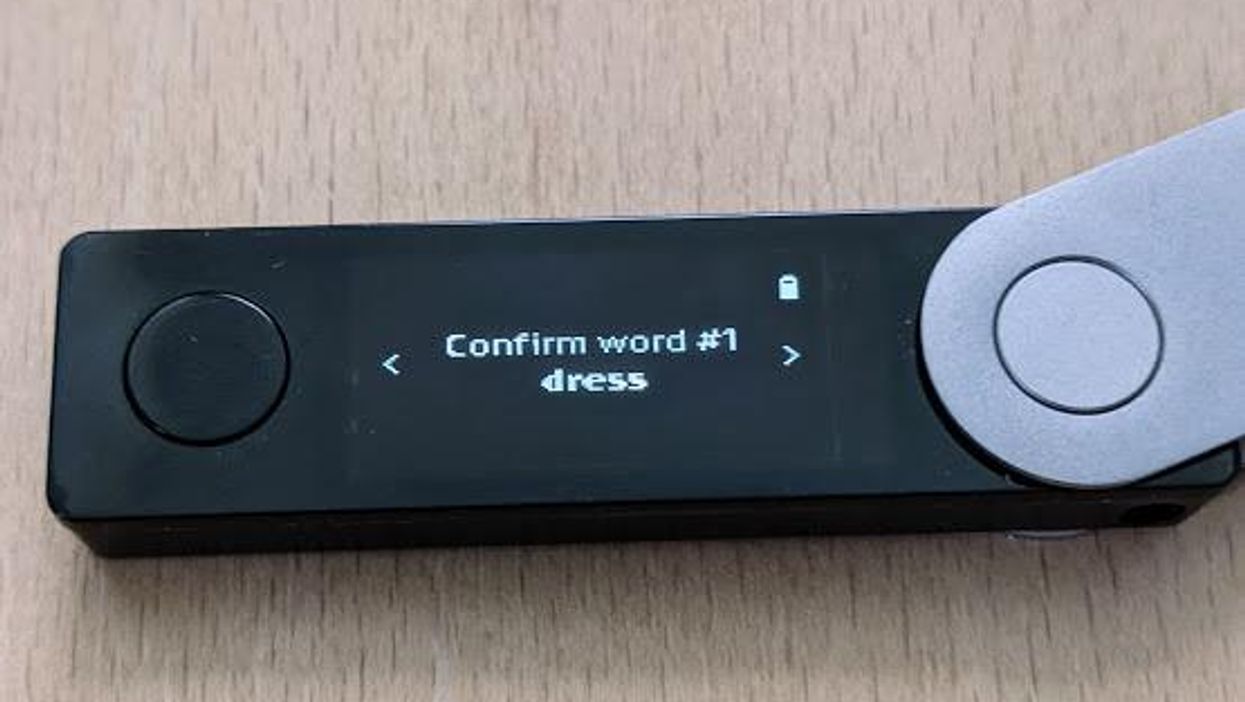
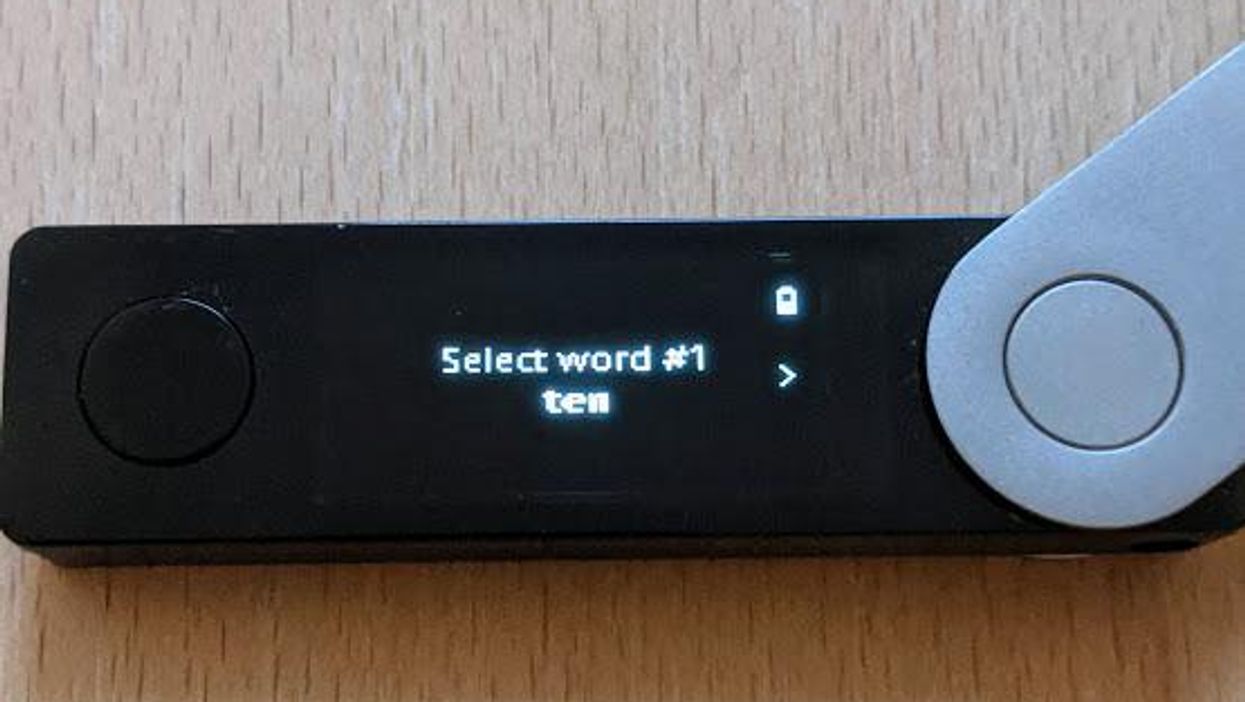
Next, your Nano X will ask you to confirm your recovery phrase by selecting the correct words. Starting with word #1, use the buttons to navigate through the list of words until you find word #1. Press both buttons to confirm your selection for word #1.
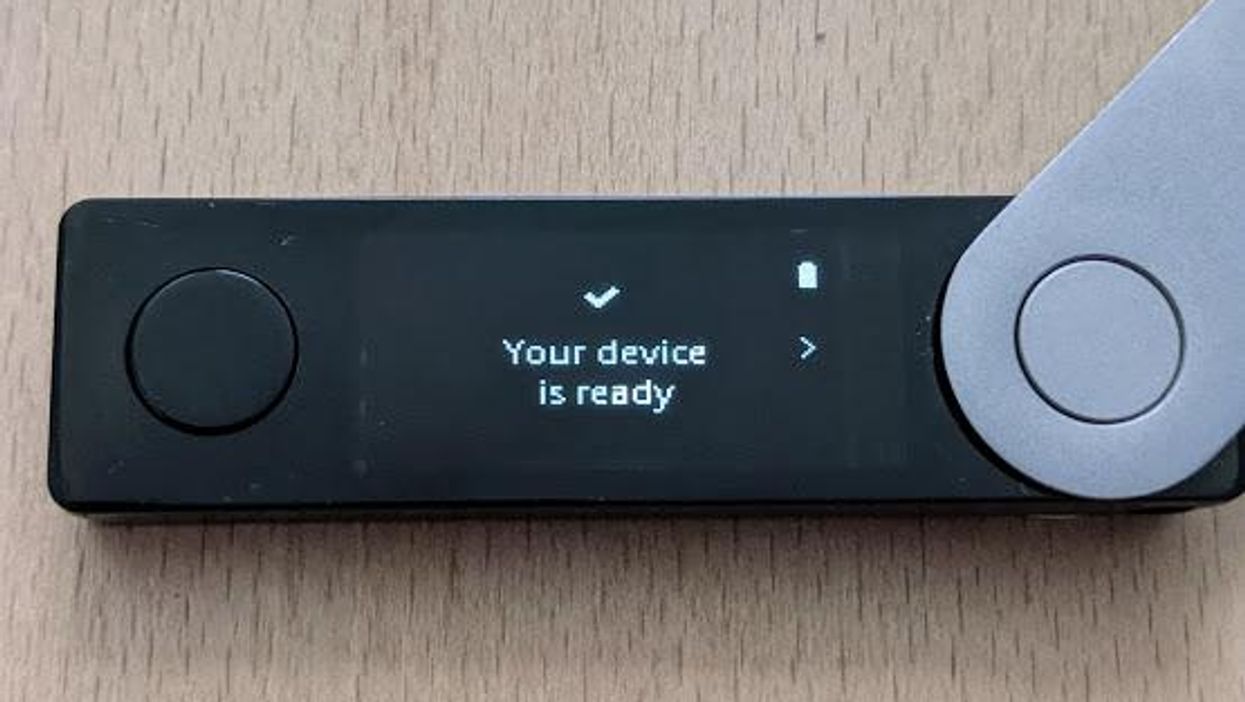
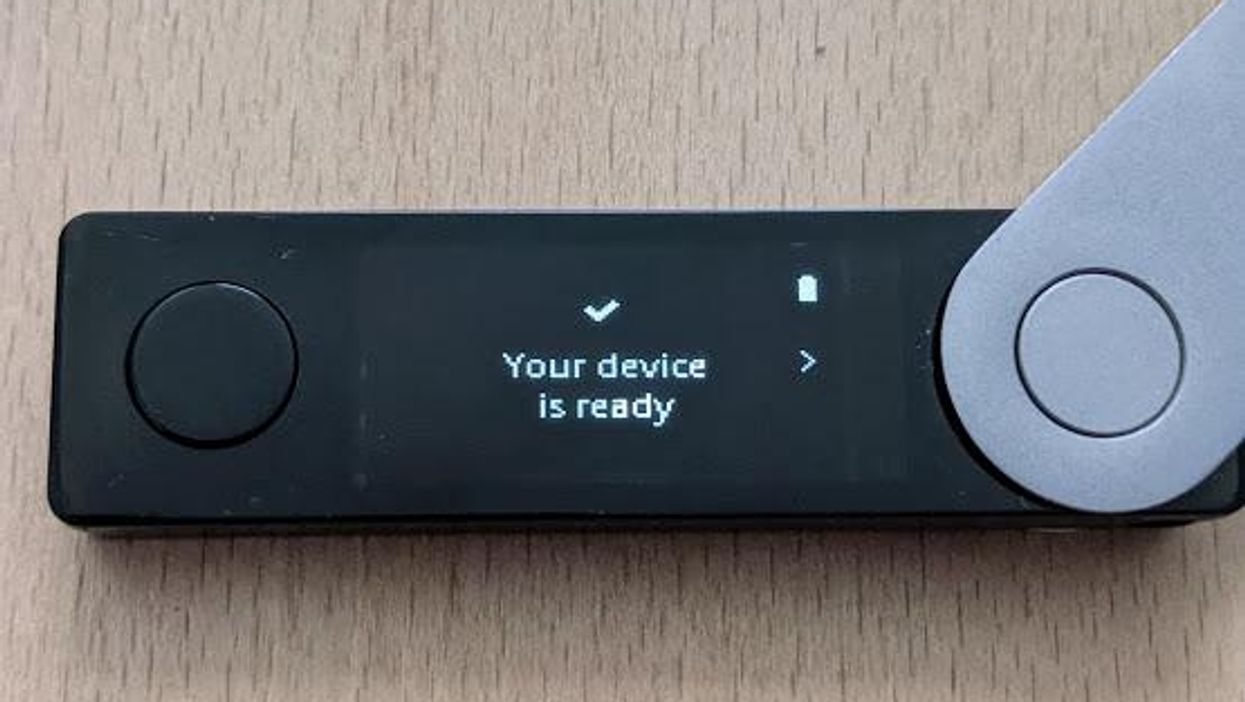
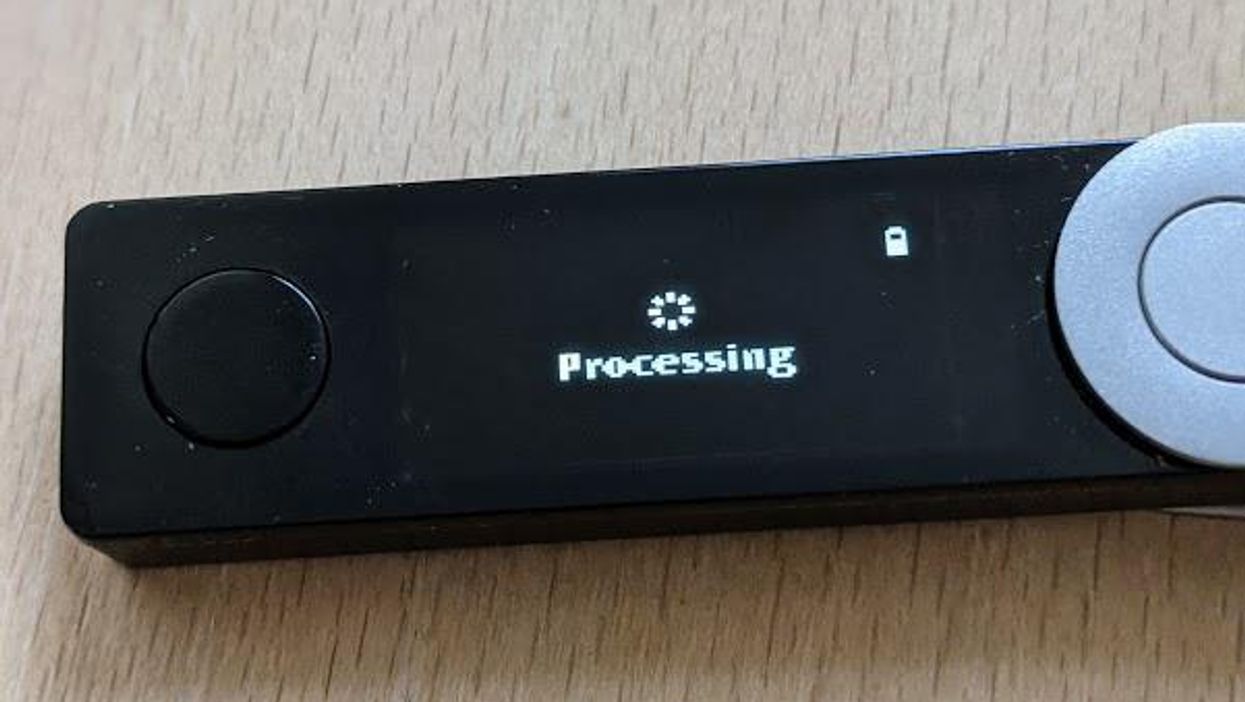
Repeat this process for all 24 words. When you confirm the final word, your Nano X will perform an accuracy check. Behind the scenes, your Nano X is comparing the recovery phrase you just entered to your recovery phrase, and making sure they match. While this is happening, the display will show "Processing."
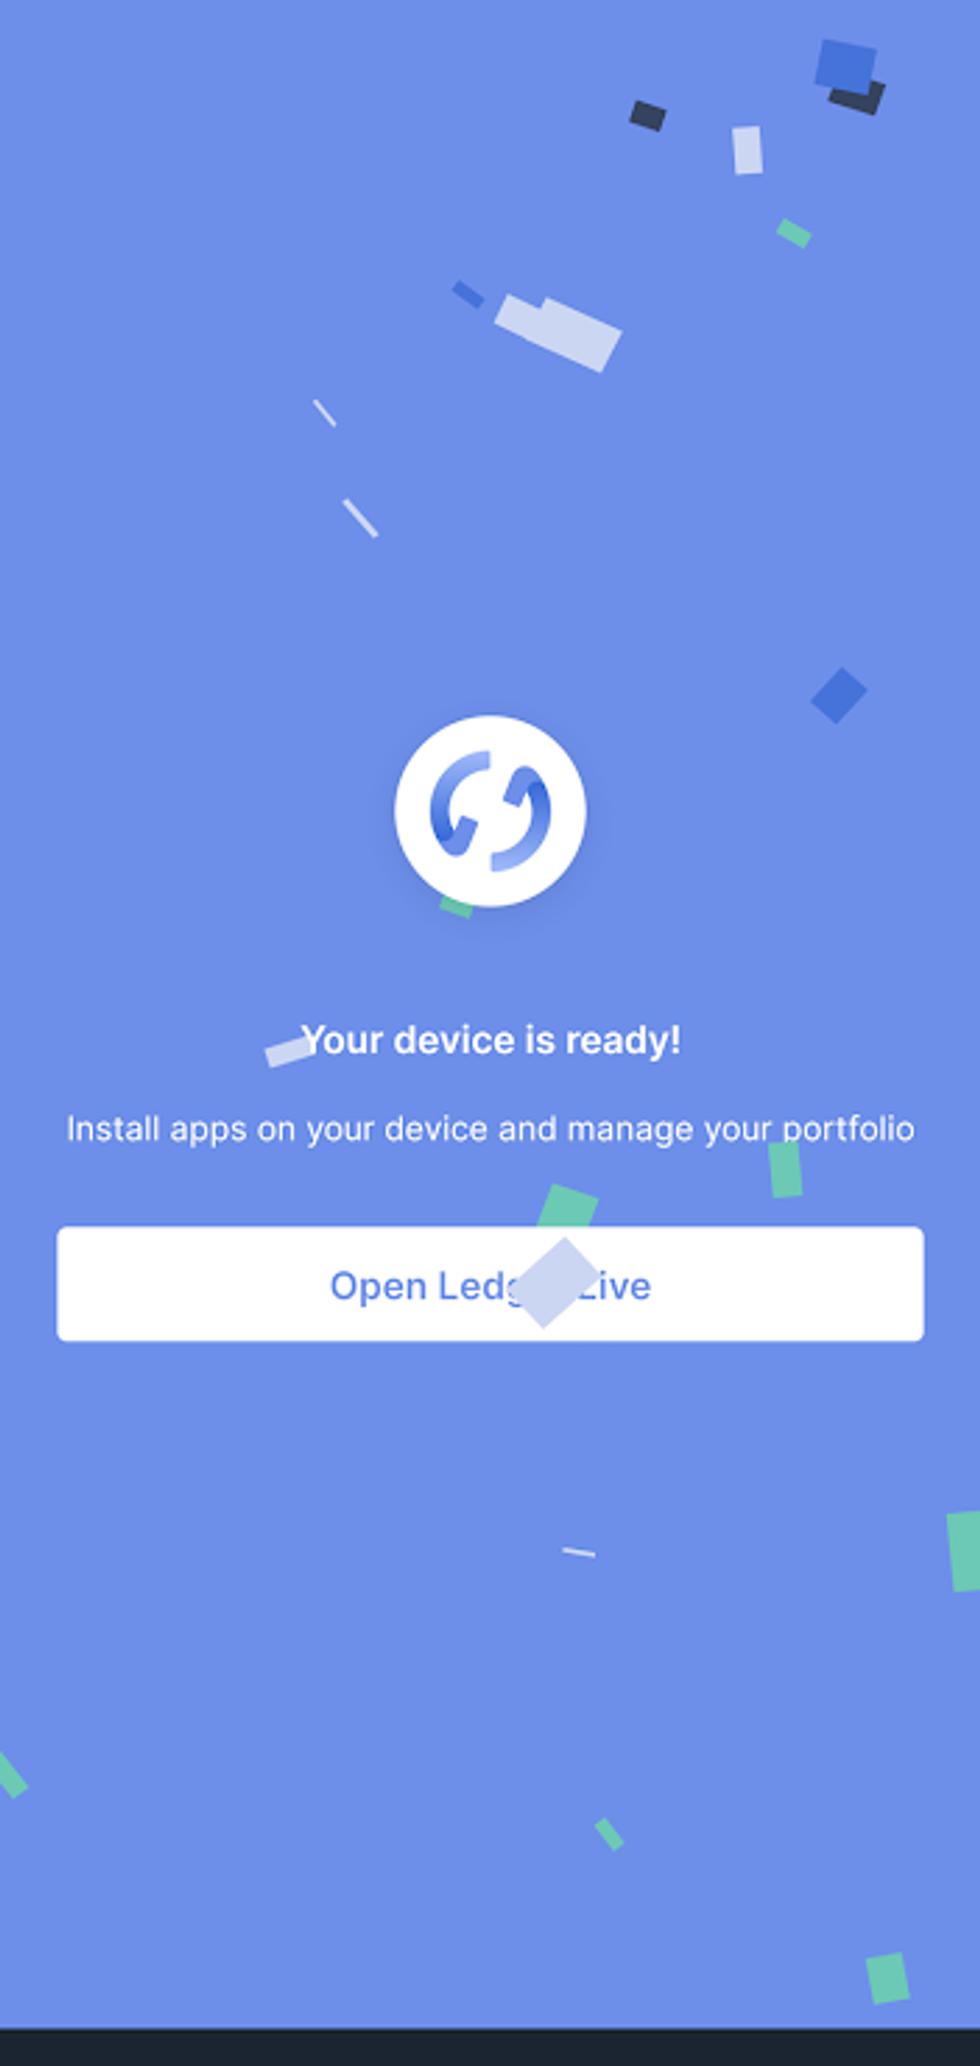
When the accuracy check is complete, the display will change to "Your device is ready." Press the silver button to finish the setup.
Start using your Nano X
Congratulations! You have completed the setup for your Ledger Nano X. Your Nano X has generated a new and unique 24-word recovery phrase for you, you have carefully written down that recovery phrase, and you successfully confirmed its accuracy.
Now your recovery phrase is ready to be backed up to a more secure medium. When you finish this guide, don't forget to follow through with backing up your recovery phrase. Remember, you are your own bank with cryptocurrency - don't lock yourself out of your own vault!
On your Ledger Nano X, find "Access Dashboard," press both buttons to confirm your selection, and you will enter the Dashboard of your Ledger Nano X.
Your Dashboard is where you will see your wallets in your Ledger Nano X. Right now, no cryptocurrency wallets exist within your Dashboard. Your Ledger Nano X is running a clean copy of the BOLOS operating system, and is waiting for you to install the cryptocurrency wallets that you would like to use.
Using Ledger Live, you will install Apps and Accounts to activate cryptocurrency wallets to use with your Nano X. Let's go back to Ledger Live and get everything set up.

Import an existing Recovery Phrase
This section is for those who already have a Seed phrase, manually generated or recovered from backup, and are initializing a wallet with it.
Or, jump to "Pair Your Nano."
The Ledger Nano X follows all common industry-standard protocols for blockchain networks, including BIP32, BIP39, and BIP44. If you have an existing BIP39 recovery phrase, you can use it to initialize your wallet with the Ledger Nano X.
- To begin, turn on your Ledger Nano X by pressing the black button.
- Navigate through the on-screen options by pressing the black and silver buttons.
- To make a selection, press both buttons at the same time.
- Navigate to "Restore from recovery phrase," and press both buttons to confirm your selection.
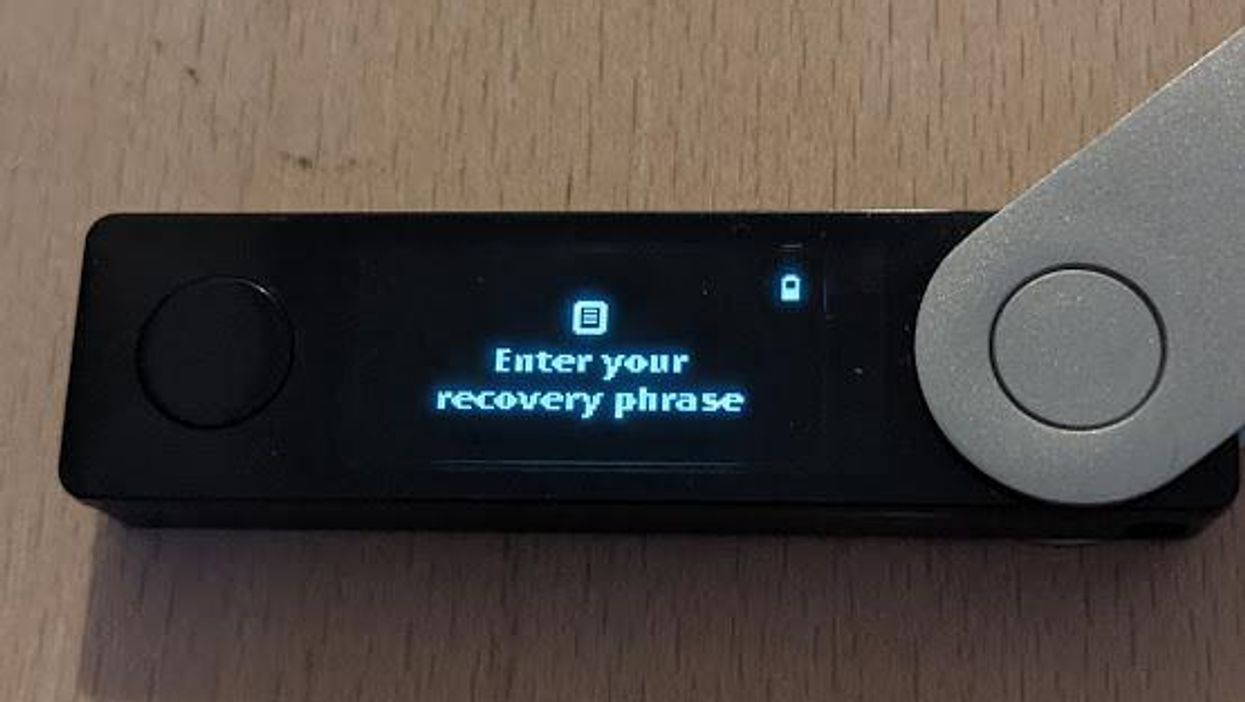
- Your Nano X will now be displaying the words "Enter your recovery phrase."
- Press both buttons to confirm and proceed.
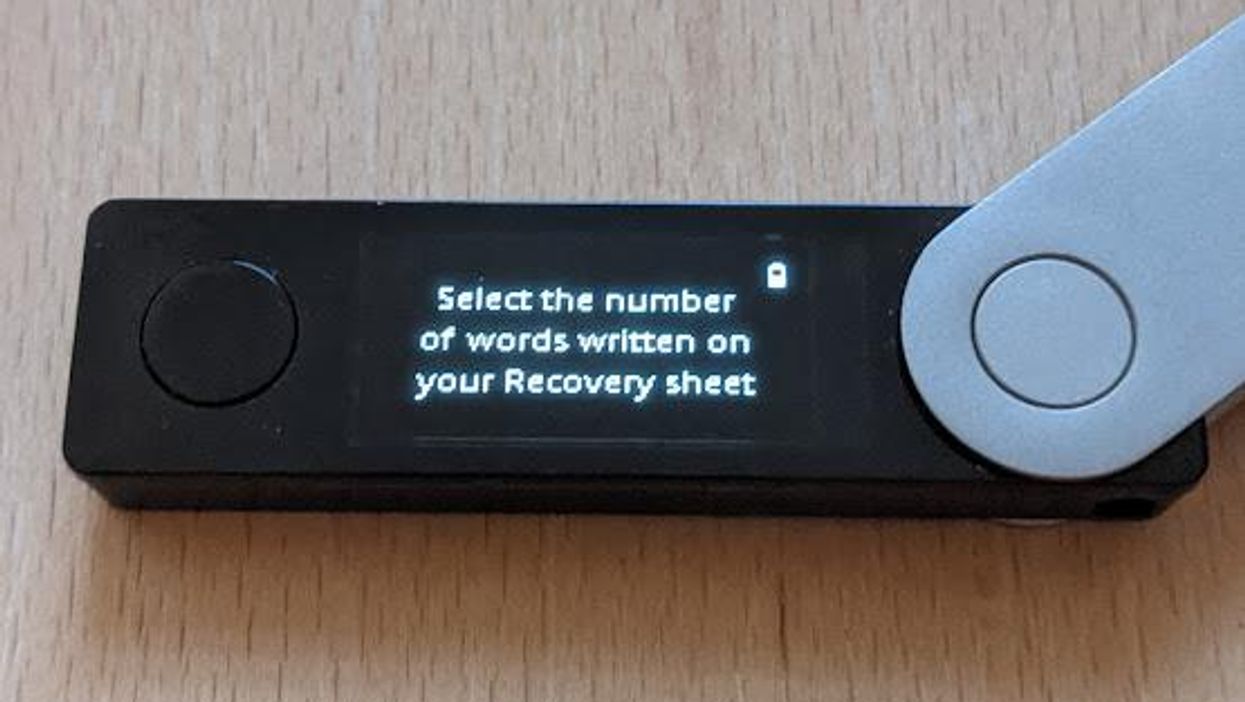
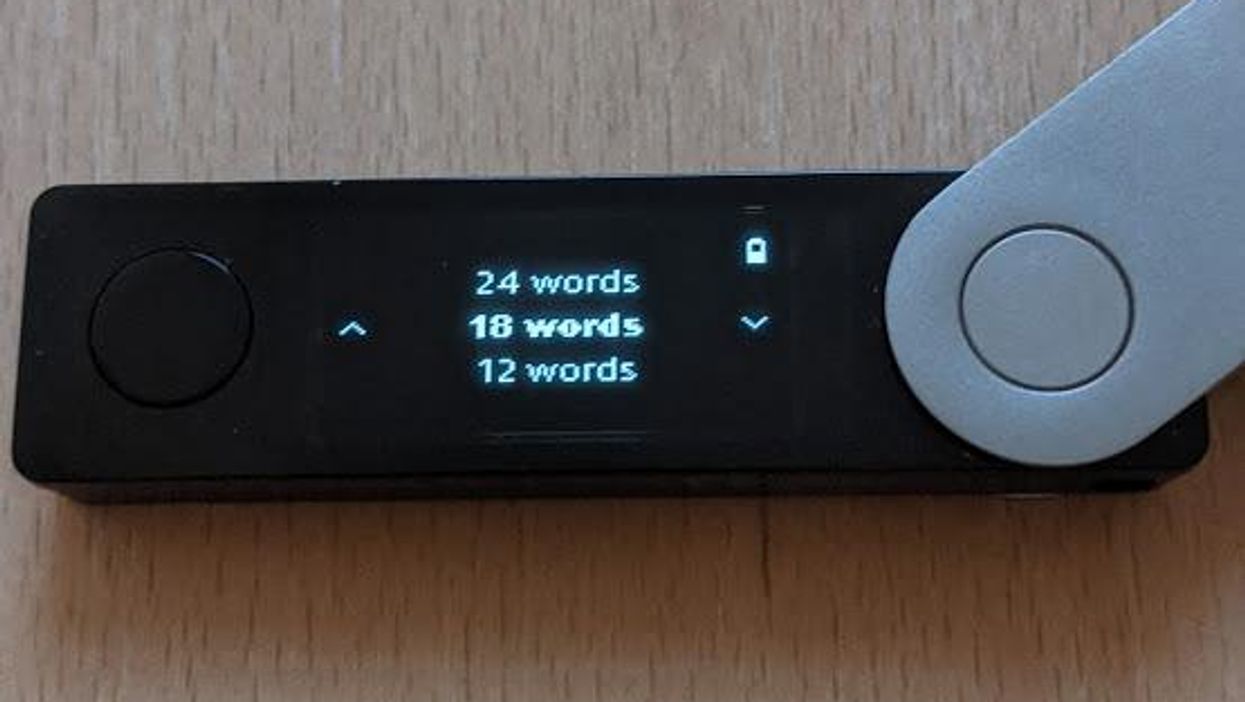
- Next, your Nano X will ask how many words are in your recovery phrase.
- Press both buttons, and the available options will appear: 12, 18, or 24.
- Use the black and silver buttons to navigate to the correct number, and then press both buttons to confirm your selection.
Entering an existing Recovery Phrase into your Nano X
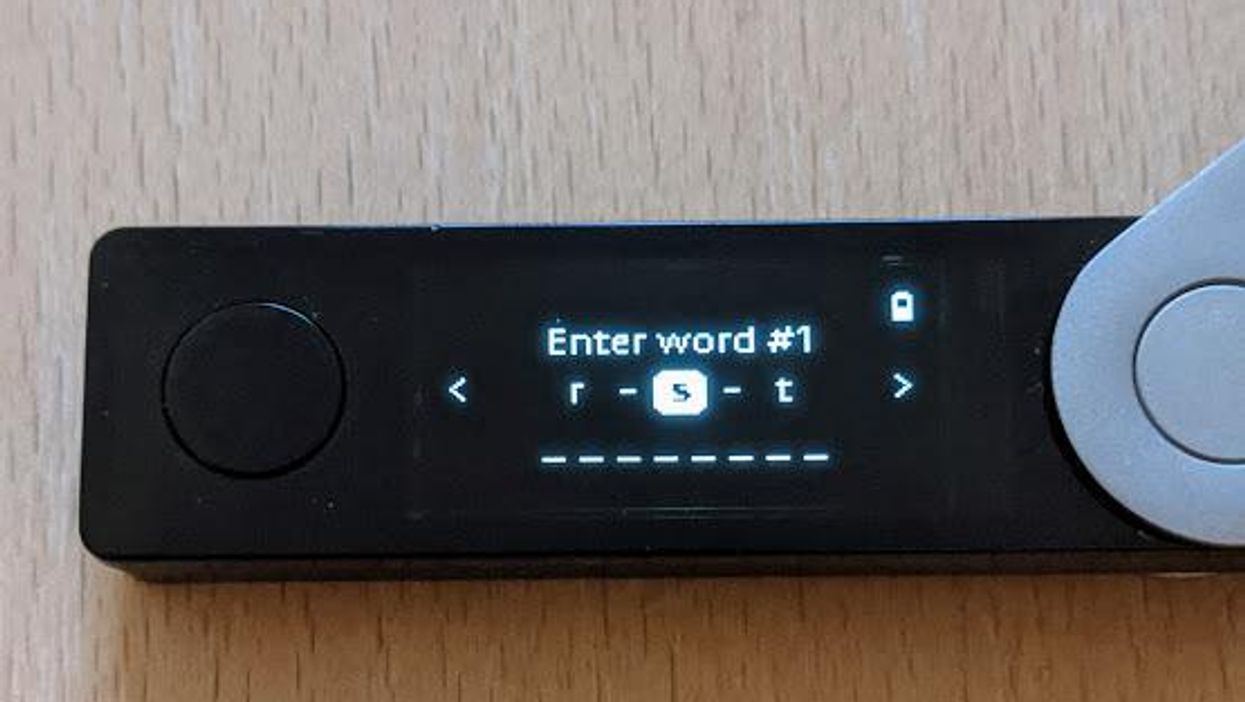
- Now, it is time to enter the words of your recovery phrase. Starting with word #1, use the buttons to navigate through the alphabet.
- When you reach the first letter, press both buttons to confirm your selection. Repeat the same process for letter #2, and letter #3.
- When you confirm letter #3, your Nano X will display a list of all the possible words based on the first 3 letters.
- Use the buttons to cycle through the word list, and press both buttons to confirm the correct word.
- Repeat this process until you have entered all of the words of your recovery phrase.
On the last word of your recovery phrase, as you press both buttons to confirm the last word, the screen on the Ledger Nano X will change and display "Processing." What is happening is the Nano X is initializing your wallet, and in just another moment, you will be brought to your wallet.
When your Nano X is done initializing your wallet, the screen will display "Your device is ready."
To enter your wallet, press the silver button and navigate to "Access Dashboard." Press both buttons on "Access Dashboard," and you will be taken to your Dashboard.
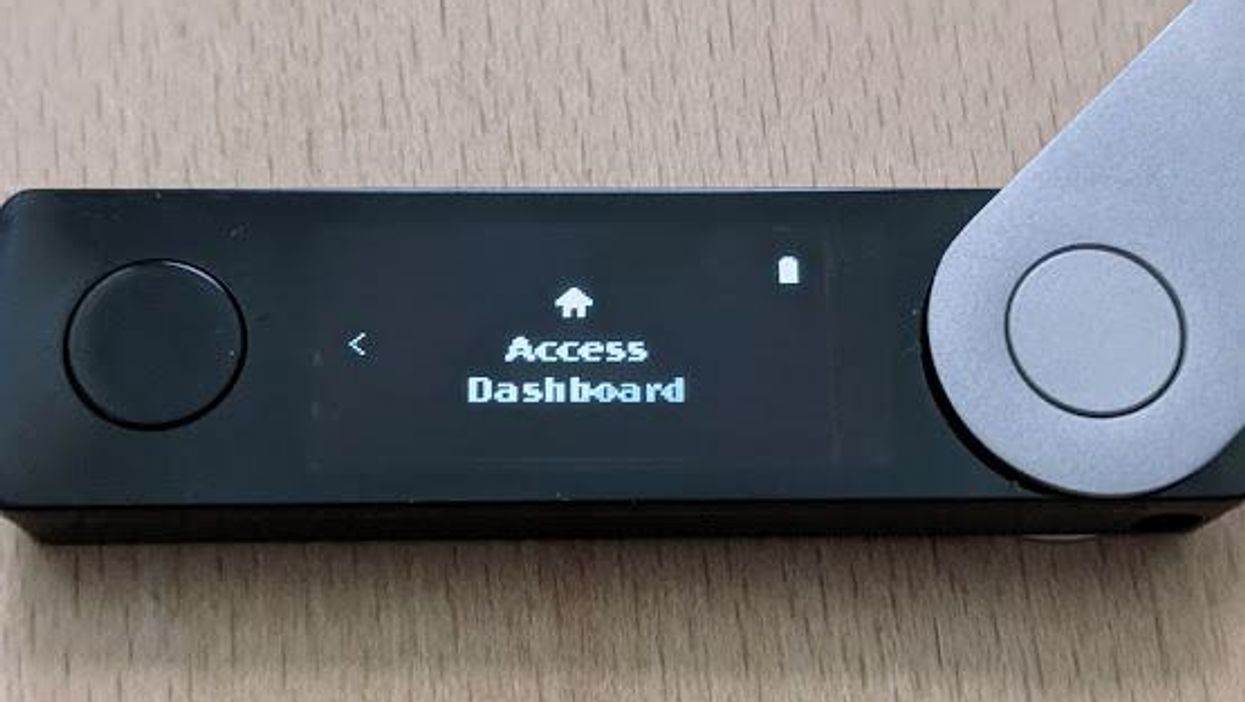
Your wallet will appear empty at first - don't worry! Your funds are safe. The reason you do not see any wallets is because no wallets are installed yet. Ledger Live is used to install wallet functionality, after which your funds will become visible.
For example, suppose you have Ethereum stored in your wallet. After importing your recovery phrase to your Nano X, no Ethereum wallet exists yet. You will use Ledger Live to install Ethereum wallet functionality, which will use your recovery phrase to generate your wallet.
Congratulations! You have just imported your recovery phrase into Ledger Nano X. Now it is time to pair your Nano X with Ledger Live.
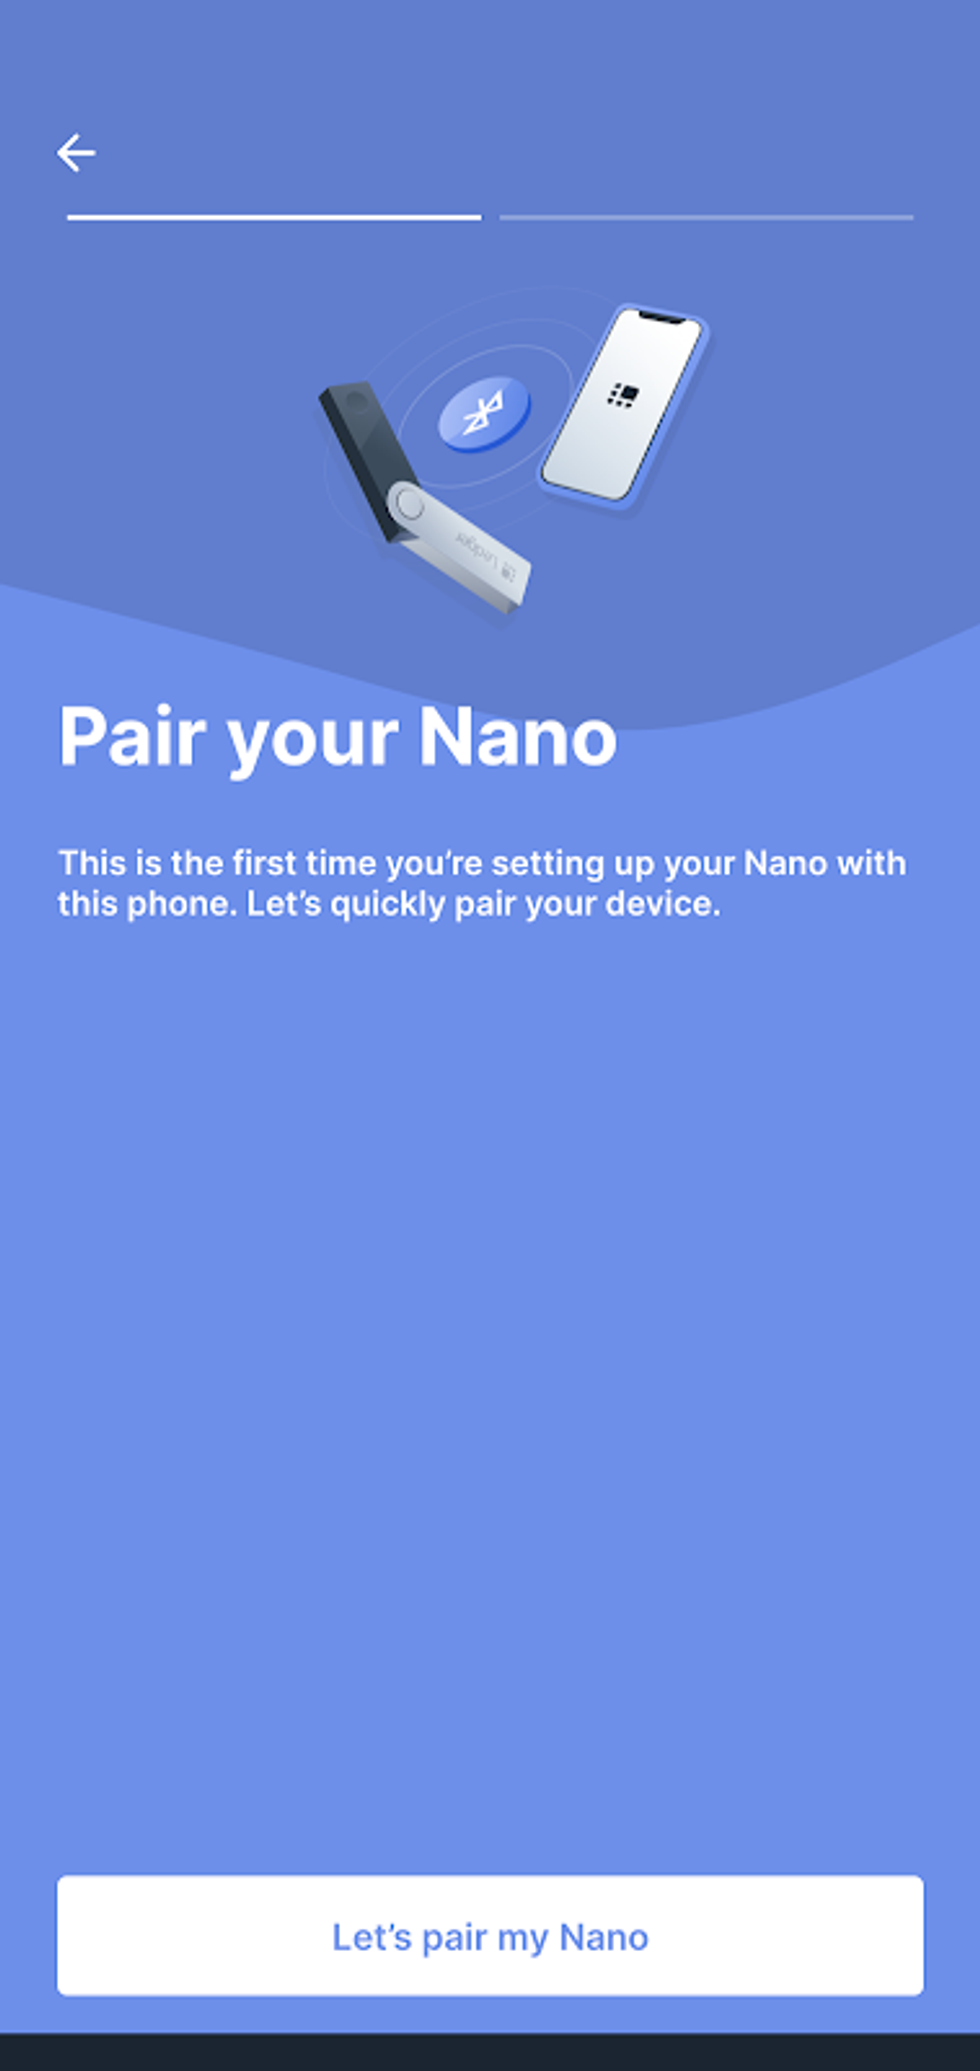
Pair your Nano X with Ledger Live
Ledger Live is the management tool for your Nano X, unlocking the full functionality of the device. When you are ready to connect your Nano X to your computer or mobile device, you can ask Ledger Live to start its secure connection with your Nano X.
Remember where we left off in Ledger Live? Return there, and select "Connect Your Nano." (If you need a reminder, just select the "Connect your Nano" option in Ledger Live, from the setup options.)
Up until this point, the setup steps in Ledger Live were the same for both mobile and desktop. The connection to Ledger Live is where the process differs slightly. If you connect your Nano X to mobile apps, it will connect wirelessly, using Bluetooth technology, and it can connect to desktop apps over a USB cable.
Pairing your Nano for iOS and Android
The iOS app and the Android app both connect to Ledger Live via Bluetooth. The process is quick and simple.
Bluetooth is enabled by default in the Ledger Nano X, so Ledger Live will automatically pick up your Nano X as long as bluetooth is enabled on your device.
- Make sure Bluetooth is enabled on your mobile device.
- In Ledger Live, tap on "Let's Pair My Nano."
Pairing your Ledger Nano with Bluetooth or USB
Next, Ledger Live will instruct you to pair via Bluetooth. Tap on "Pair via Bluetooth."
Below "Pair via Bluetooth," you will also see an option to connect with USB. This option is only available for the Ledger Nano S, and is not compatible with the Ledger Nano X.
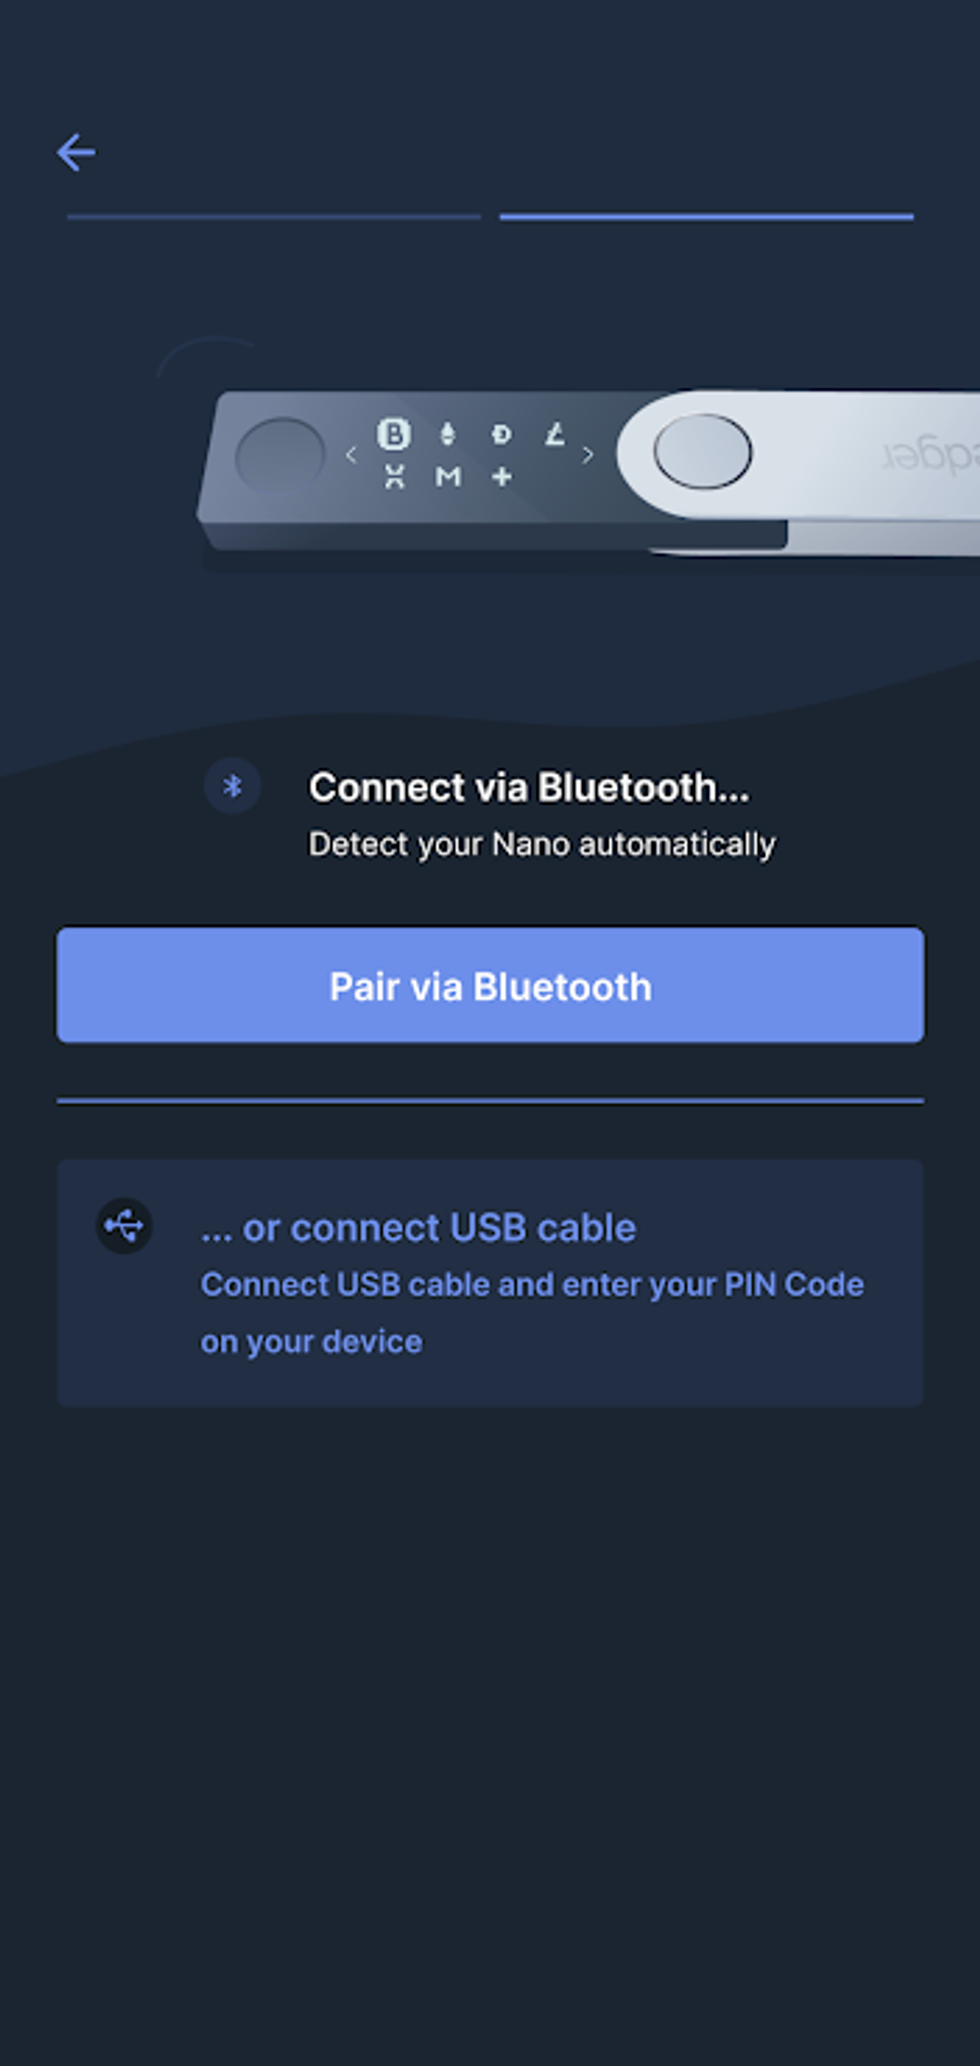
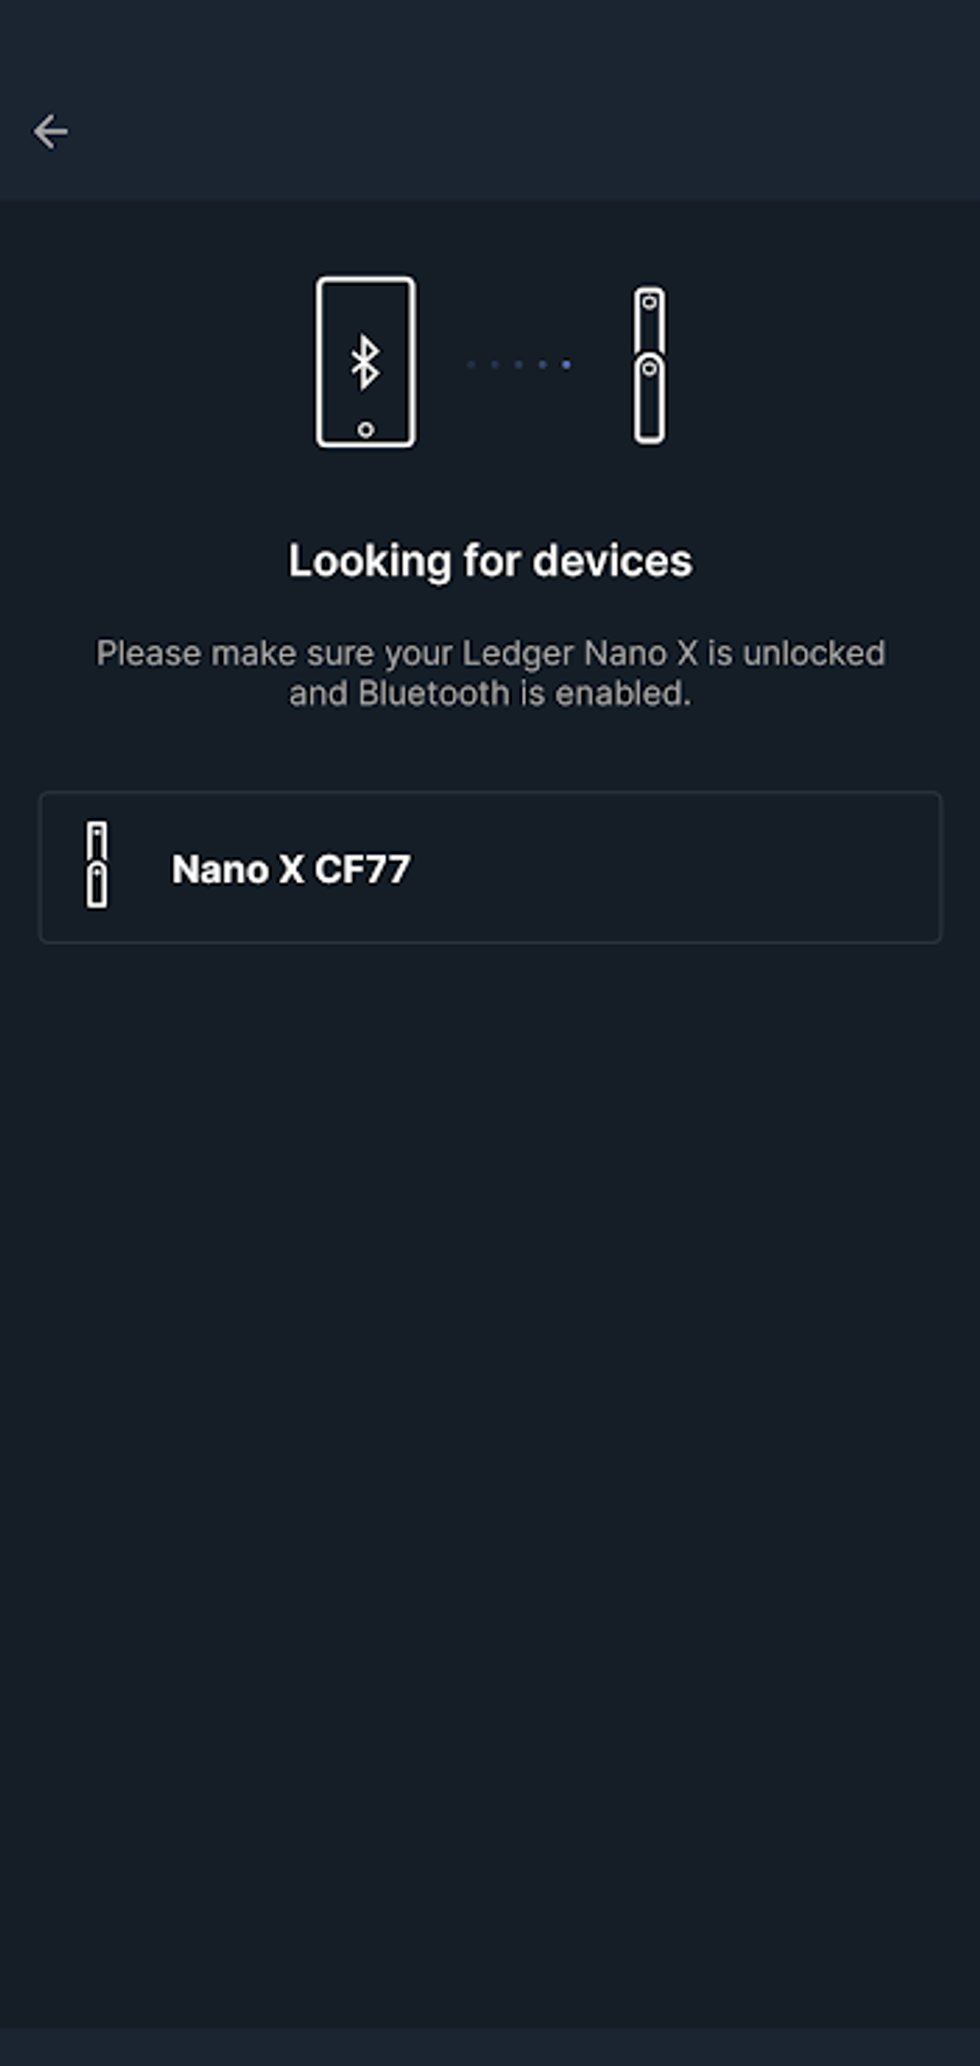
Ledger Live will start to scan for Nano X over Bluetooth. Your device should show up on the screen fairly quickly.
- Select your device from the list, and the Bluetooth connection will start.
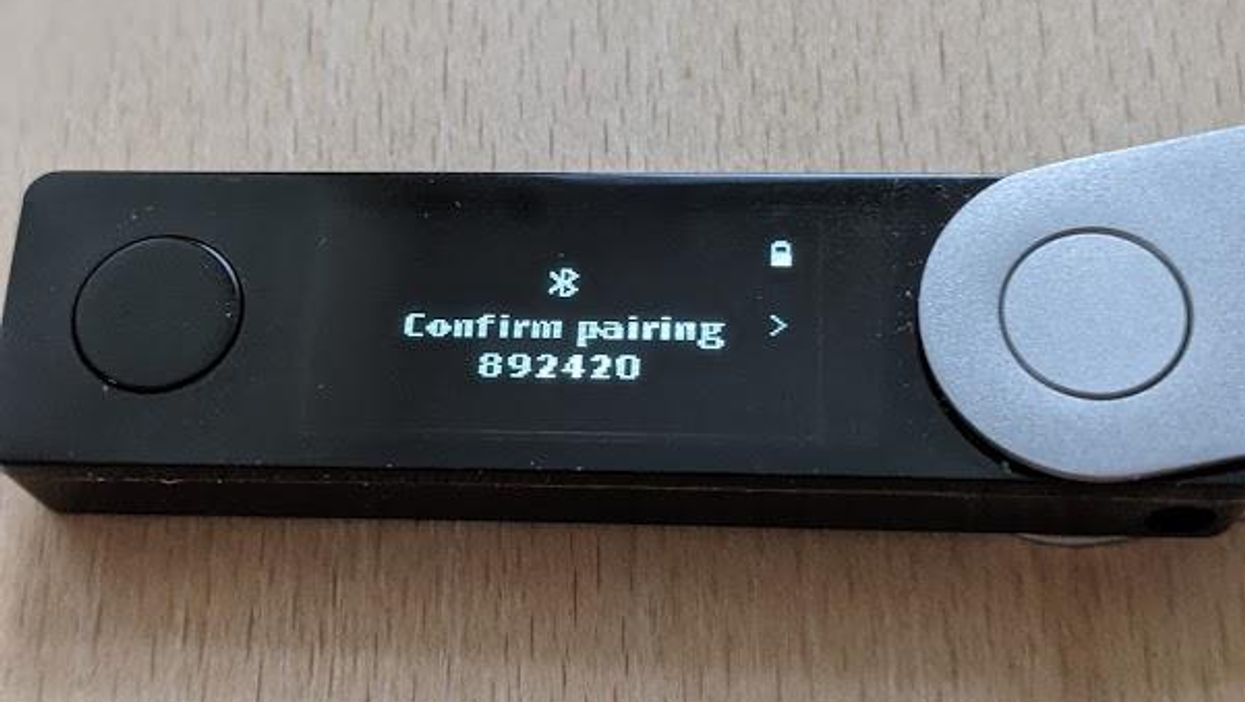
- A 6-digit code will appear on your Nano X and on your mobile device.
- Compare the two codes, and make sure that they are exactly the same.
- Once you have confirmed that the codes match, press both buttons on your Ledger Nano X to accept the connection, and accept the connection on your mobile device.
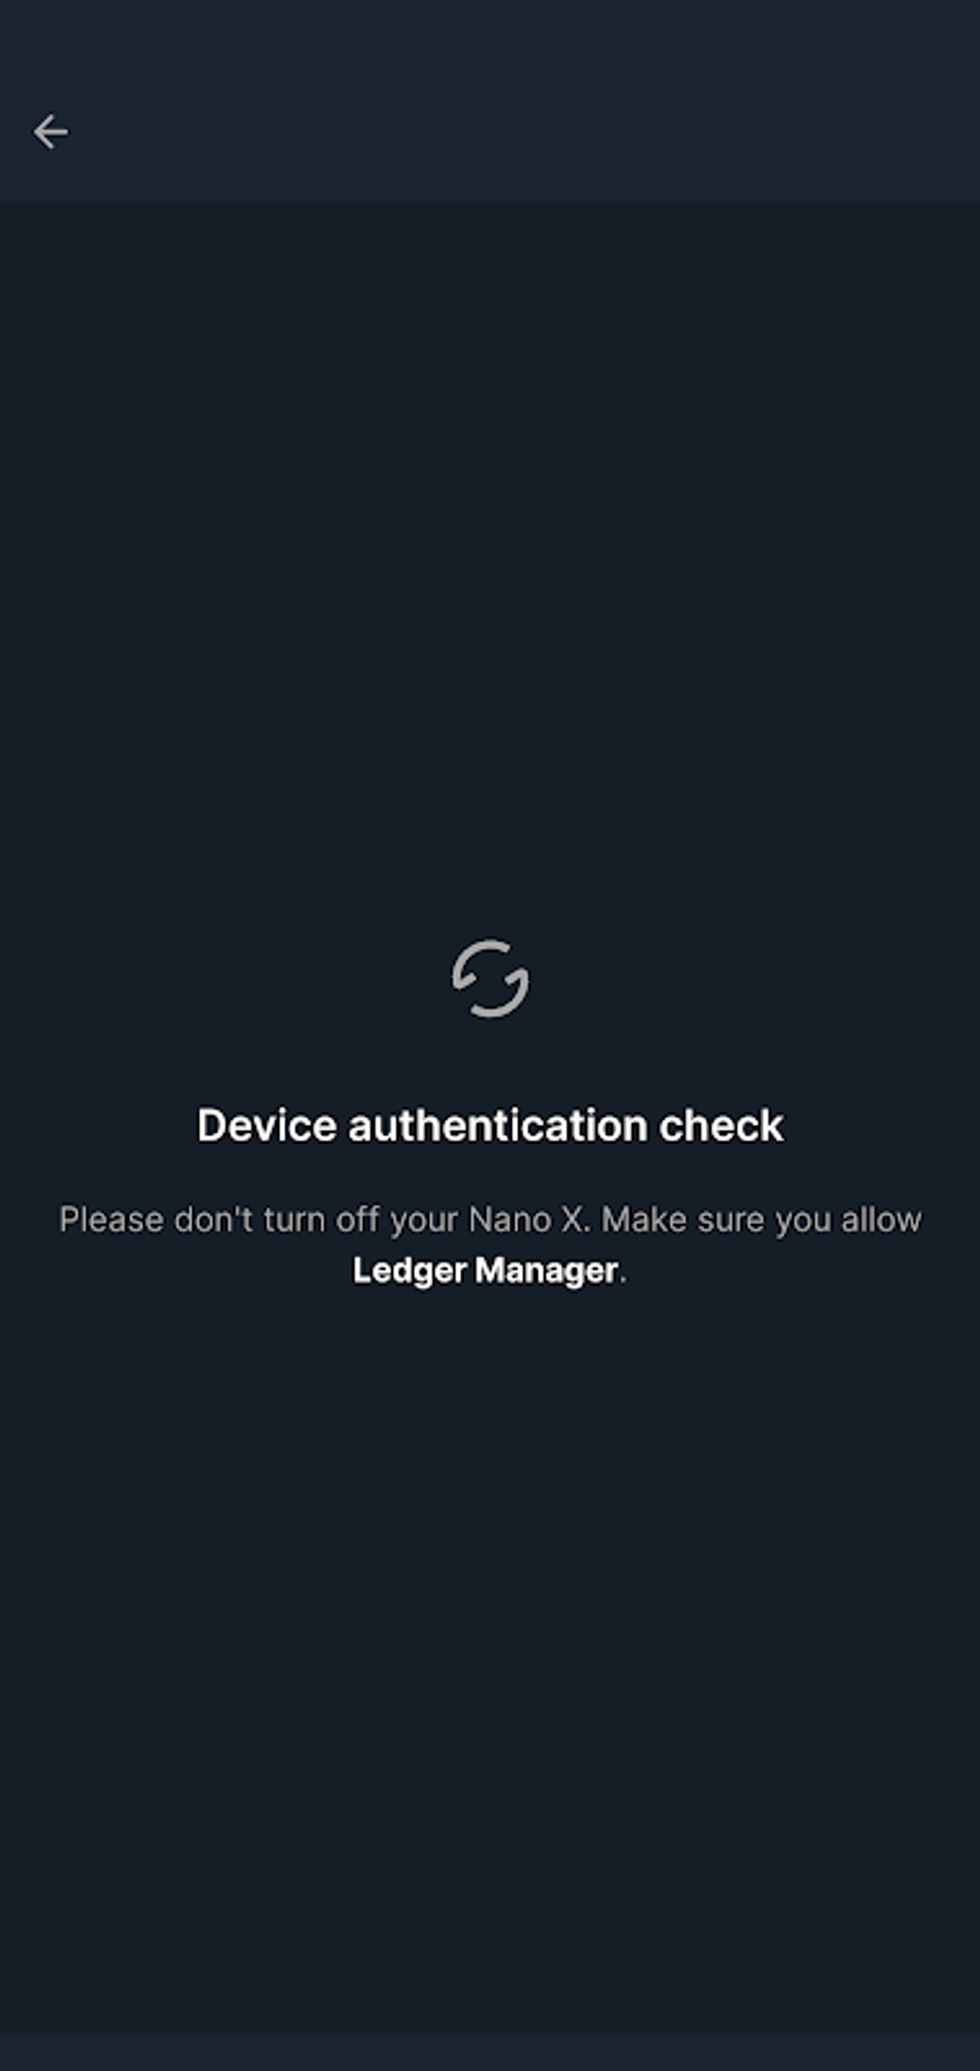
All Nano X devices contain a unique hardware keypair that cannot be forged. While forming a connection, Ledger Live will verify the authenticity of your device. As part of this process, Ledger Live sends the Nano X a random string, and the Nano X returns it, along with its factory-installed unique signature.
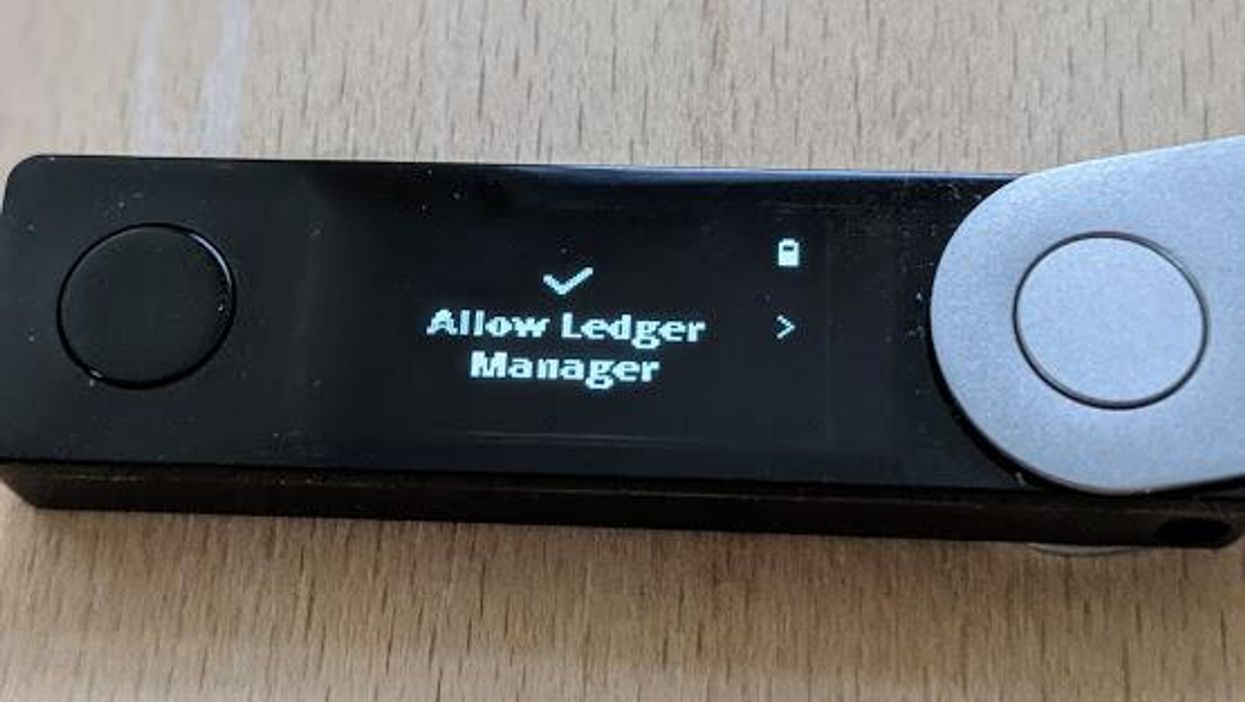
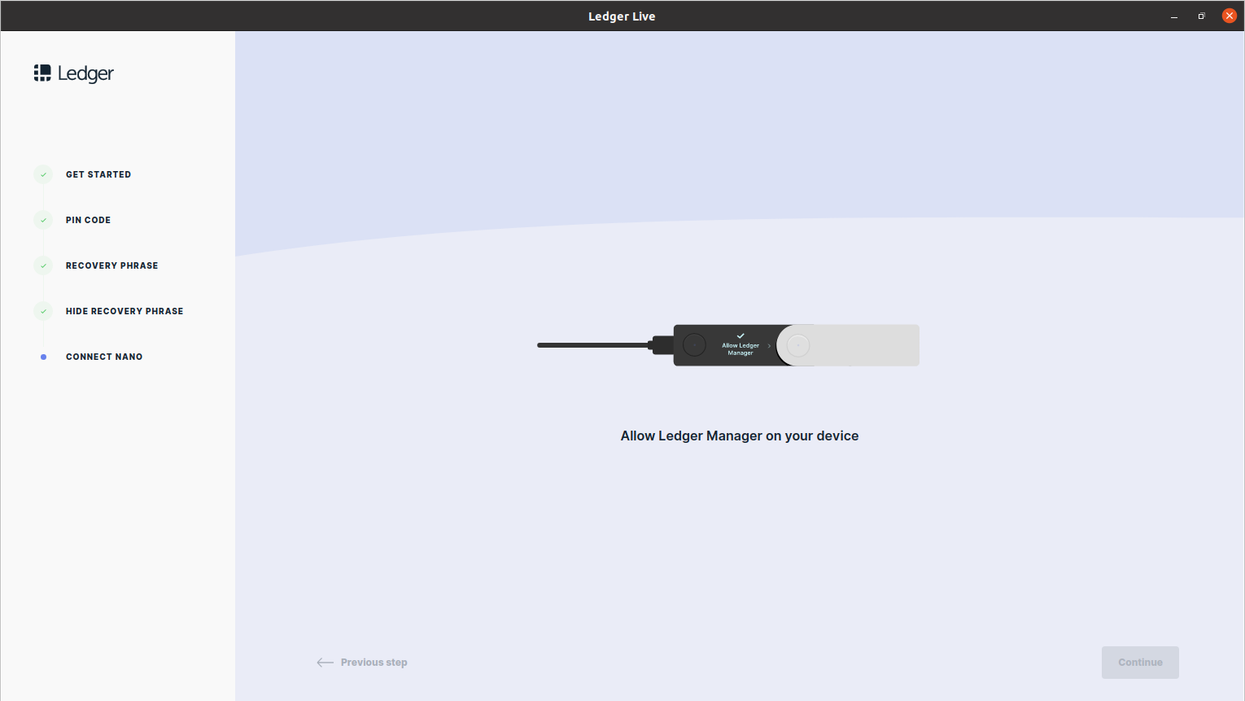
Since the Ledger Nano X is a high-security device, it does not allow any actions without confirmation from the user. While the screen on Ledger Live indicates that a device authentication check is in progress, nothing happens on your Nano X until you allow Ledger Manager to run.
On your Ledger Nano X, press both buttons to allow Ledger Manager to run. After you allow Ledger Manager to run, the pairing will complete, and your device authenticity check will return its results (success).
Finishing Pairing your Nano X with Ledger Live
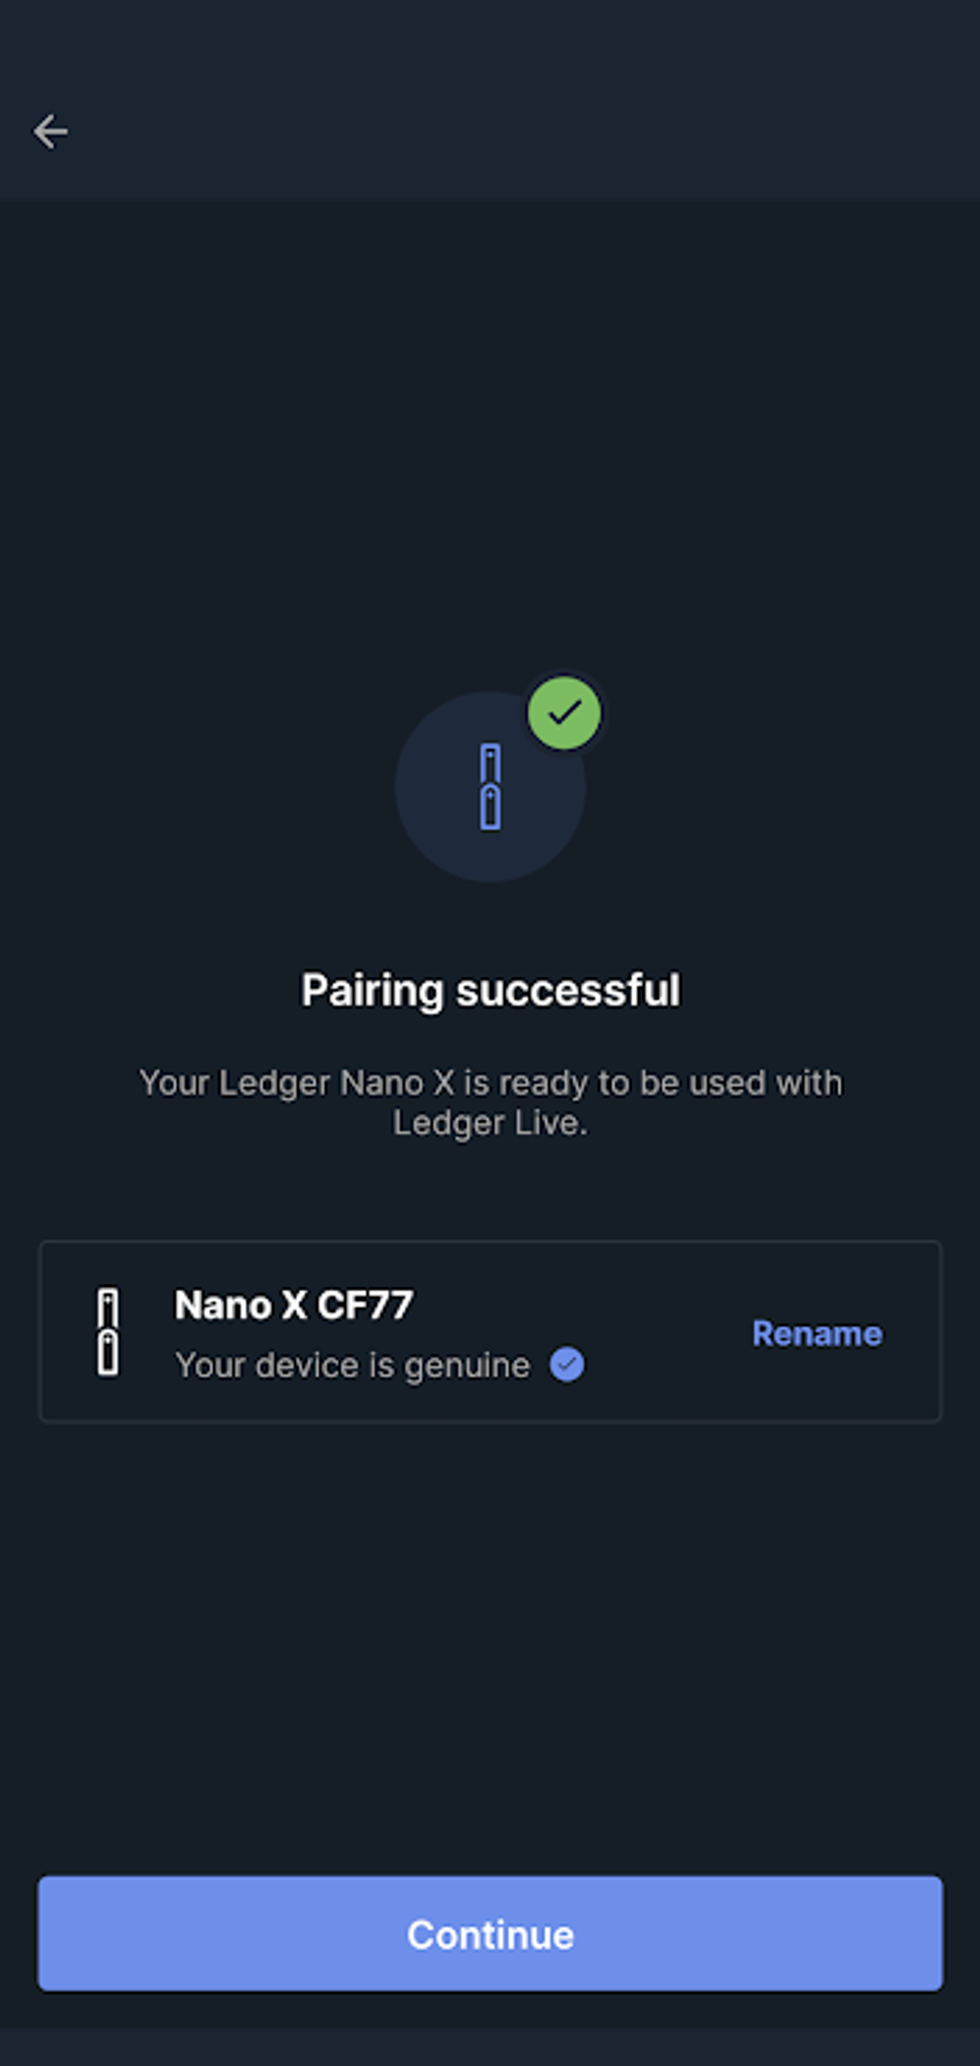
The results of your connection and authenticity check will now be displayed on the screen in Ledger Live. You should see "Pairing successful," and "Your device is genuine." Tap on "Continue."
Congratulations! You have successfully paired Ledger Live to your Nano X. Ledger Live now displays a welcome screen. Tap on "Open Ledger Live" to continue.
You are now in Ledger Live, and you can add Apps, Accounts, and more.
Pairing your Nano for Desktop - Windows, Mac OS, and Linux
The process for pairing your Ledger Nano X to Ledger Live on the desktop is straightforward. The connection happens only when plugged in via USB cable. The desktop apps will not process any Bluetooth connections, even if you have Bluetooth enabled on your desktop. (This might change in the future, with M1 chip-based Macbooks.)
- Connect your Nano X to your desktop using the USB cable that came with your Nano X.
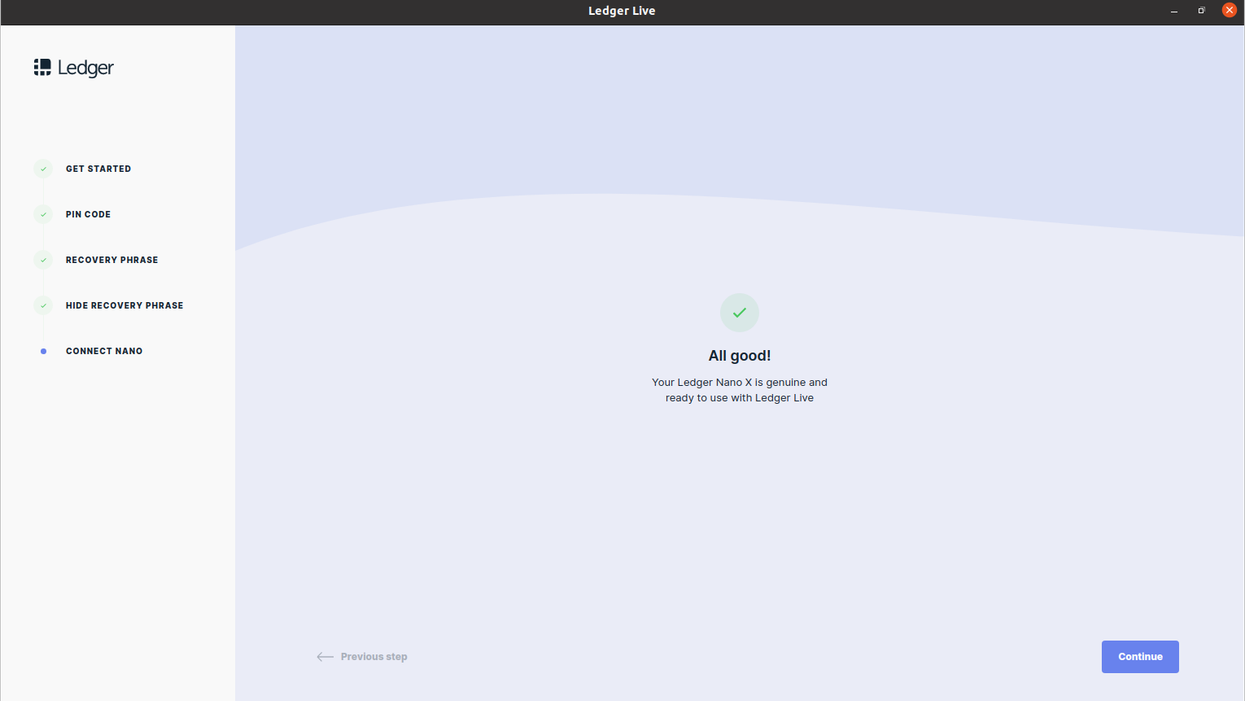
- In Ledger Live, you will be asked to perform a Genuine Check. Click on Check "My Nano" in the bottom right corner.
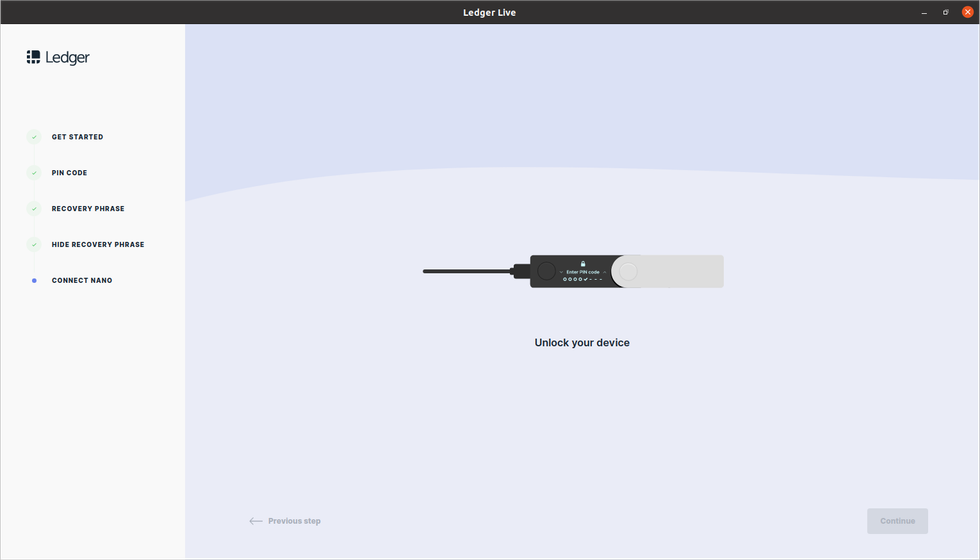
- Nothing happens on your Nano X without your consent - enter your PIN code to allow the genuine check to proceed.
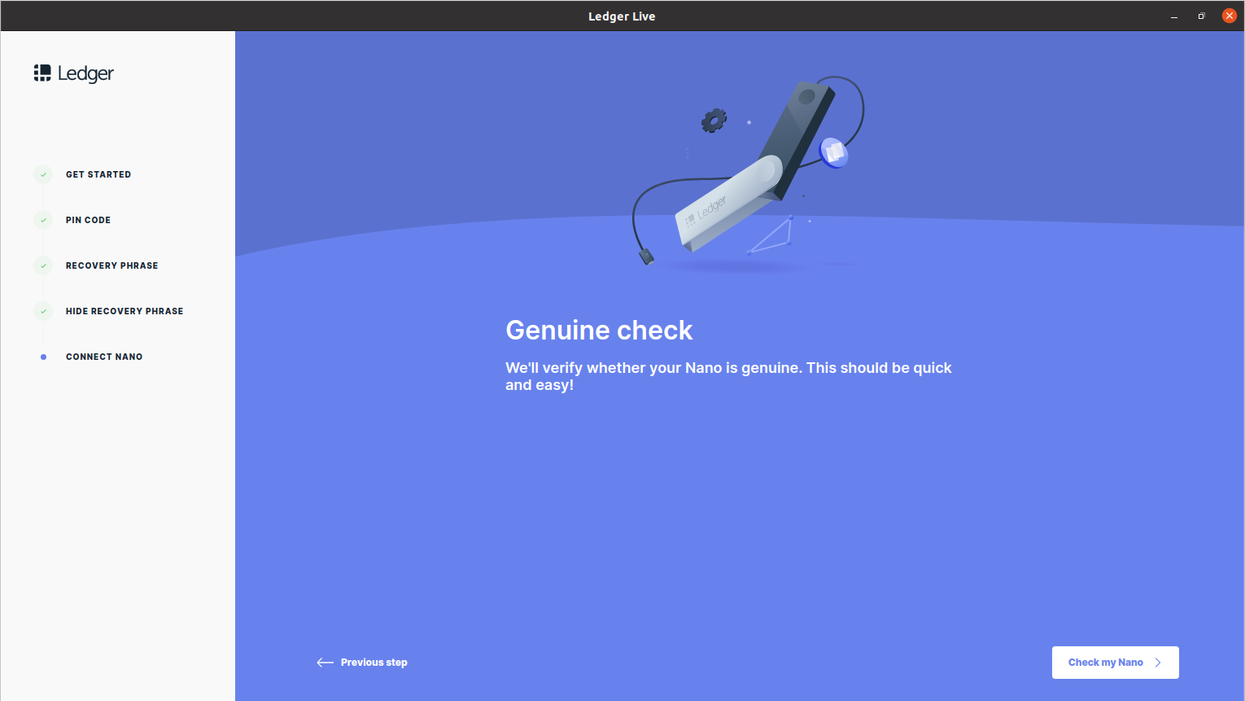
- After entering your PIN to unlock your Nano X, you will be asked to allow Ledger Manager. On your Nano X, press both buttons to allow Ledger Manager.
- Once you allow Ledger Manager, Ledger Live will perform the Genuine Check. It only takes a few seconds to get the results.
- The results should read "All Good - your Ledger Nano X is genuine and ready to use with Ledger Live."
- Tap on Continue, and you will be taken to the Ledger Live Dashboard.
Using Ledger Live to update your Firmware
Keeping your firmware updated is a very important step, because it keeps the security and the functionality of your Nano X up to date. Firmware updates can be used to add support for new features of cryptocurrencies itself, like Ethereum 2.0 or the expected Taproot for Bitcoin update - but even more important than feature updates are security updates. Ledger is committed to securing their devices, and employs a team to try to break Ledger devices' security. With each new security improvement discovered by this team, Ledger updates the security of your device through firmware updates, updates of Apps installed on the device, and Ledger Live software updates.
If your firmware needs to be updated, you will see it at the top of your Ledger Live display. There is one limitation: firmware updates can only be performed with the Desktop app. But if you setup your Nano X using Ledger Live on a mobile device, don't worry ... all of your data resides safely on your Nano X. Ledger Live is simply a management tool, and you can use as many Ledger Live instances as you want. Simply download Ledger Live for desktop, and follow the instructions in this guide to connect Ledger Live to your Nano X to update its firmware.
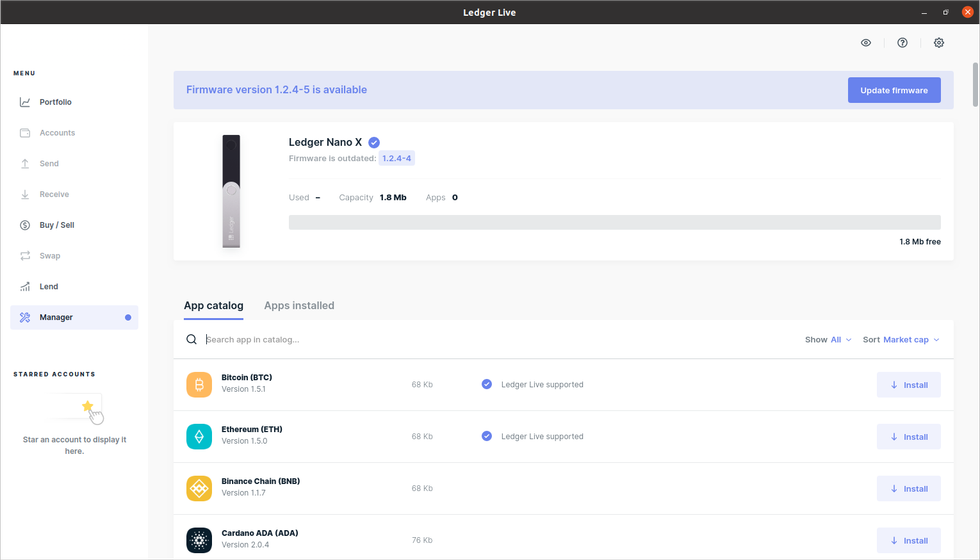
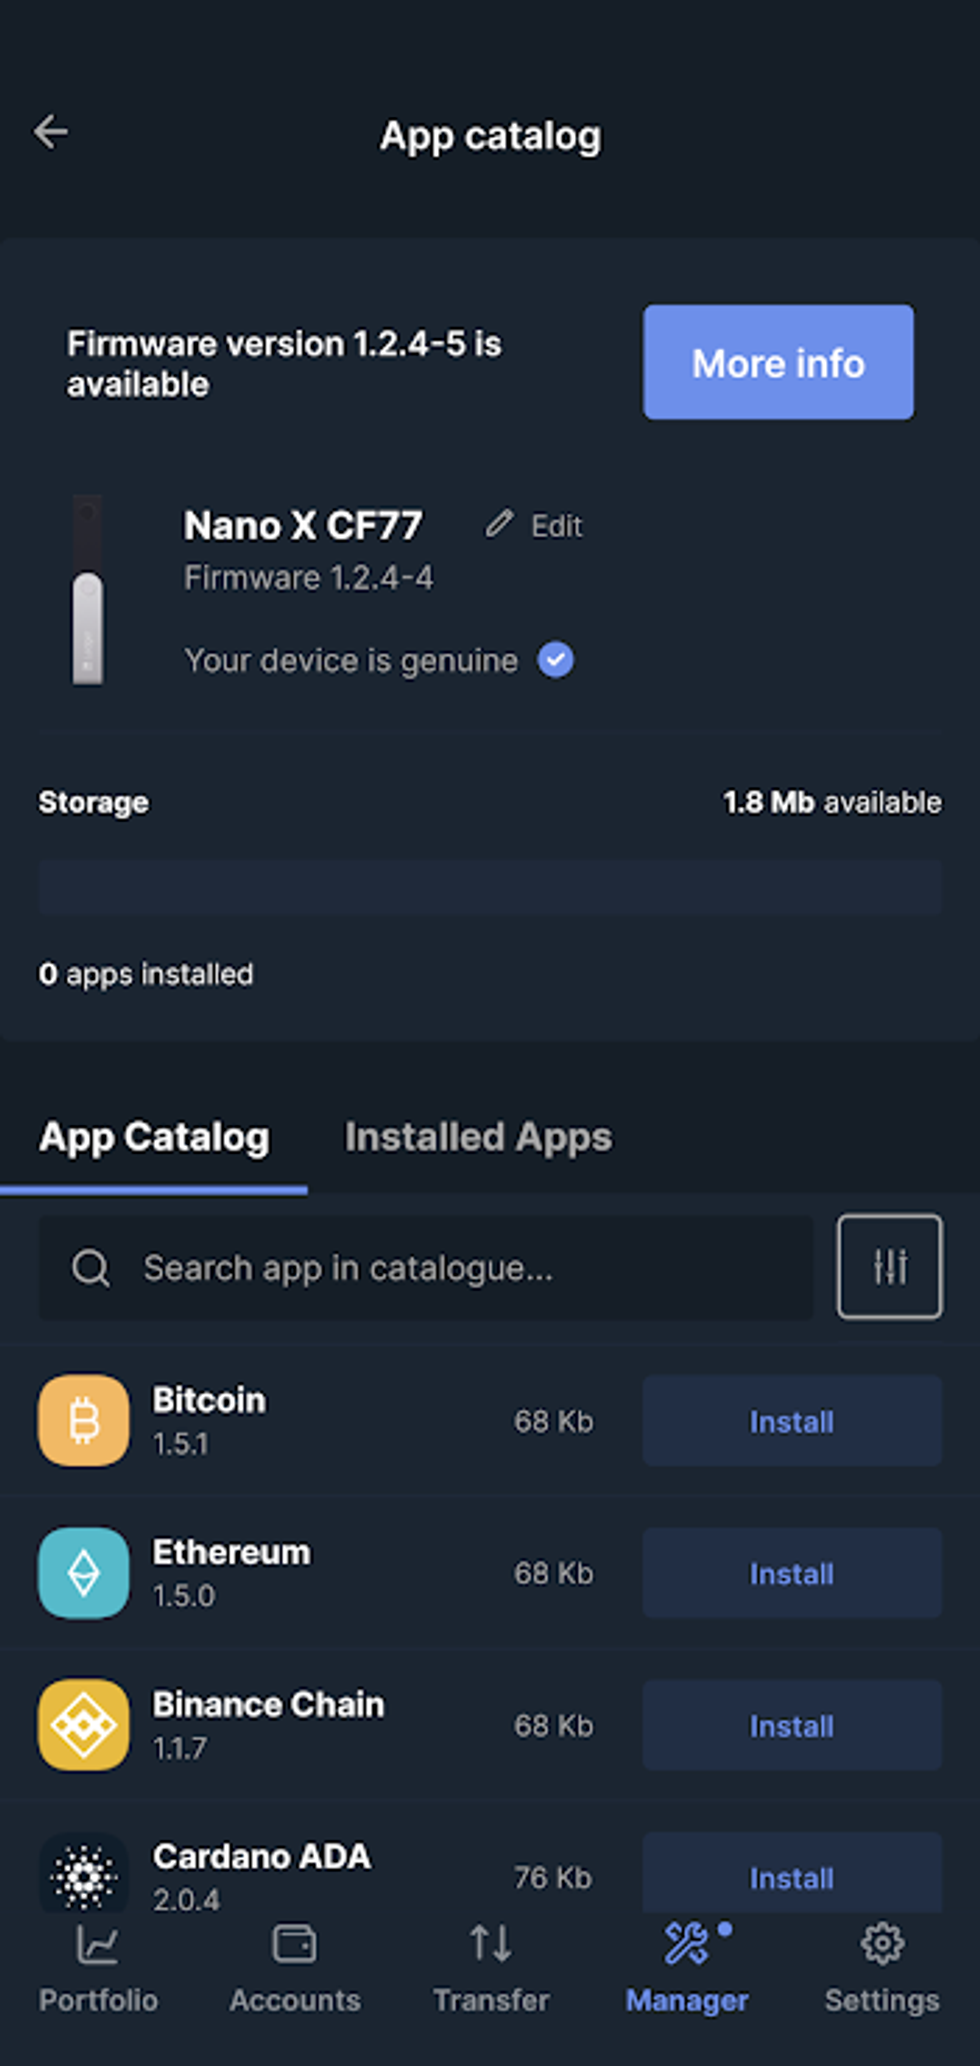
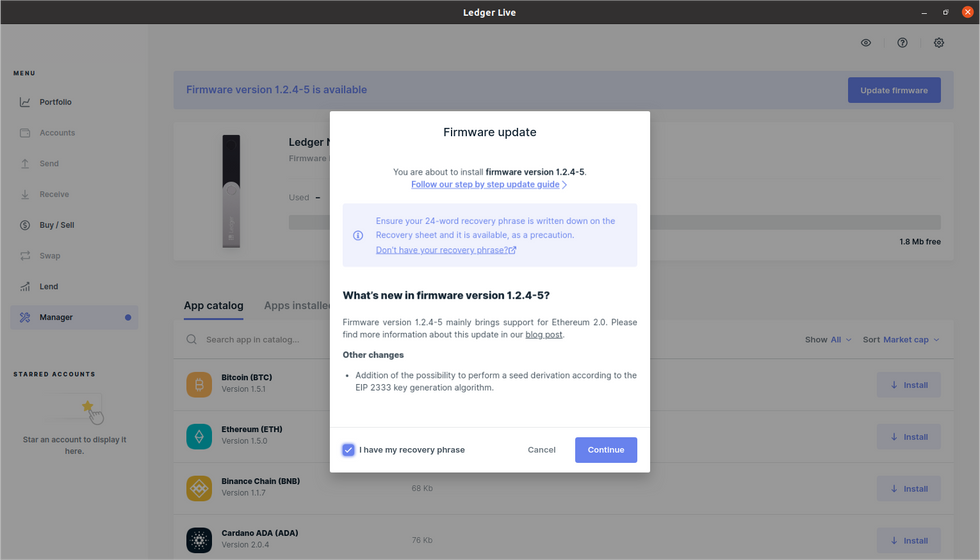
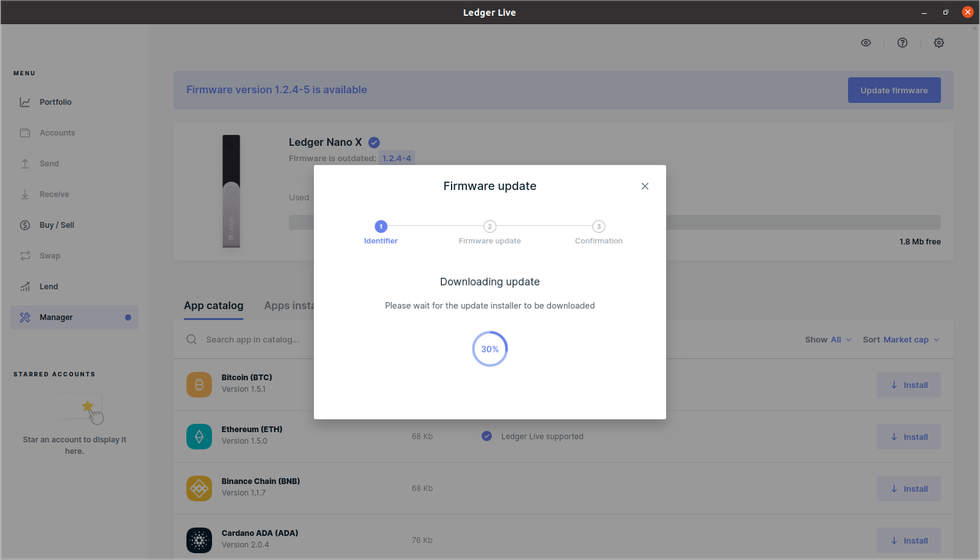
To update your firmware, click on "Update Firmware" in the Ledger Live desktop app, and a pop-up will appear with information about the latest firmware update.
IMPORTANT: Make sure your recovery seed phrase backup exists and is healthy before every update of the firmware. Sometimes firmware updates reset your hardware, and you will have to restore your wallet from your recovery phrase.
Check the box that says "I have my recovery phrase," and then click on Continue. Ledger Live will display the progress of your firmware update until it completes.
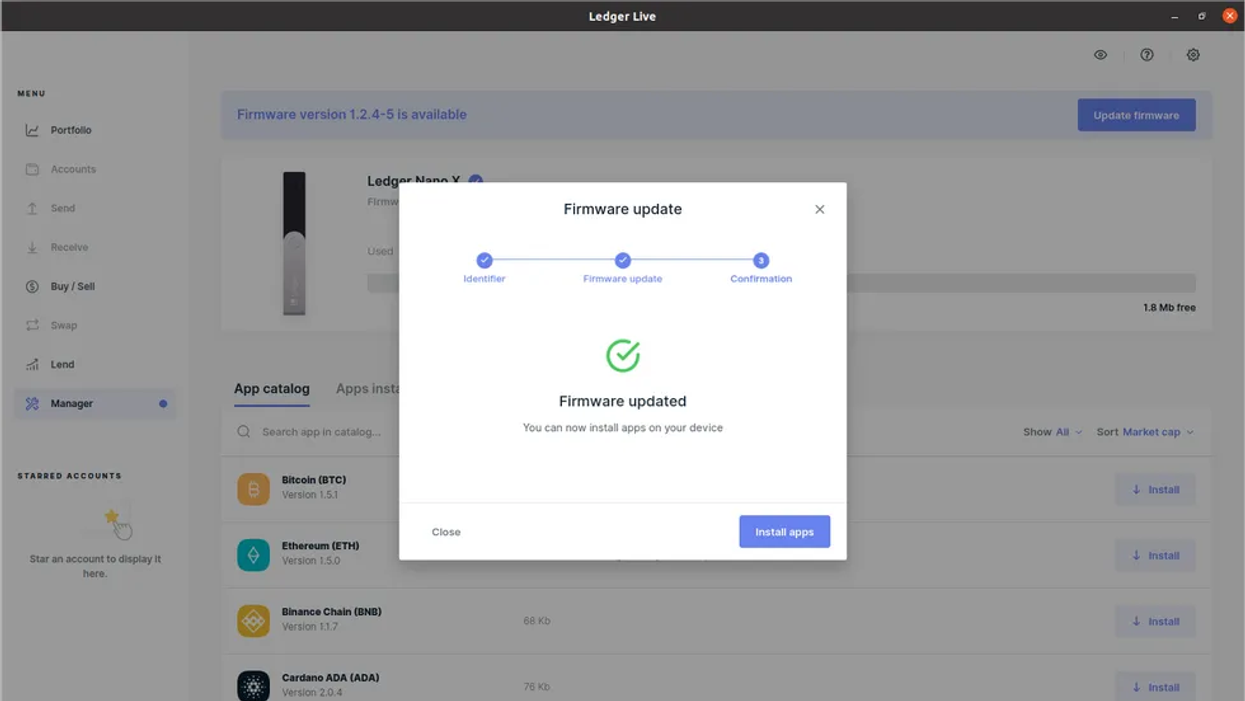
When the firmware update is completed, you can either continue to use Ledger Live on the desktop, or you can return to using Ledger Live on your mobile device. Ledger Live is simply a management tool for your Nano X, and it does not store any private keys or sensitive information - your private keys, and your funds, remain safely on the Nano X.
How to use your Ledger Nano X
With your Nano X set up and paired to Ledger Live, it is time to add the wallets that you want to use. Ledger Live supports 27 coins and 1500+ tokens. You can check the full list here. For this example, we are going to add an Ethereum wallet.
Note: Your Nano X can be used with 3rd-party wallets, such as MyEtherWallet and Electrum. In this case, for MyEtherWallet, you would need to add the Ethereum app, and then follow the directions provided by MyEtherWallet.
If you wanted to use Electrum, you would need to add the Bitcoin app, and then read the instructions provided by Electrum.
Let's add Ethereum to our Nano X. Make sure your Nano X is turned on, and unlock it by entering your PIN.
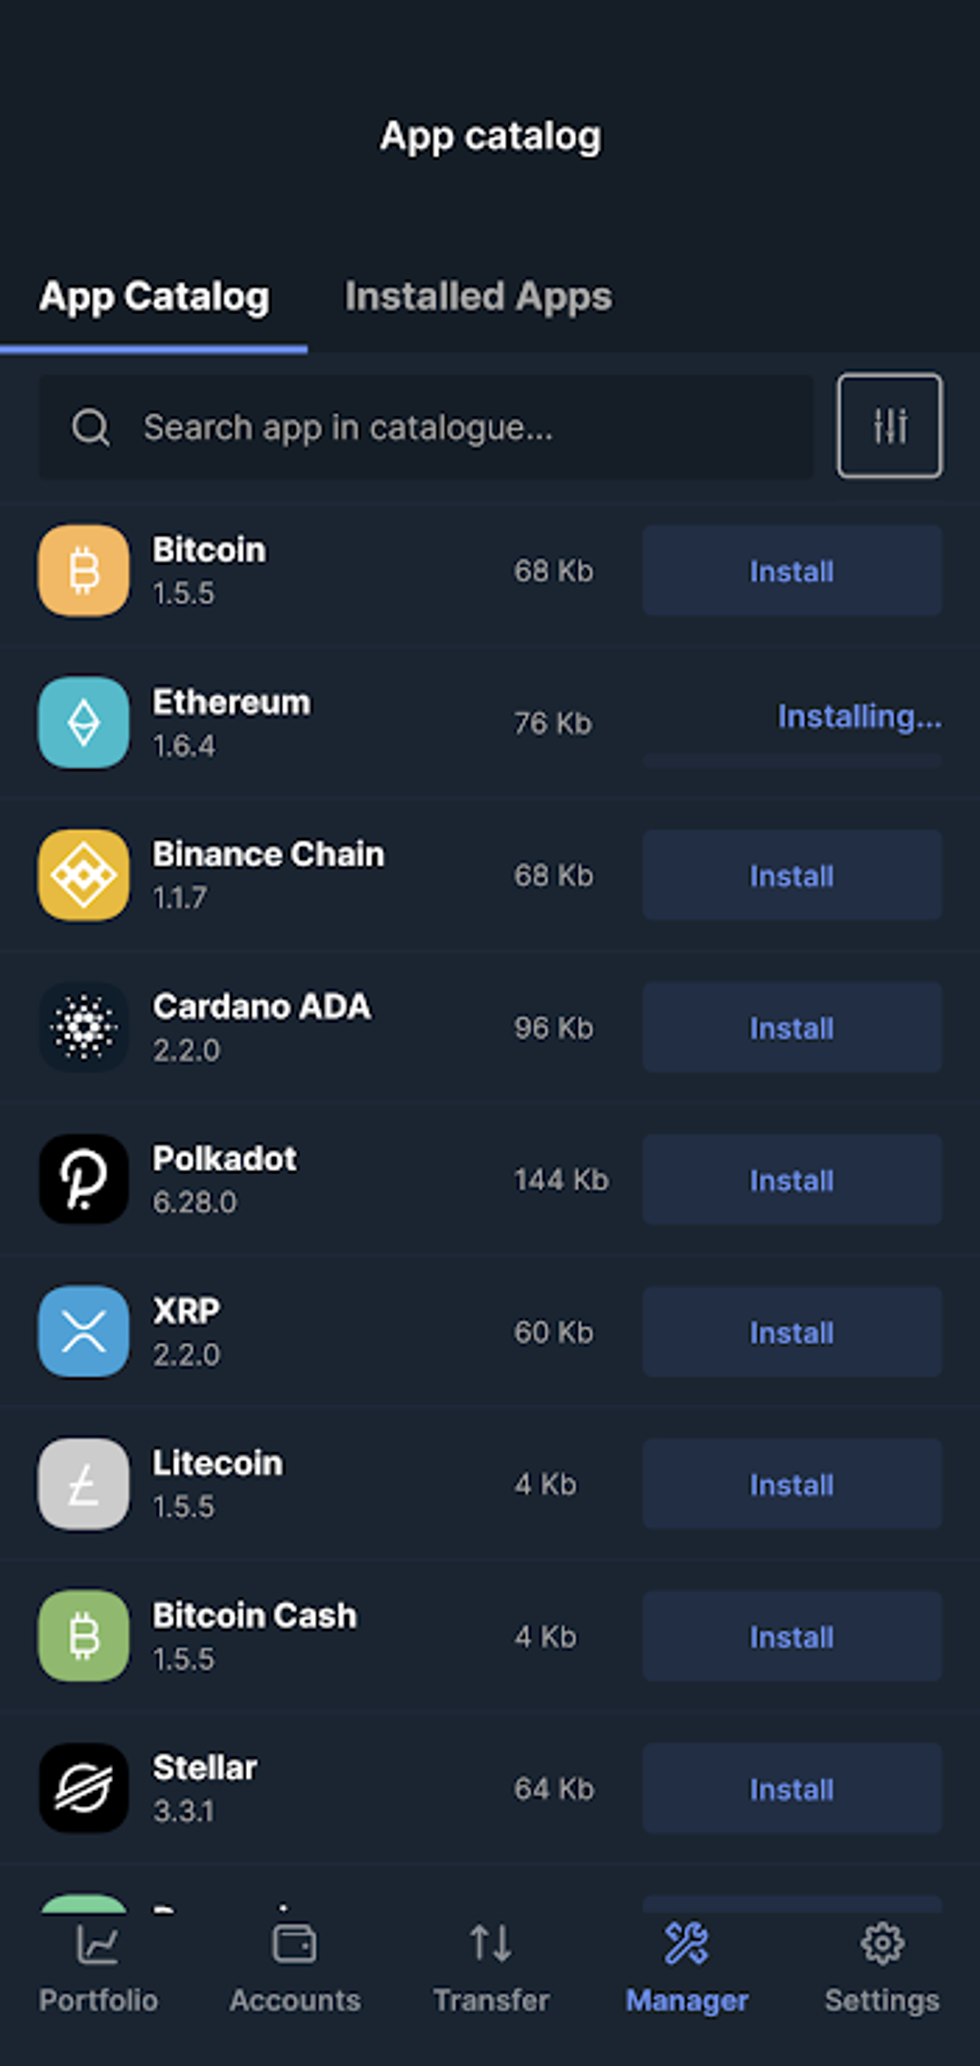
In Ledger Live, navigate to the Manager tab, and select your device. Here you will see the list of coins and tokens supported by Ledger Live. Locate Ethereum, and tap on "Install."
Your Nano X display will show "Processing." While this is happening, is your Nano X is installing the functionality needed to create wallets on the Ethereum blockchain. You can follow the status of the install from Ledger Live.
When the installation is complete, Ledger Live will prompt you to add an account. Alternatively, you can select the Accounts tab from the menu. We recommend selecting the accounts tab from the menu, as if you ever want to install more than 1 wallet per cryptocurrency, this is how you would do it.
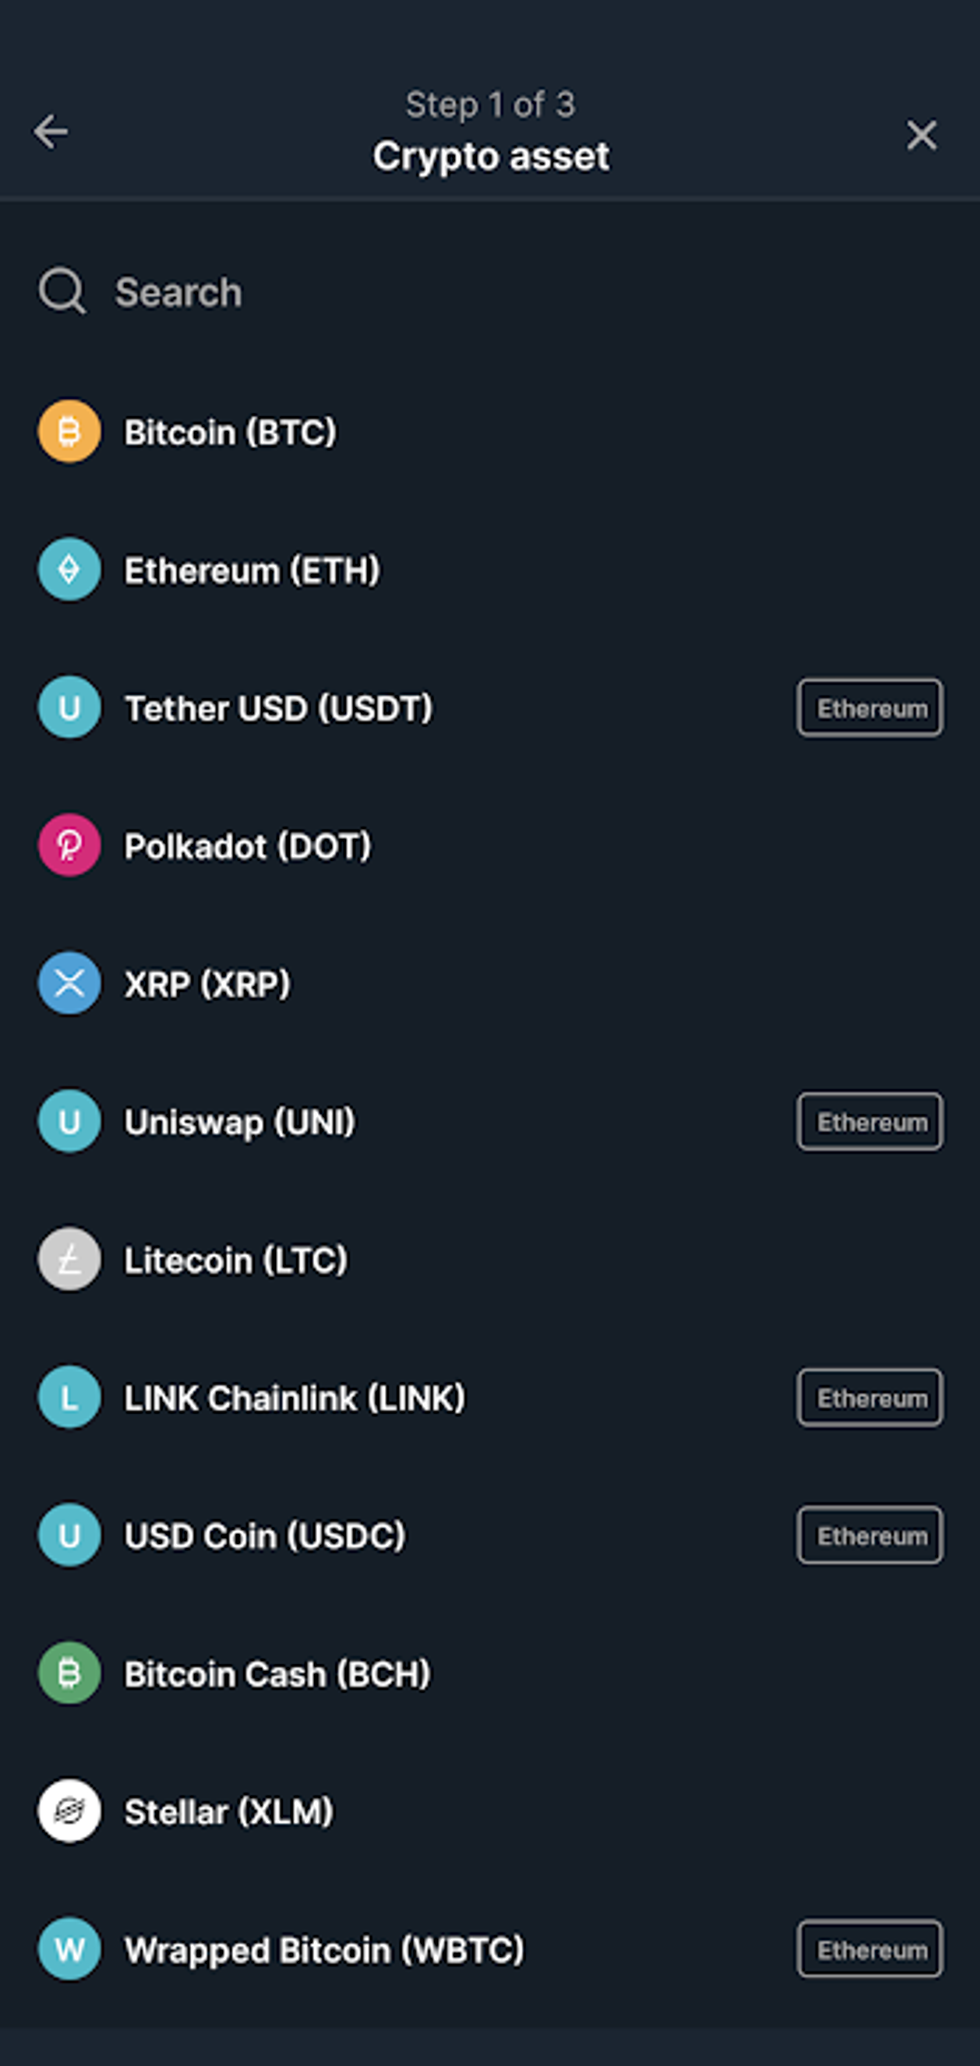
On the accounts screen, tap on "Add account."
A list will appear with all the supported assets. It makes sense to install wallets for common cryptocurrencies like Bitcoin and Ethereum. This manual will go through the steps for Ethereum, so here, you can select Ethereum from the list.
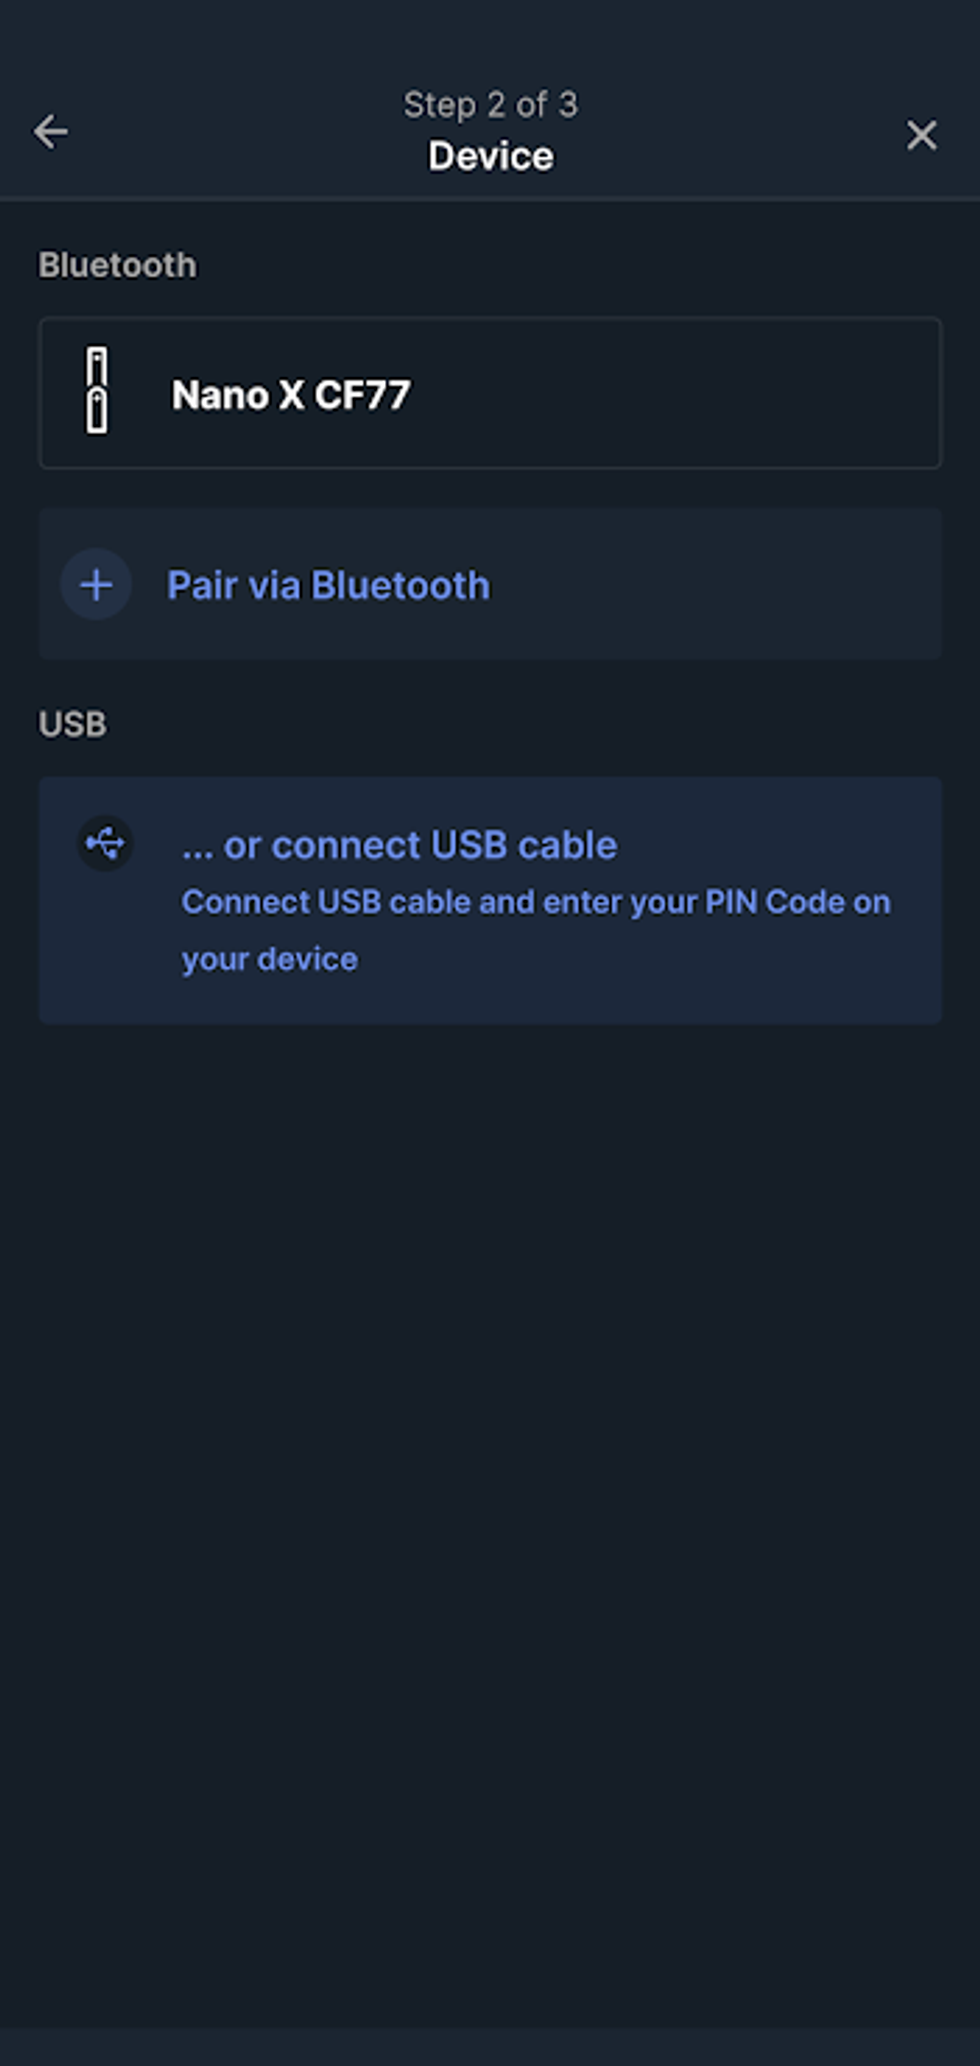
Next, Ledger Live needs to connect to your device.
If you are using the desktop version, connect your Nano X to your computer,
If you are using the mobile app, select your device from the list to form a Bluetooth connection.
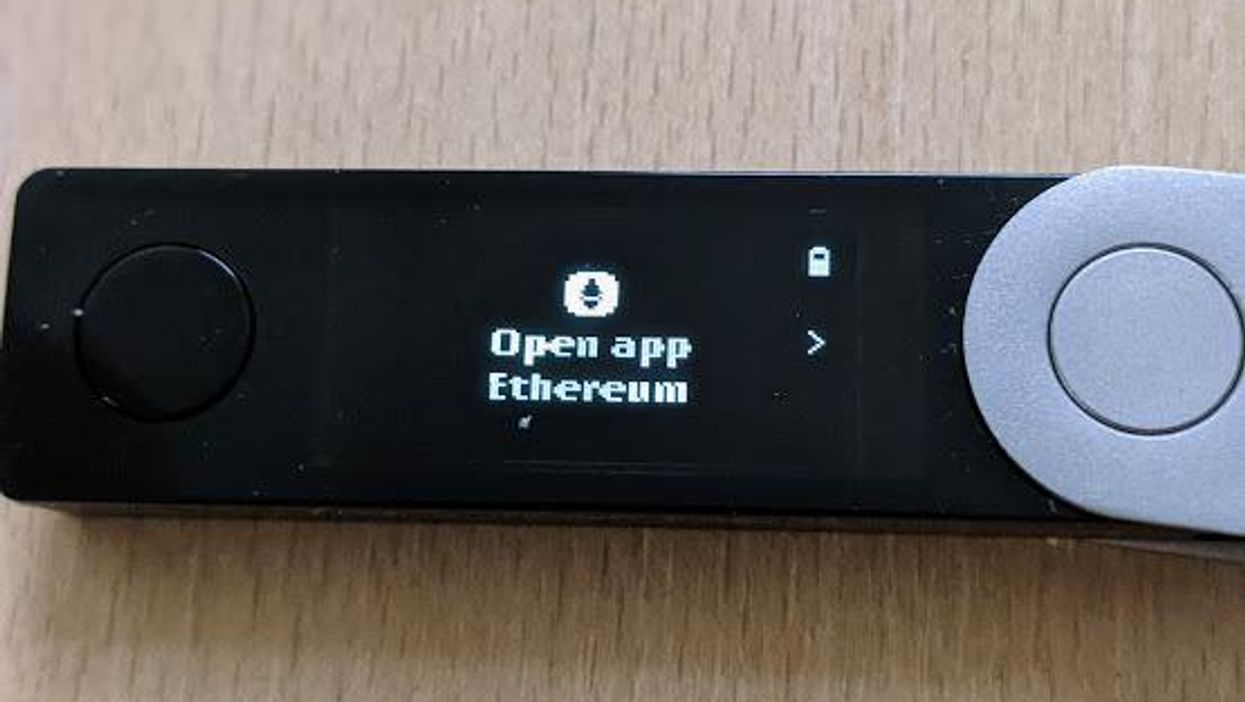
Unlock your Nano X, and open the Ethereum app.
Generating public wallet addresses in Ledger Live
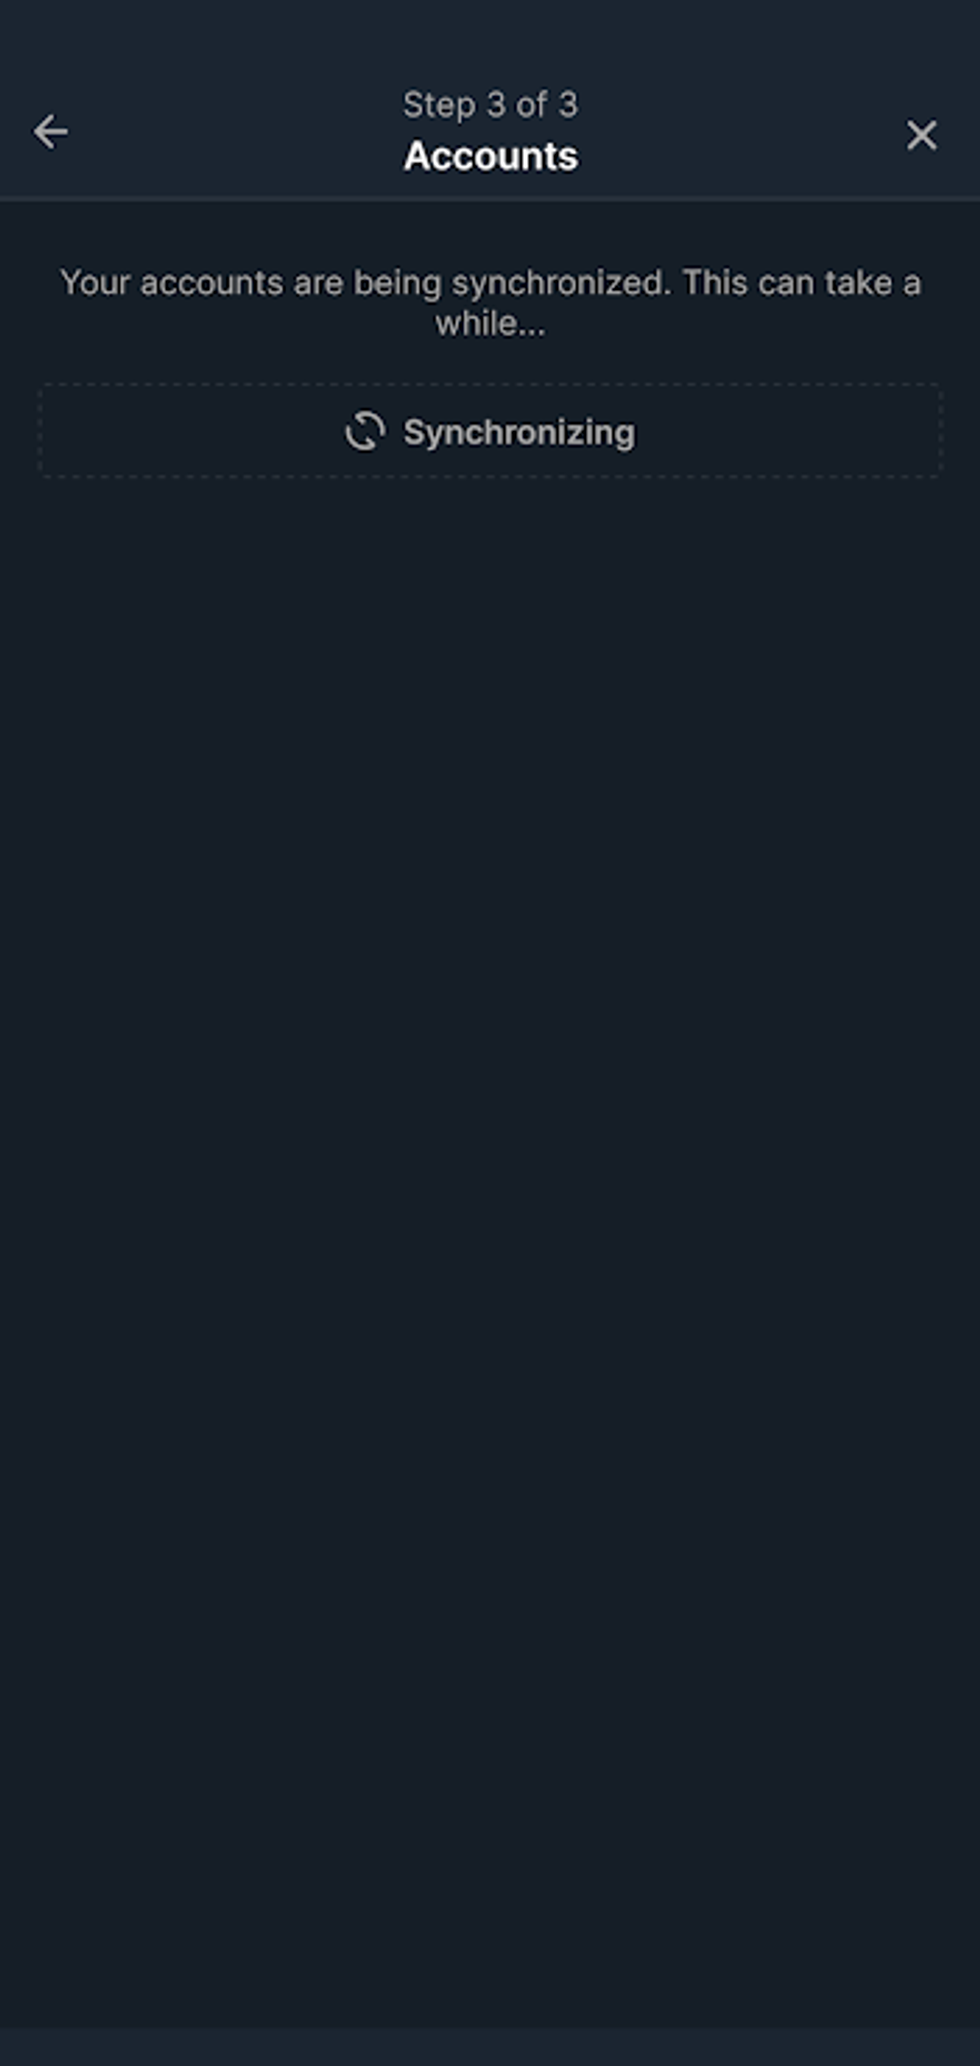
Next, Ledger Live will start synchronizing. While this is happening, Ledger Live is generating your public addresses. (Be assured that your private keys are stored offline, and never touch the Internet.)
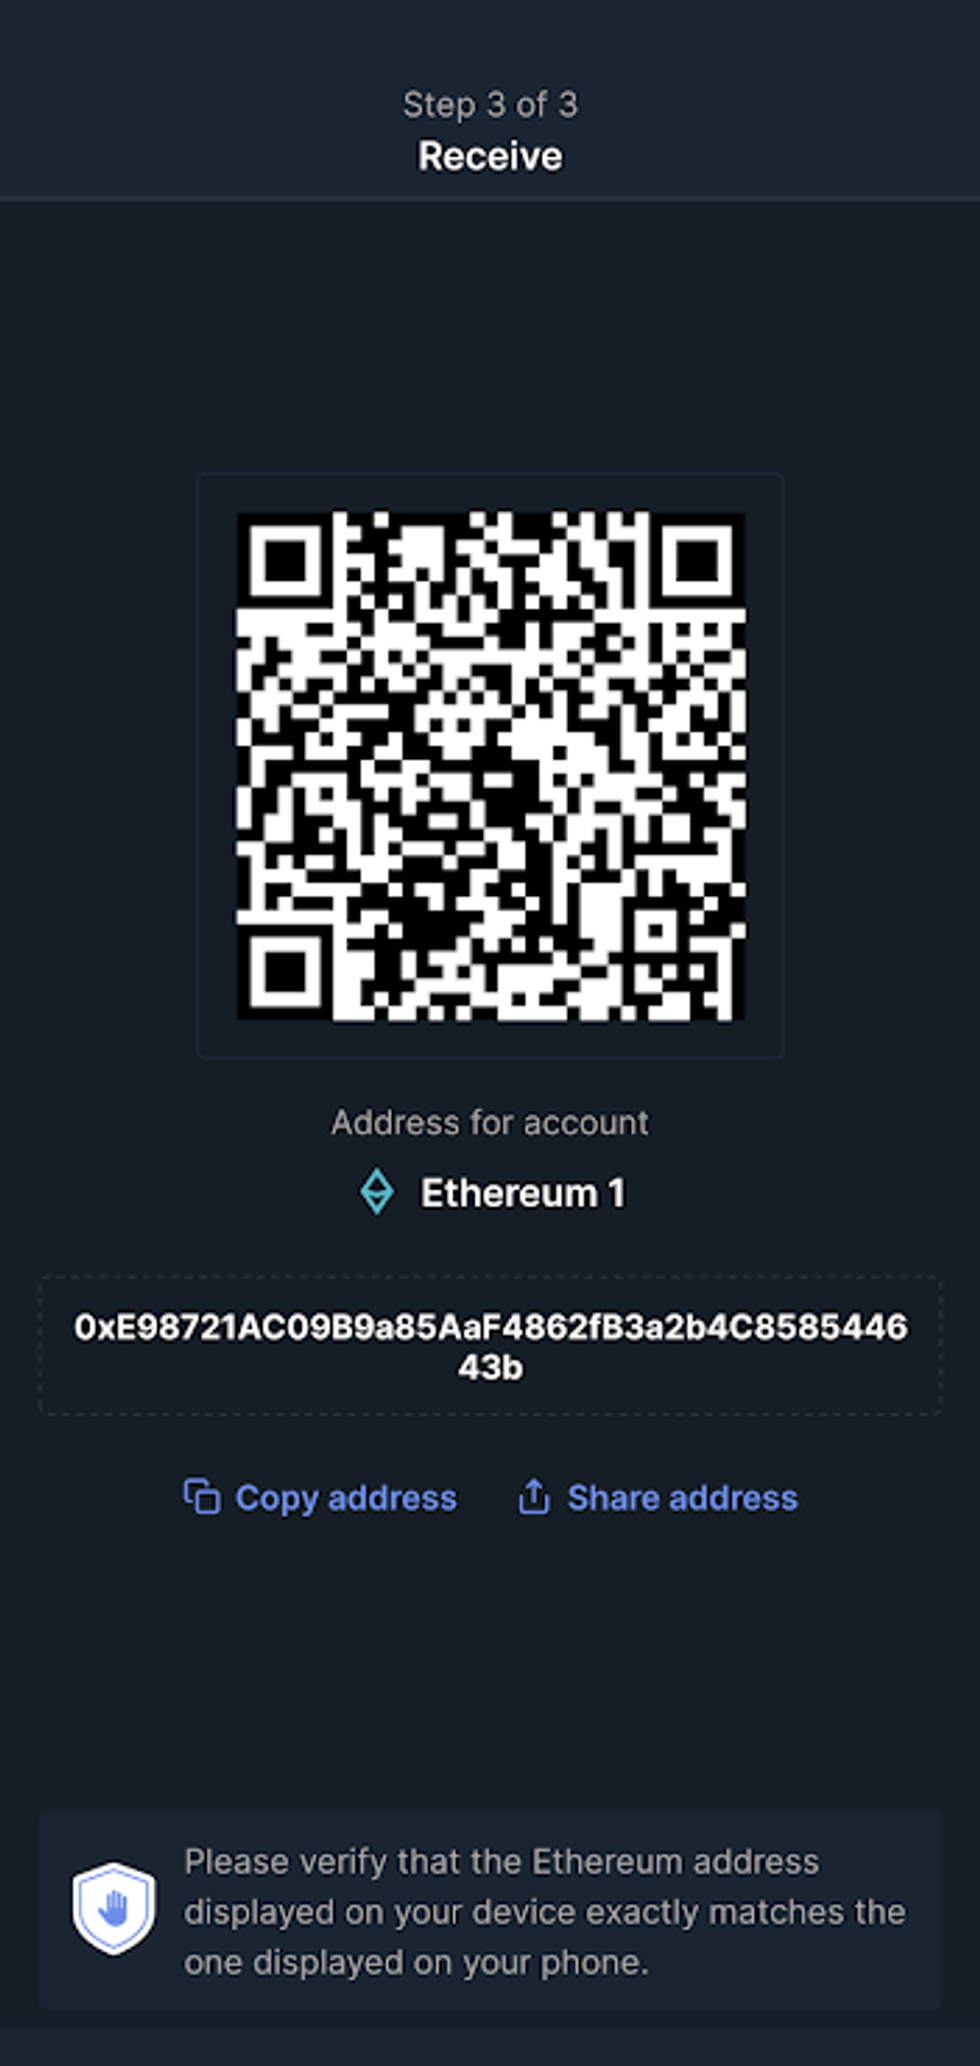
When Ledger Live is finished synchronizing, you will see a success message. To view your new public address, tap on "Go to Accounts."
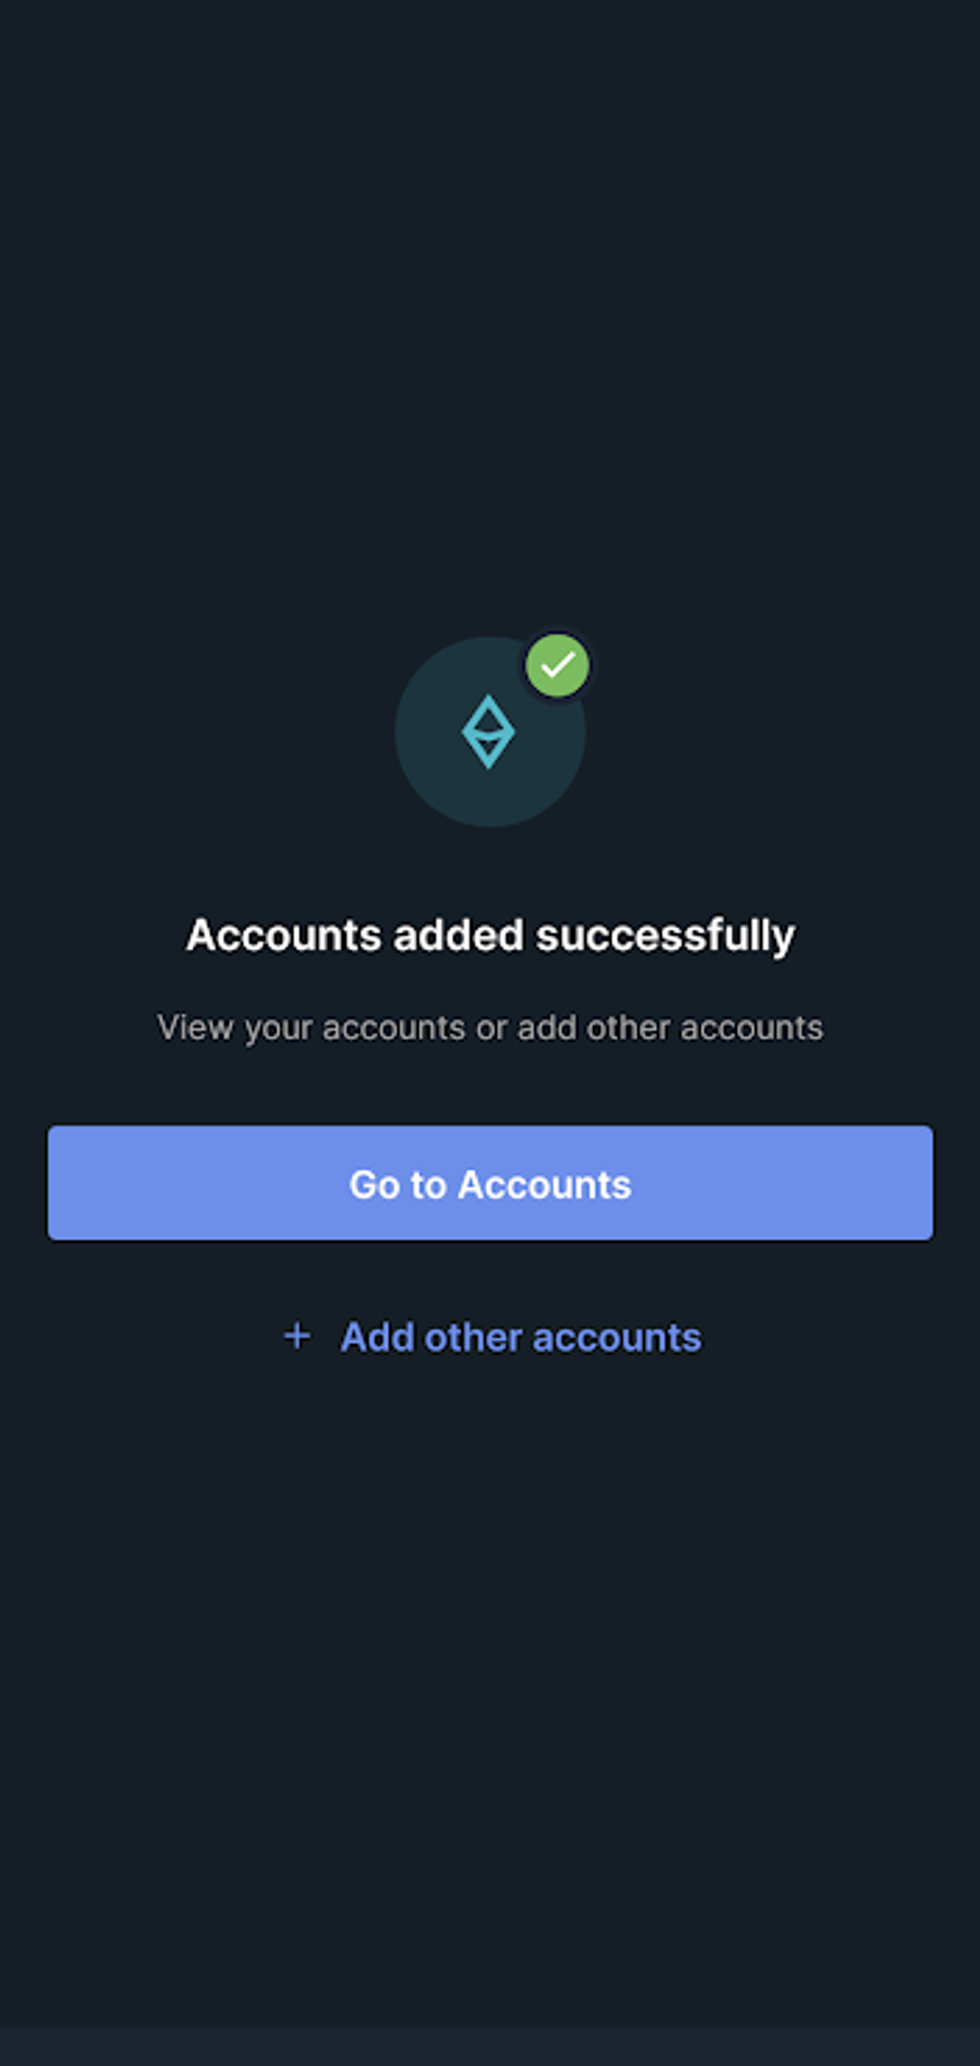
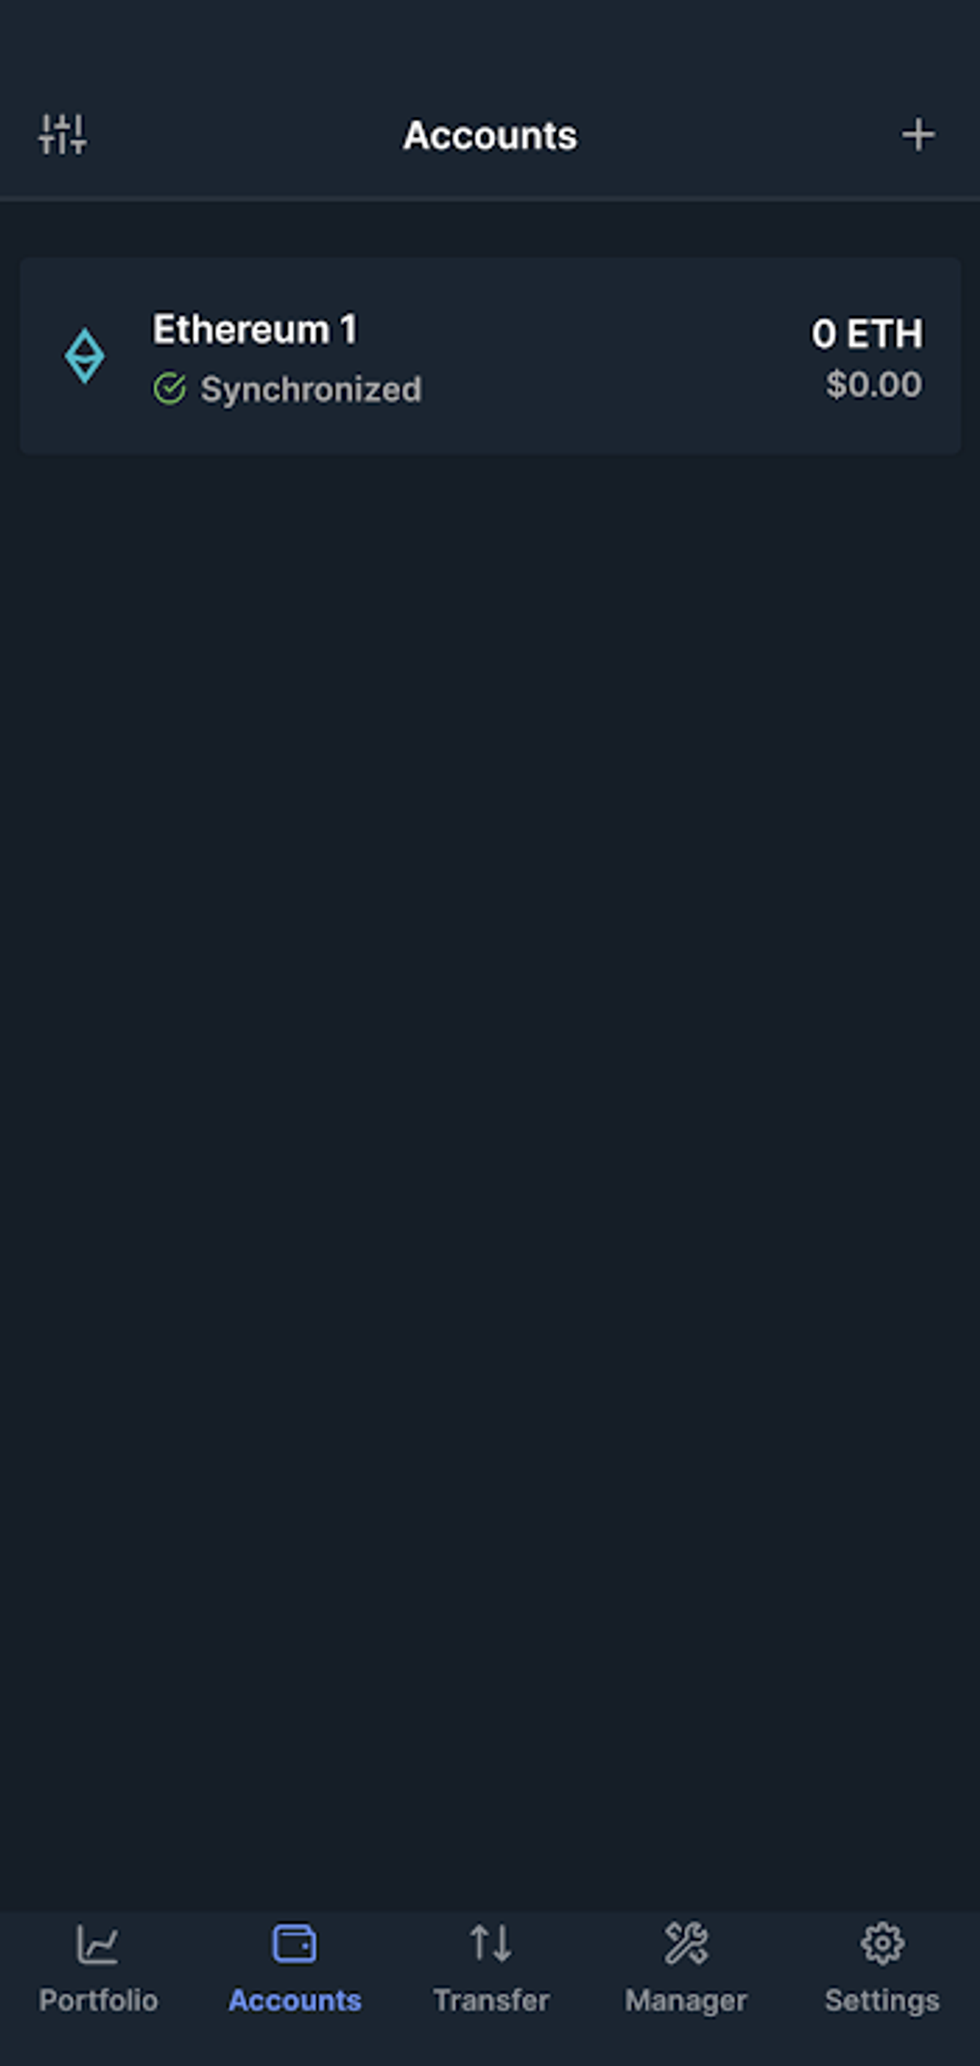
On your Accounts page, you will see your Ethereum account. Tap on your Ethereum account to access your wallet.
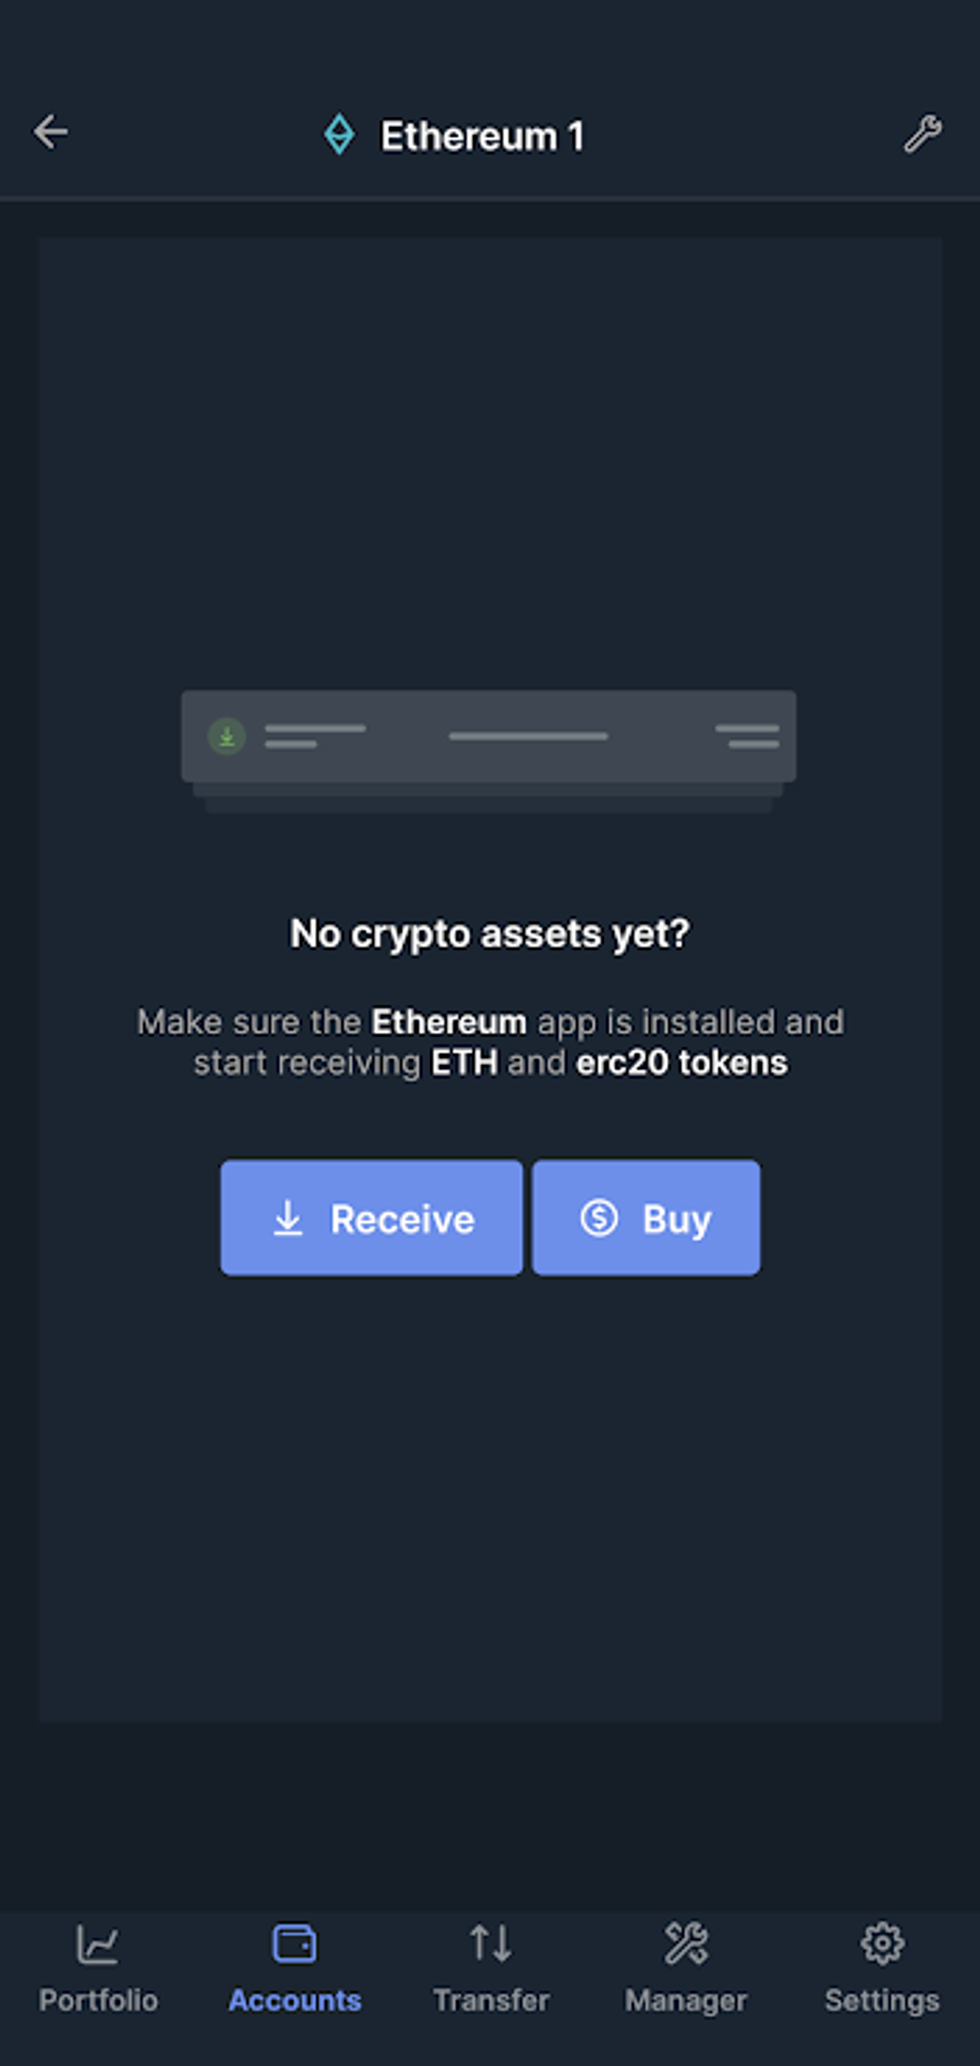
From this page, you will be able to send and receive cryptocurrency. You can also buy cryptocurrency through Ledger's partners. In the screenshot below, our wallet is empty, so the Send button does not appear.
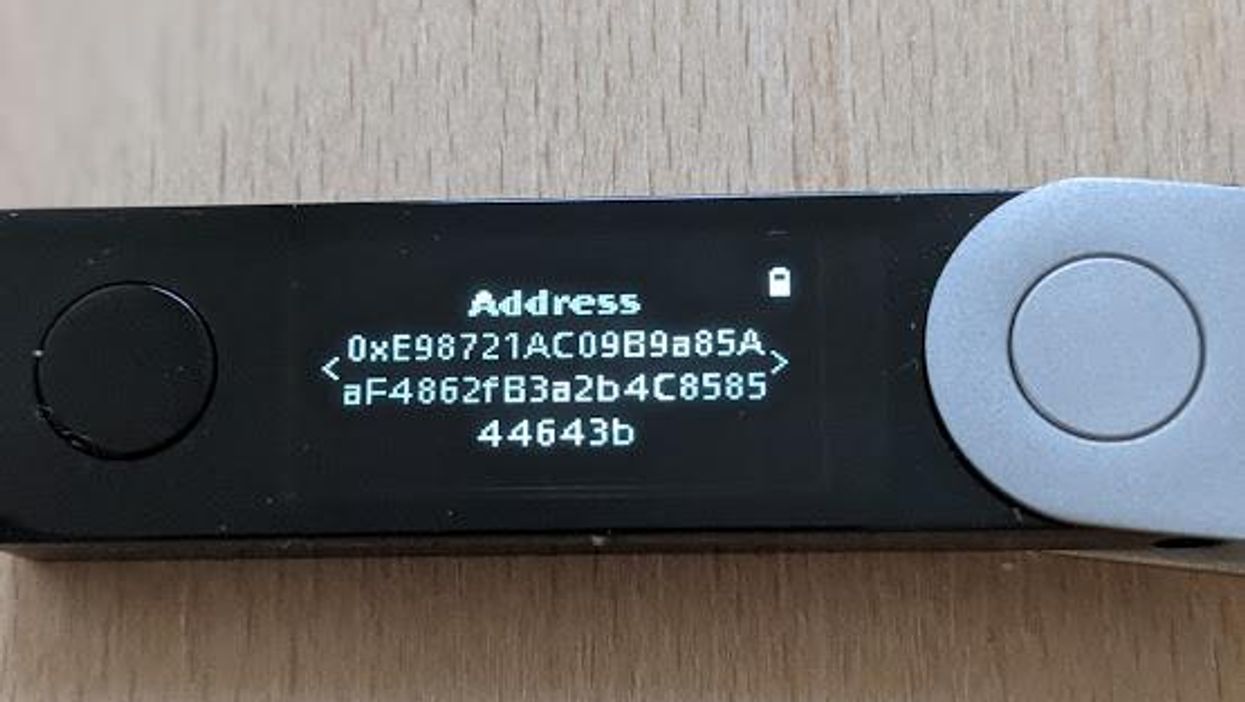
To view your public wallet address, tap on "Receive," then connect and unlock your Nano X as prompted.
After connecting and unlocking your Nano X, Ledger Live will prompt you to verify that your addresses match on both devices. Tap continue to match your addresses.
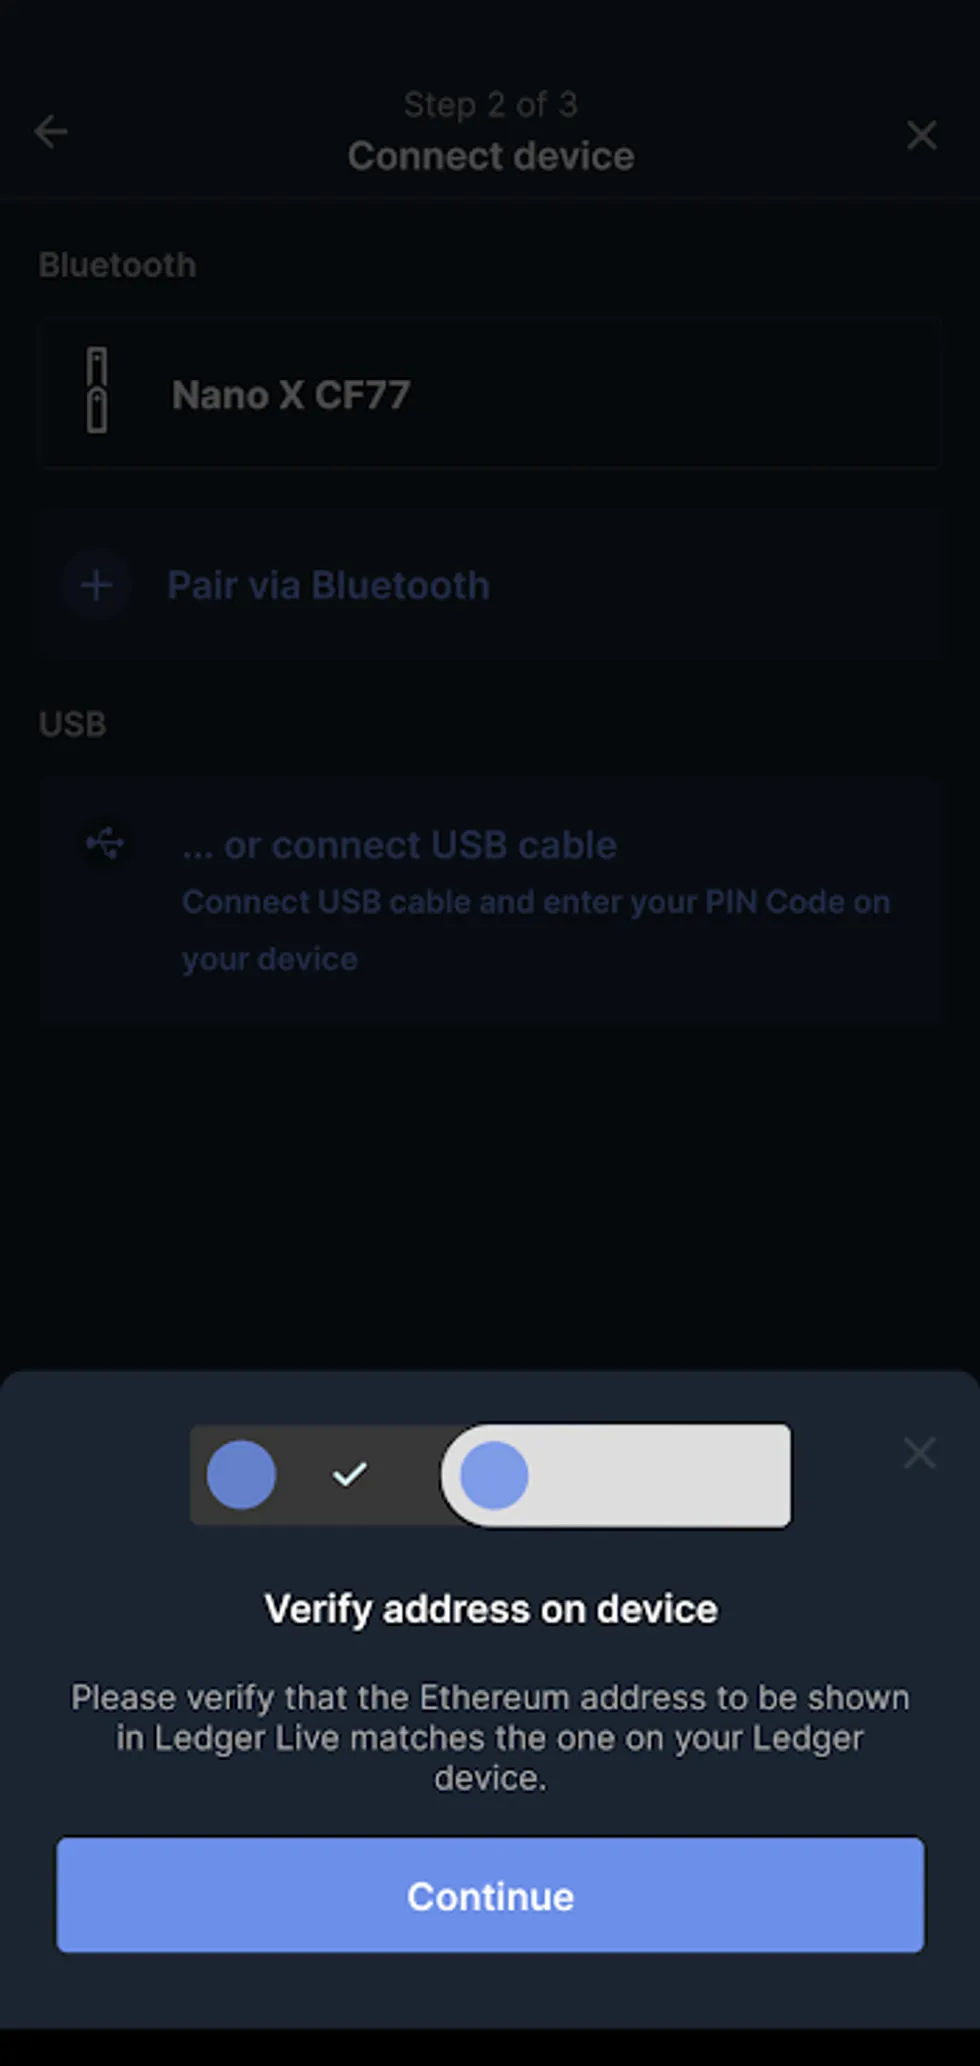
Compare the address on your Nano X to the address displayed in Ledger Live.
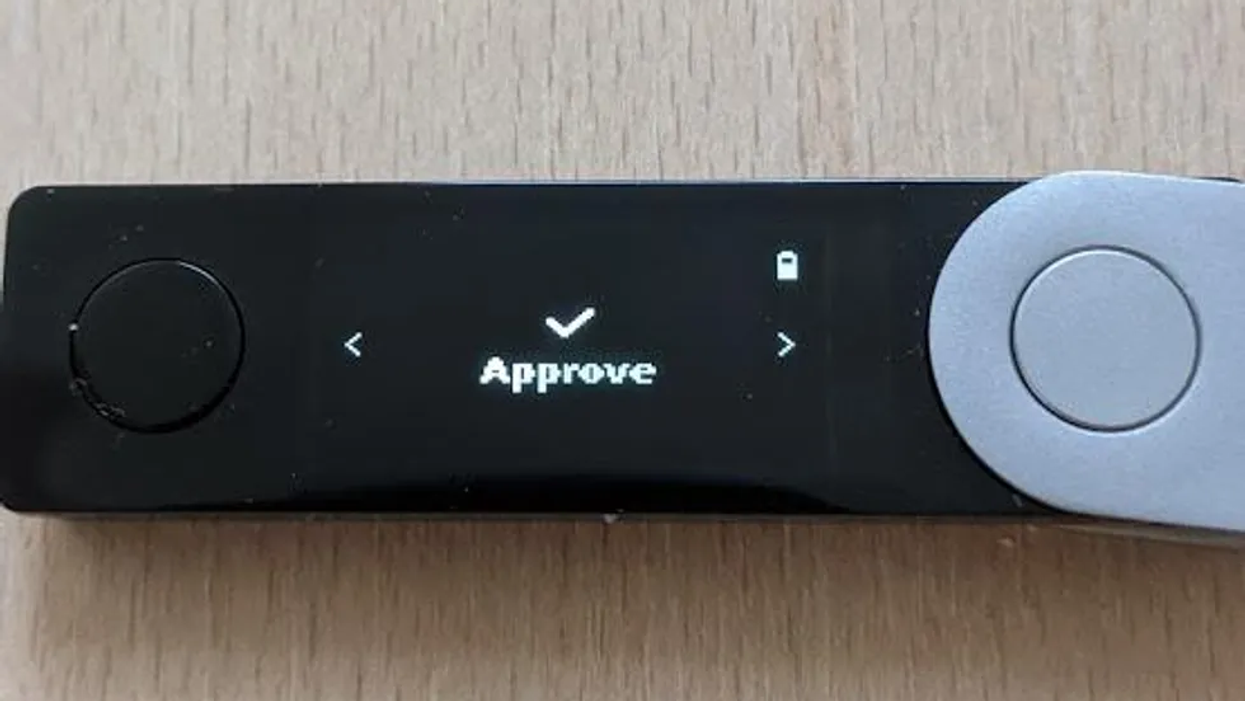
To confirm that the addresses match, navigate on your Nano X until you see "Approve." Press both buttons to approve the address.
Congratulations - your public wallet address is verified by Ledger Live, and you are ready to receive funds!
The process for adding new cryptocurrency wallets is the same. For example, to add a Bitcoin wallet, follow the same steps that you followed above for Ethereum. However, for Ethereum there is a small, hidden "gotcha" to look out for.
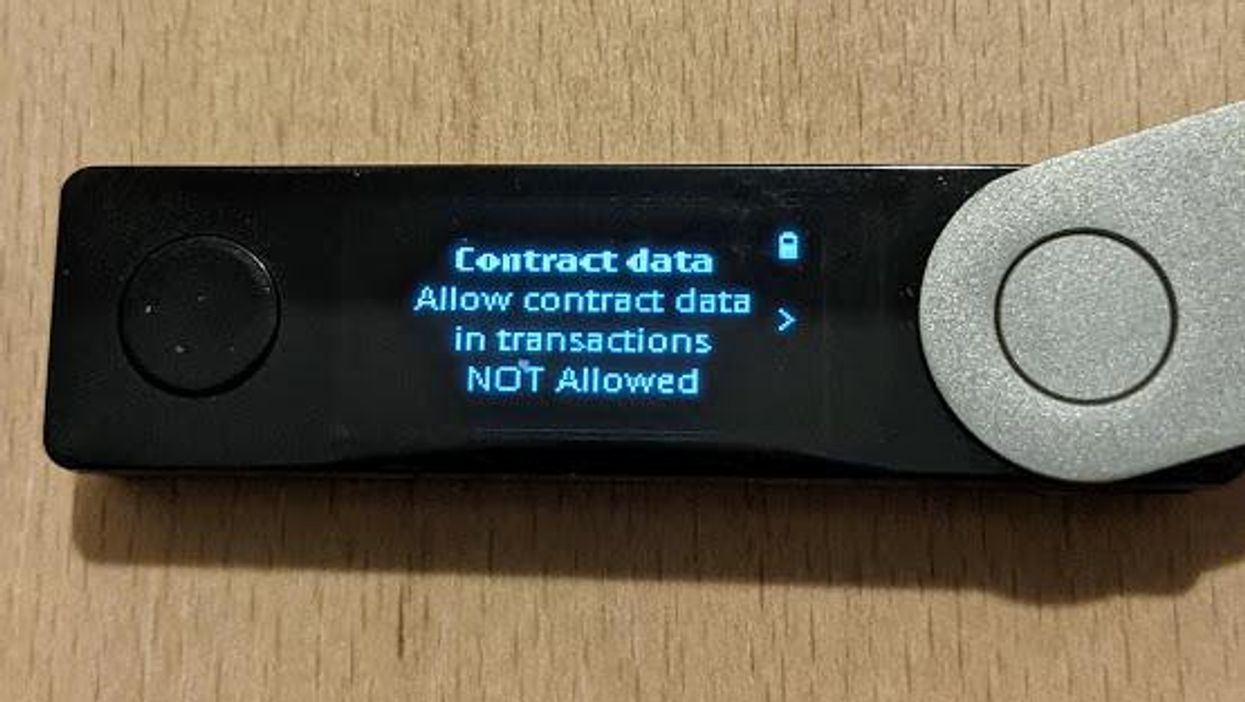
When using Ethereum with your Ledger Nano X, if you plan to interact with any smart contracts, or if you plan to receive any ERC-20 tokens, you will have to enable that feature in your Nano X. Otherwise, the transaction will fail.
- On your Nano X, open the Ethereum app by pressing both buttons.
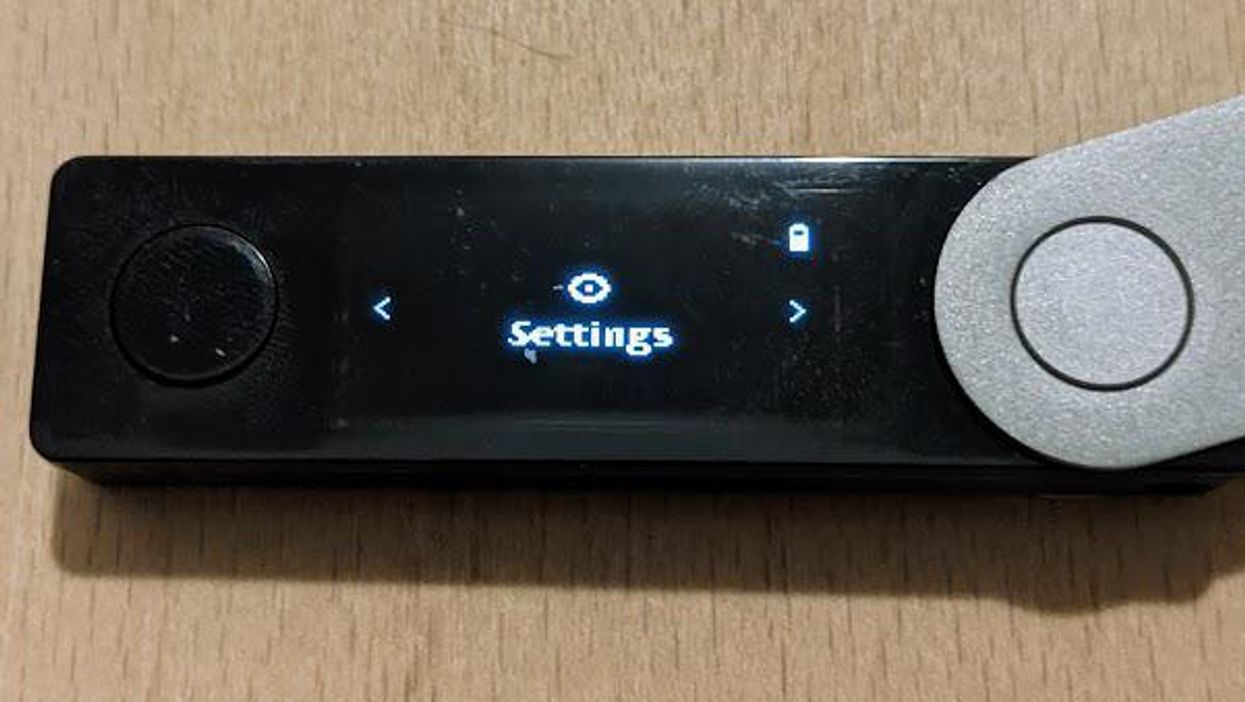
- Navigate to "Settings" - and press both buttons to enter your settings.
- Navigate to "Contract Data - Allow Contract Data."
- By default, contract data is disabled. Notice it says "NOT Allowed."
- Press both buttons to enable contract data. Notice it will now say "Allowed."

Great job! You have now set up your Ledger Nano X, learned how to add apps and accounts, and learned how to send and receive transactions.
In cryptocurrency, knowledge is your best friend. The Ledger Nano X is a high-security device with many features, and correspondingly, Ledger Live has more features than most realize. It is recommended to visit the below web pages, to stay up to date with information about the Ledger Nano X and Ledger Live.

Art Krotou
Art is a crypto-security expert and researcher with serial entrepreneurship background. Having a degree in physics and experiences in multiple cutting-edge industries like fintech, secure hardware and semiconductors, and identity gave him a unique multi-faceted perspective on the problem of key management for individuals in the crypto networks and the evolution of the internet in general.
In his current work, he is specifically researching how cryptographic keys can be inherited without posing a threat to 3rd parties in edge cases. In addition, he advocates for "fault-tolerance via secrets automation". He discusses the quantitative impact of user experience factors on the uptake of non-custodial solutions.
As one of his most notable accomplishments, he co-founded and led through the early years of the company that contributed to the complex technology behind Apple's recent M-series CPUs. He is also the creator of the most friendly and aesthetically pleasing, but nonetheless super secure and fault-tolerant hardware wallet - U•HODL.
Check out his curated series of "Vault12 Learn" contributions below, and follow him on Twitter and LinkedIn for more sharp insights.

Vault12
Vault12 is the pioneer in crypto inheritance and backup. The company was founded in 2015 to provide a way to enable everyday crypto customers to add a legacy contact to their cry[to wallets. The Vault12 Guard solution is blockchain-independent, runs on any mobile device with biometric security, and is available in Apple and Google app stores.


Vault12 Product Demo
Get The Vault12 App Onto Your Phone