Contents
- 1. Introduction
- 2. Download and install
- 3. Create and setup
- Create a new standard wallet in Electrum Wallet
- Create a new wallet with 2FA in Electrum Wallet
- Create a new Multi-sig wallet in Electrum Wallet
- Create a new wallet in Electrum by importing bitcoin address or private key
- 4. Verify your seed phrase
- 5. Securely back up your seed phrase
- 6. Initialize or import recovery phrase
- 7. Further Reading
Welcome to this guide on safely setting up an Electrum Wallet on Android. First released in 2011, Electrum is one of the most popular Bitcoin-only wallets. It strikes a great middle-ground between privacy, security, ease of use, and advanced features.
This guide focuses on the security choices you can make when setting up your wallet; if you are looking for the official setup guide, please click here.
1. Introduction
Electrum is actively developed, 100% open-source, and it supports both the main blockchain and the lightning network - a second layer that sits on top of the blockchain. The main benefits of the lightning network are instant transaction settlement, scaling, enabling smart contracts, and increased transaction privacy.
A huge benefit to using Electrum wallets is the feature set. Electrum can do everything - from sending complex transactions via the in-app command line, to integrating with hardware wallets, and much more in between. Furthermore, Electrum has a plugin infrastructure, giving developers the ability to make custom plugins to accomplish any task.
Electrum Wallet was one of the first bitcoin wallets and is a pioneer in bitcoin wallet software. The source code of Electrum has been used to develop versions for other cryptocurrencies - like Bitcoin Cash, Dash, and Litecoin.
If you are looking for a lightweight Bitcoin-wallet, that offers the flexibility to participate in the Bitcoin ecosystem without any roadblocks - Electrum is for you. This wallet is great for beginners and advanced users alike and is perfect for beginners with an interest in increasing their knowledge of Bitcoin, blockchain, and security.
Electrum releases versions for OS X, Windows, Linux, and Android. This guide is focused on the Android version of Electrum. If you are not using Android, see the guide for desktop.
2. Download and install
Electrum offers two options for installing on Android - direct download of the APK file, and installation via the Google Play Store. Each method will contain benefits and drawbacks in terms of security and user-friendliness. Realistically, it is best to familiarize yourself with both options, and then choose the option that is best for you.
In most cases, if you are running Android with Google Play Services enabled, which is the majority of Android users, downloading from the Play Store is the way to go. The Play Store handles verification of apps, and does a good job removing malicious apps. However, effort should be made to verify the app being downloaded is the correct, authentic app every time an app is downloaded.
If you are running a custom ROM, like Graphene OS, then downloading the APK file is your only option. Electrum provides the GPG signatures for each release. This means you will have the ability to verify the authenticity of the app.
In this section, both installation methods are covered. Let's get started.
Download Electrum Bitcoin Wallet from the Play Store
- From your mobile device, open the 'Play Store' and search for 'Electrum Wallet' or click this link: Electrum Bitcoin Wallet - Apps on Google Play to get the Electrum Bitcoin Wallet

- Trust, but verify. When using any cryptocurrency wallet, it is important to make sure you are downloading the correct version. Check the store listing for the following info:
Version: 4.0.9.0 as of December 18, 2020
Offered by: Electrum Technologies GmbH
- The `Version` number and the `Updated on` date will change as the app is updated over time. The important part to verify is the `Offered by` field. Remember the phrase trust, but verify. Taking the extra step to verify can prevent loss of funds. Trust, but verify is an important concept in having a security mindset.
- For those who are extra security conscious, try extracting the Electrum APK file, and checking it against the GPG signature released by Electrum.


Direct Download Electrum Bitcoin Wallet APK
Direct Download of the APK file and manual installation is an advanced method, and generally suitable for devices running custom ROMs - like Graphene OS. If you have Google Play Services installed, it is advisable in most cases to download Electrum via the Play Store - this ensures you receive automatic security updates.
This installation method requires the use of the terminal. Android typically does not come with a terminal, but it can be installed. Termux is a recommended option for Android, and what this guide uses.
As an alternative, you can use the terminal on OS X, Windows or Linux to download the APK and verify the GPG signatures. Once you have the APK and verified its authenticity, you can transfer the APK file to your Android device. ]
This method uses the terminal to download the Electrum Wallet APK file and the corresponding application GPG signatures. When software is released independently, the developer will sign the software with their GPG key. This allows users to be sure the files downloaded are authentic and not tampered with by an attacker.
In order to do this on Android, tools to handle GPG from the terminal and tools for downloading files from the terminal need to be installed. Termux also needs permission to access the file manager, so it can interact with files. Let's set this up now.
- There are two ways to give Termux permission to manage files. One is through the settings menu, and the other is in Termux itself
- On your Android device, open the permission manager and allow Termux access to the file manager
- Settings → Apps & Notifications → App Info → Termux →Permissions →Allow management of files
- Open Termux and run the following command
- # termux-setup-storage
- A pop-up will appear, asking you to allow/deny permission for Termux to Allow management of files. To proceed, select 'Allow'.
- For termux to download files from the internet and run GPG operations, like verifying GPG signatures, two packages need to be installed. Open Termux and run the following command to install gnupg and wget.
- # pkg install gnupg wget -y
Your Android device is now set up and ready to validate GPG signatures from the terminal. Pretty cool right? Electrum Wallet is signed by developer ThomasV. To verify the authenticity of the AppImage, you will need ThomasV's key.
- Run the following command to import ThomasV's GPG key.
# gpg --keyserver keys.gnupg.net --recv-keys 6694D8DE7BE8EE5631BED9502BD5824B7F9470E6
Next, navigate to https://electrum.org - the homepage for Electrum and click on Download. You should be on this URL - https://electrum.org/#download.
Electrum Wallet releases Android versions for 32-bit devices and 64-bit devices. In general, most devices, especially new devices are 64 bit. In the future, 32-bit devices are being slowly faded out. Before downloading the Electrum Wallet APK file and the corresponding Signature file, you have to find out which architecture your Android device is running, don't worry - it's super easy.
- To check which version to download, run the following command in termux
- # uname -m
- The resulting text will list information about the device's hardware. If you see 64 in the result, you have a 64-bit device. If you do not see 64, you have a 32-bit device
- In this guide, a 64-bit device was used. The rest of the tutorial will follow the steps for a 64-bit device. If you have a 32-bit device, substitute the steps for 64-bit by selecting 32-bit.
You are ready to download Electrum! In this section, the download will be performed from the terminal. Navigate from Termux to the directory from which you want to download the files. Normally, this is the Downloads folder.
- In termux, navigate to the directory that you want the downloaded files to go. Normally, this is the Downloads folder. To do this, use the cd command
- # cd storage/downloads
- Note: Depending on your specific device, the 'downloads' folder may have a different path. Utilize the ls command to list the files and folders of the current directory
- On the Electrum download page, find the Android 64 bit version download link. Long press/right-click and select 'copy link address'. You are going to paste this link into the terminal for accuracy.
- In termux, run the following command to download the Electrum Wallet 64-bit Android version:
# wget https://download.electrum.org/4.0.9/Electrum-4.0.9.0-arm64-v8a-release.apk
- Go back to the Electrum download page, find the Android 64-bit version signature file. Long press/right-click and select 'copy link address'. You are going to paste this link into the terminal for accuracy
- In termux, run the following command to download the signature file for the Electrum Wallet 64-bit Android version:
# wget https://download.electrum.org/4.0.9/Electrum-4.0.9.0-arm64-v8a-release.apk.asc
Good job! You now have all the files you need downloaded to your Android device. Just a few more steps and you will be ready to start using Electrum. It's time to verify the GPG signature, making sure the copy downloaded is authentic and not malicious.
- From the terminal, run the following command to verify Electrum's GPG signature: There is a lot of text here, it is a good idea to utilize copy and paste
# gpg --verify https://download.electrum.org/4.0.9/Electrum-4.0.9.0-arm64-v8a-release.apk.asc
- The result you are looking for is the text 'Good Signature'. You can ignore any warnings about 'This is not a trusted key'. The warnings are referring to the fact that you have not signed the key as trusted, in a web of trust model.
- Android should automatically match the signature file to the downloaded APK file. Make sure both files are in the same directory. If you are having trouble, try running the command again putting the APK file after the signature file:
# gpg --verify https://download.electrum.org/4.0.9/Electrum-4.0.9.0-arm64-v8a-release.apk.asc https://download.electrum.org/4.0.9/Electrum-4.0.9.0-arm64-v8a-release.apk
Now it's time to install Electrum!
- Open the file manager, and navigate to the Downloads folder. Look for and click/tap on the Electrum Wallet APK file. C
- A pop up will appear asking you to confirm you want to install. Select yes.
- If you get permission denied, you need to allow install of untrusted sources from your file manager. Open your settings and navigate to 'install unknown apps'
- Settings -> Apps & Notifications -> Special App Access -> Install unknown apps
- A list of apps will appear, search for and select your file manager. Use to toggle to enable your file manager to 'install apps from this source'
- Go back to the beginning of this step and retry installation - it should work this time!
Congrats! You just installed electrum from direct download. Let's get your wallet setup!
3. Create and setup
Electrum is considered a light-wallet - this means it starts up instantly, is light on resources, and is ready to be used right away. Light-wallets connect to a full-node - Bitcoin software with a full copy of the blockchain. Light-wallets, like Electrum, are able to query the full-node to interact with the blockchain - getting transaction history, sending and receiving transactions, and more.
Today, a majority of user-facing wallets are light-wallets. Blockchain's take up a lot of space, and many people do not have 300+ GB of hard drive space laying around. Fun Fact: Satoshi Nakamoto wrote about this topic in the Bitcoin whitepaper, and developed the solution used by Electrum today, called SPV - Simplified Payment Verification.
Electrum can be set up and configured in many different ways. For increased security, run and connect to your own Electrum server. If you can't run your own Electrum server, route all network traffic from Electrum over TOR. Or, do both! Electrum is configurable and extendable, it's as secure as you make it. Under the hood, Electrum generates your wallet with the use of a seed phrase. The seed phrase can be used to restore your Electrum wallet, but it cannot be imported into most other wallets. This is because Electrum uses its own algorithm to generate a seed phrase, called Seed Version System - and is not compatible with BIP39.If you have a BIP39 seed phrase, you can use Electrum by following Section 6 — Initialize Wallet With Your Seed Phrase. Electrum supports initializing wallets from BIP39 seed phrases, but it does not support generating BIP39 seed phrases.
If you want to pre-generate a BIP39 seed phrase to use with this guide, instead of using Electrum's seed phrase algorithm, read How to generate a seed phrase, then come back to this guide and read Section 6 — Initialize Wallet With Your Seed Phrase.
You can think of your seed phrase as a master backup of all your cryptocurrency in this wallet. It will unlock every single address created by your wallet. Backing up your seed phrase ensures you will always have access to your funds. If access is lost to your wallet, the seed phrase is the only option available to recover access to your crypto - Section 5 - How to Securely Back Up Your Seed Phrase.
Electrum is super configurable. When creating a new wallet, Electrum offers four options:
- Standard Wallet. The standard wallet is a traditional bitcoin wallet. Electrum supports bech32/segwit and legacy formats. For the majority of people, this type of wallet will be sufficient
- Wallet with 2FA. Electrum's implementation of 2FA is a bit different from standard 2FA applications. It is actually a 2-of-3 multi-sig wallet, where you hold 2 out of the 3 keys. A trusted 3rd party - a service called trusted coin, holds the 3rd key and acts as the 2FA. Trusted Coin uses the standard OTP based 2FA, when you send a transaction Electrum will prompt you to enter the OTP, and Trusted Coin will sign the transaction and broadcast it.
- Multisig Wallet. Multisig (multi-signature) wallets are wallets that require more than 1 entity to sign a transaction in order for it to broadcast to the blockchain. Multisig wallets fill professional use cases, such as an exchange wanting multiple people to sign off before sending withdrawals, or a business wanting to authorize a payment to be sent
- Import Bitcoin Address or Private key. This is another wallet that is for more specialized use cases. Electrum allows you to create a new wallet by importing public, watch-only addresses, or importing private keys to be able to send transactions.
This guide covers each wallet creation method. Let's get started creating new wallets in Electrum. Up first is the standard wallet
Create a new standard wallet in Electrum Wallet
Open the Electrum Wallet app. The interface is no-frills, opening up to a screen that is the beginning of the create wallet process.
- Click/tap on next to create a new wallet
- By default, Electrum will name the first wallet created `default_wallet`. If you want to give your first wallet a different name, tap on the wallet icon - this will bring you to a screen listing all wallets. At the bottom of the screen, tap on `New` to create a new wallet. Electrum will now prompt you to name your wallet.
- If you have previously created a wallet in Electrum, the app will open asking for the password of the last used wallet. Tap on the wallet icon - this will bring you to a screen listing all wallets. At the bottom of the screen, tap on `New` to create a new wallet
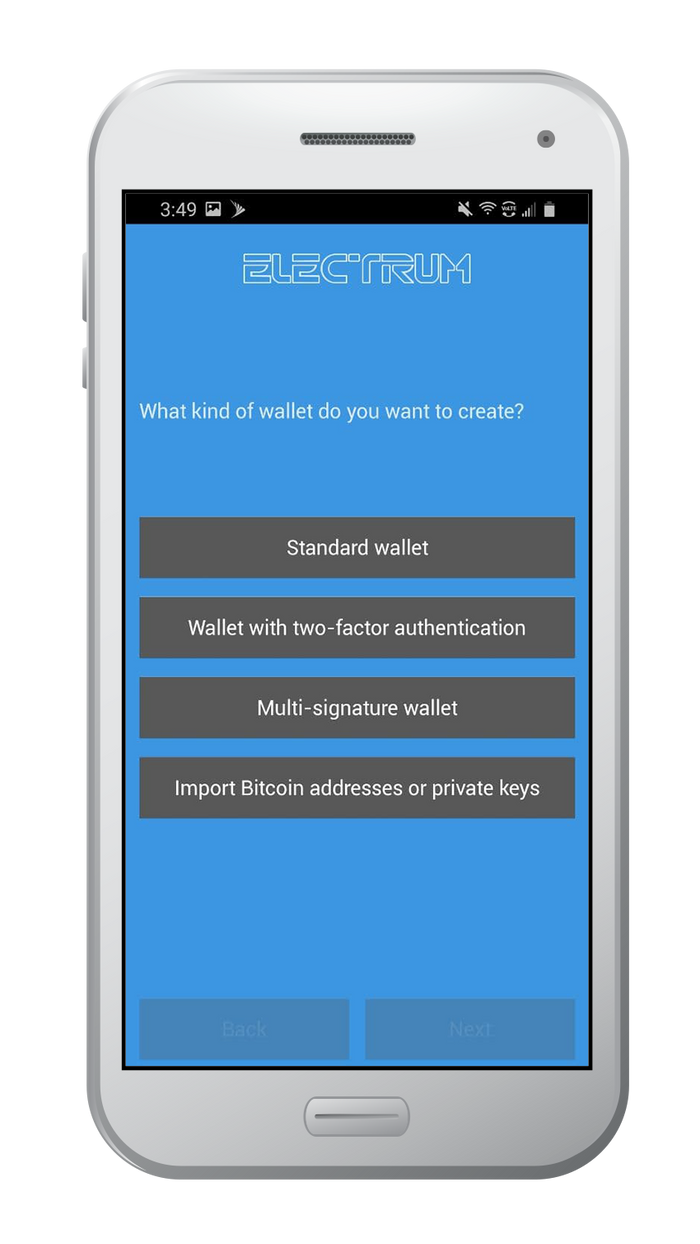
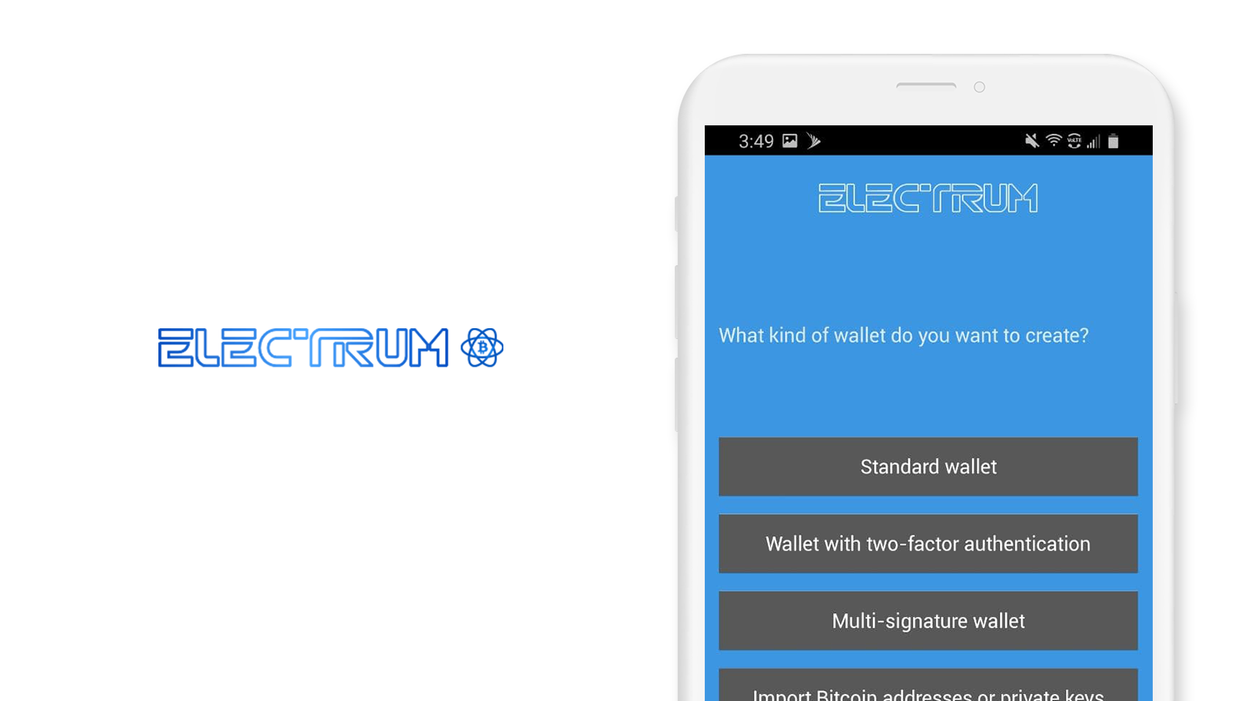
What kind of Wallet do you want to create? Electrum will list the 4 types of wallets that it can create.
- Standard Wallet ← Select this option
- Wallet with two-factor authentication
- Multi-signature wallet
- Import Bitcoin addresses or private keys
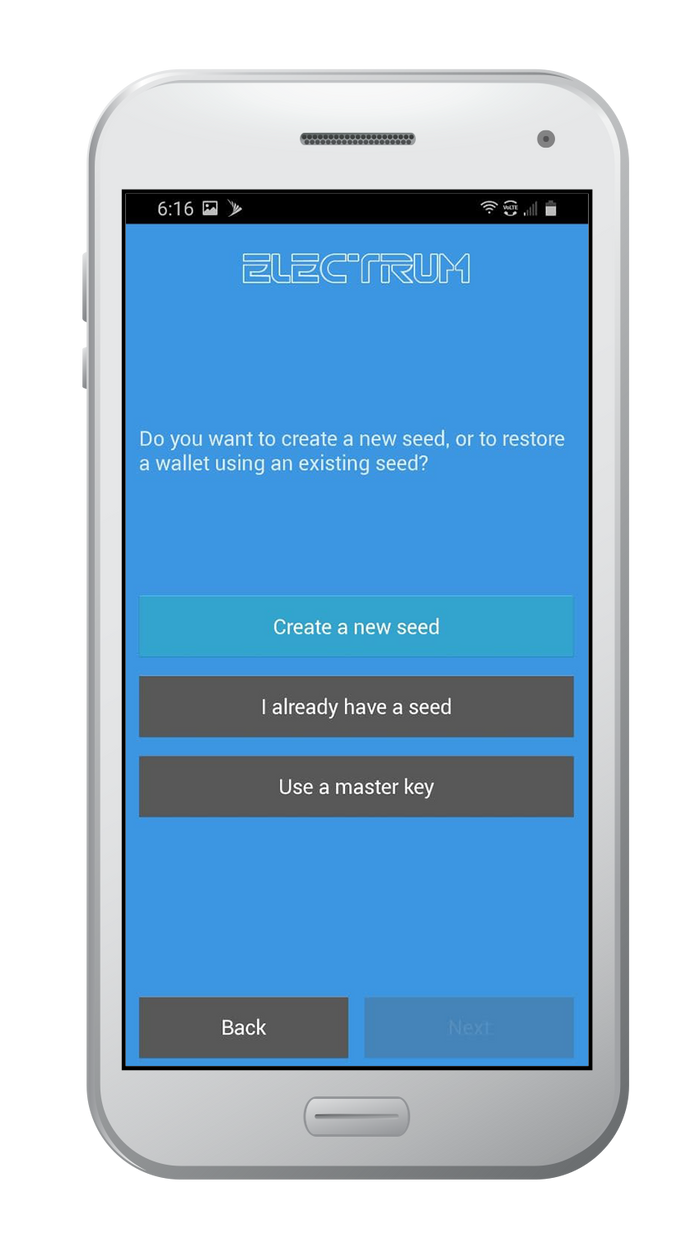
Do you want to create a new seed, or to restore a wallet using an existing seed? Electrum gives three options here. Remember, Electrum uses their own algorithm to generate the seed phrase, and it is not compatible with BIP39.
- Create a new seed ← Select this option
- I already have a seed
- Reminder - Electrum uses its own algorithm to generate the seed phrase. However, Electrum supports importing a BIP39 seed phrase and creating your wallet from it.
- Use a master key
- This option is similar to selecting `Import Bitcoin addresses or private keys` in the previous step. This allows importing a master public key or master private key. The master public key is for watch-only wallets, you will not be able to spend the funds. The master private key will allow funds to be sent.
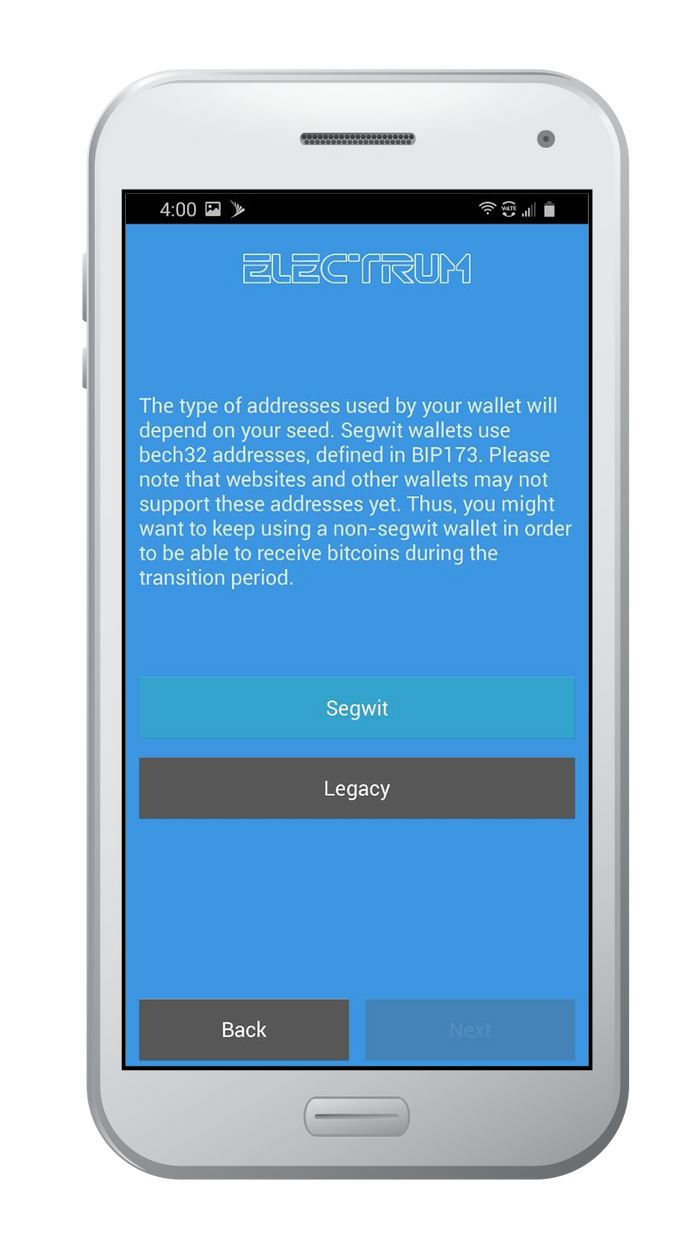
Segwit vs Legacy?This choice is about address formats. Segwit was a network upgrade, called a hard fork, that changed the address format for bitcoin addresses. As of Dec 2020, around 70% of transactions on the Bitcoin blockchain use Segwit. However, not all network participants have upgraded their wallets, so there are cases where a legacy wallet address is needed in order to complete a transaction.
- Segwit ← Select this option if you want to future-proof your wallet
- Legacy ← Select this option if you will be using a service that has not updated their wallets.
Key Takeaway - In most cases, Segwit is the preferred choice. Also consider creating two wallets - one segwit, one legacy
Securing your wallet and verifying your seed phrase
Electrum is going to display your 12-word seed phrase. Your seed phrase is the most important step in this process - backing it up is essential. Section 5 - How to Securely Backup Your Seed Phrase covers all the methods to safely backup your seed phrase.
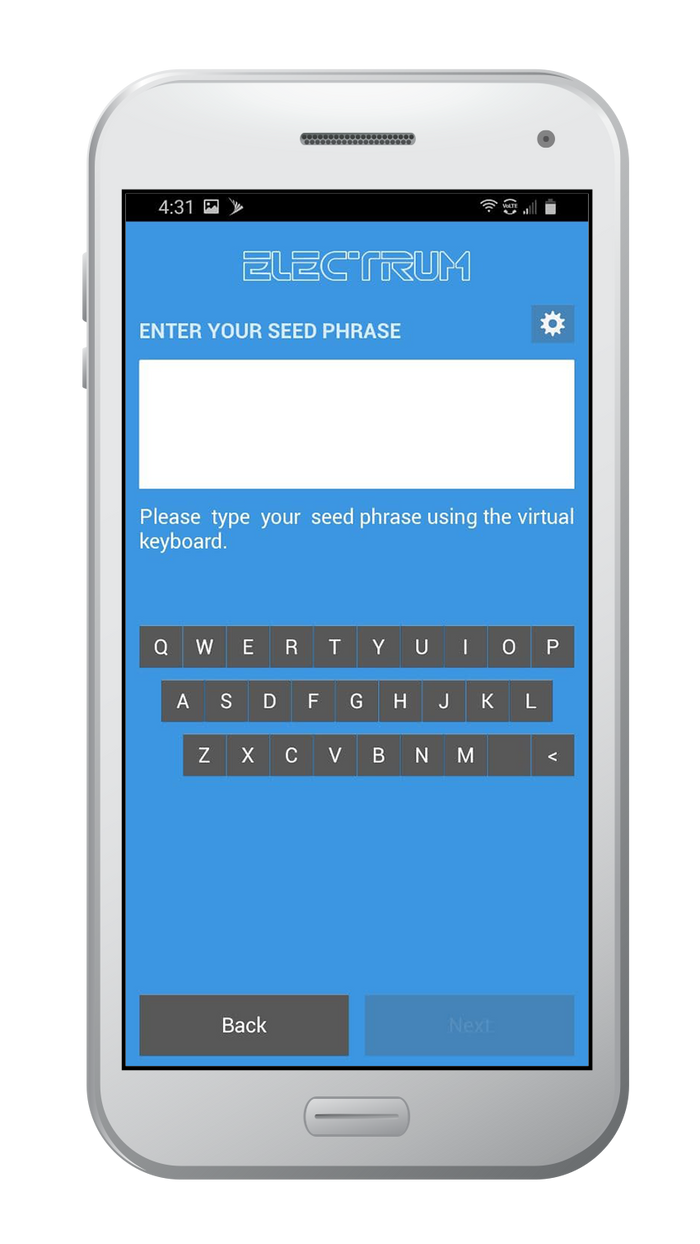
- Your 12-word seed phrase will be displayed on the screen. In the next step, Electrum will ask you to type your seed phrase to continue. This is done to make sure you backup your seed phrase.
- Write your seed phrase down on paper. Keep in mind that storing your seed phrase long-term on paper is not safe. The goal of writing your seed phrase on paper is to be able to safely back it up, then destroy the paper
- Optional: Electrum allows extending your seed phrase by adding additional words. If you want to do this, the words added must be random. Read How to generate a seed phrase to get started.
- After writing your seed phrase on paper, click/tap next and type in your seed phrase. Any misspellings, typos, or typing the words in the wrong order and you will have to start over. Electrum uses a virtual keyboard for this step, you will not be able to use Android's built-in keyboard. The purpose of this is to prevent keyloggers from obtaining your seed phrase.
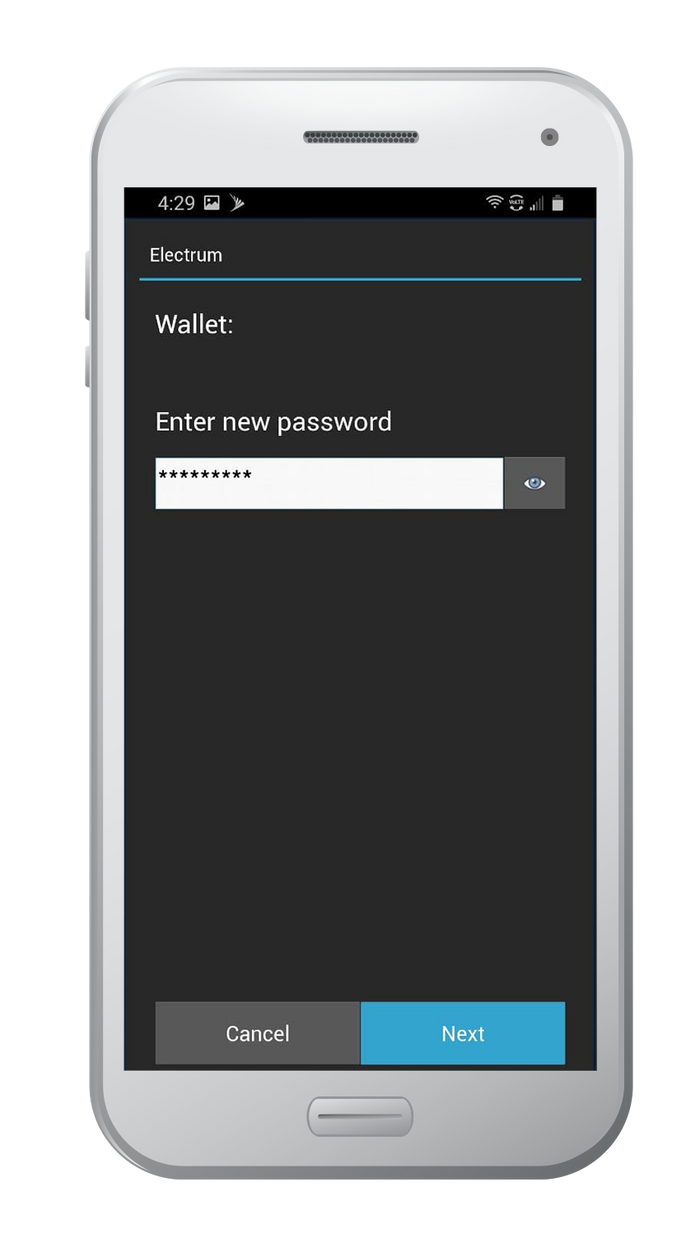
It's time to create your password. Electrum encrypts your wallet file, and your password is needed to unlock it. If you forget your password, Electrum cannot reset it for you, so back up your seed phrase - it is the only way to regain access to your funds.
- Your password should be unique to this wallet, never reuse passwords.
- Secure passwords are hard for both a human and a computer to crack.
- Consider using a password generator or password manager
- Learn about what makes a strong password
Awesome! You successfully created a standard wallet in Electrum. Before putting any funds in your wallet, make sure you backup your seed phrase.
Go to Section 5 securely back up your seed phrase.
Recommended Action: After you securely back up your seed phrase, it is important to destroy the paper you wrote your seed phrase on.


Create a new wallet with 2FA in Electrum Wallet
Open the Electrum Wallet app. The interface is no-frills, opening up to a screen that is the beginning of the create wallet process.
- Click/tap on next to create a new wallet
- By default, Electrum will name the first wallet created `default_wallet`. If you want to give your first wallet a different name, tap on the wallet icon - this will bring you to a screen listing all wallets. At the bottom of the screen, tap on `New` to create a new wallet. Electrum will now prompt you to name your wallet.
- If you have previously created a wallet in Electrum, the app will open asking for the password of the last used wallet. Tap on the wallet icon - this will bring you to a screen listing all wallets. At the bottom of the screen, tap on `New` to create a new wallet
- What kind of Wallet do you want to create? Electrum will list the 4 types of wallets that it can create.
- Standard Wallet
- Wallet with two-factor authentication ← Select this option
- Multi-signature wallet
- Import Bitcoin addresses or private keys
- Electrum will give a brief overview of how two-factor authentication works. It is important to highlight some of the information listed
- Electrum 2FA is a 2-of-3 multisig wallet, where you hold 2 keys and a third-party service called Trusted Coin holds 1 key. Trusted Coin requires registration with an email address, and requires a small payment to sign and broadcast transactions on your behalf.
- Electrum does not use SMS messaging. They use time-based one-time-passwords (OTP). A popular solution is Google's Authenticator app. If you do not have the authenticator app, download it from the app store here.
- Since Electrum's 2FA wallet is a multisig wallet, this can be set up manually without relying on an unknown third-party.
- Do you want to create a new seed, or to restore a wallet using an existing seed? Electrum gives two options here. Remember, Electrum uses its own algorithm to generate the seed phrase, and it is not compatible with BIP39.
- Create a new seed ← Select this option
- I already have a seed
- Reminder - Electrum uses its own algorithm to generate the seed phrase. However, Electrum supports importing a BIP39 seed phrase, and creating your wallet from it.
- Segwit vs Legacy? This choice is about address formats. Segwit was a network upgrade, called a hard fork, that changed the address format for bitcoin addresses. As of Dec 2020, around 70% of transactions on the Bitcoin blockchain use Segwit. However, not all network participants have upgraded their wallets, so there are cases where a legacy wallet address is needed in order to complete a transaction.
- Segwit ← Select this option if you want to future-proof your wallet
- Legacy ← Select this option if you will be using a service that has not updated their wallets.
- Key Takeaway - In most cases, Segwit is the preferred choice. Also consider creating two wallets - one segwit, one legacy
Securing your wallet and verifying your seed phrase
Electrum is going to display your 12-word seed phrase. Your seed phrase is the most important step in this process - backing it up is essential. Section 5 - How to Securely Backup Your Seed Phrase covers all the methods to safely backup your seed phrase.
- Your 12-word seed phrase will be displayed on the screen. In the next step, Electrum will ask you to type your seed phrase to continue. This is done to make sure you backup your seed phrase.
- Write your seed phrase down on paper. Keep in mind that storing your seed phrase long term on paper is not safe. The goal of writing your seed phrase on paper is to be able to safely back it up, then destroy the paper.
- Optional: Electrum allows extending your seed phrase by adding additional words. If you want to do this, the words added must be random. Read How to generate a seed phrase to get started.
- After writing your seed phrase on paper, click/tap next and type in your seed phrase. Any misspellings, typos, or typing the words in the wrong order and you will have to start over. Electrum uses a virtual keyboard for this step, you will not be able to use Android's built-in keyboard. The purpose for this is to prevent keyloggers from obtaining your seed phrase.
It's time to create your password. Electrum encrypts your wallet file, and your password is needed to unlock it. If you forget your password, Electrum cannot reset it for you, so back up your seed phrase - it is the only way to regain access to your funds.
- Your password should be unique to this wallet, never reuse passwords.
- Secure passwords are hard for both a human and a computer to crack.
- Consider using a password generator or password manager
- Learn about what makes a strong password
The final step is establishing a link from Electrum to Trusted Coin. If you have not downloaded an OTP client, like Google Authenticator, now is the time to do so.
- Accept the terms & conditions then enter your email address. It is important to enter an accurate email address. The email address is to provide a link between you, Electrum and Trusted Coin
- Setup your OTP client. The recommended OTP client to use is Google Authenticator. The default way to set up 2FA with the Authenticator app is to scan a QR code. In order to do this, you will need Authenticator running on a separate device. If you only have one device, you can instead enter a code.
- Open Authenticator and look for the + symbol. The + symbol is how you add new accounts you want to use with Authenticator. It is located on the bottom right corner of the screen.
- Tap on the + symbol, and you will see a popup appear with 2 options. The 2 options are "Scan QR code" and "Enter a setup key". Follow the directions below:
- To `Enter a setup key-type the code provided by electrum into Google Authenticator. When done, Authenticator will provide a 6 digit code - type this code into Electrum.
- To 'Scan QR code', the camera will activate on Authenticator. Scan the QR code provided by Electrum, and Authenticator will automatically add it. That's it, all done!
- Electrum will now load your new 2FA Bitcoin Wallet
Well done! You successfully created a standard wallet in Electrum. Before putting any funds in your wallet, make sure you backup your seed phrase.
Go to Section 5 securely back up your seed phrase.
Recommended Action: After you securely back up your seed phrase, it is important to destroy the paper you wrote your seed phrase on.
Create a new Multi-sig wallet in Electrum Wallet
Open the Electrum Wallet app. The interface is no-frills, opening up to a screen that is the beginning of the create wallet process.
- Click/tap on next to create a new wallet
- By default, Electrum will name the first wallet created `default_wallet`. If you want to give your first wallet a different name, tap on the wallet icon - this will bring you to a screen listing all wallets. At the bottom of the screen, tap on `New` to create a new wallet. Electrum will now prompt you to name your wallet.
- If you have previously created a wallet in Electrum, the app will open asking for the password of the last used wallet. Tap on the wallet icon - this will bring you to a screen listing all wallets. At the bottom of the screen, tap on `New` to create a new wallet
- What kind of Wallet do you want to create? Electrum will list the 4 types of wallets that it can create.
- Standard Wallet
- Wallet with two-factor authentication
- Multi-signature wallet ← Select this option
- Import Bitcoin addresses or private keys
Electrum will ask how many signatures are needed to unlock funds, and how many keys to generate. It is important to highlight some information.
- There are two fields to select from `From X cosigners, require Y signatures`.
- Cosigners refers to how many keys are to be issued.
- Require Y signatures refers to how many keys need to sign a transaction before it will be broadcasted to the blockchain.
- For this tutorial, choose 2 cosigners and require 3 signatures. This is referred to as a 2-of-3 multi-sig wallet.
- Do you want to create a new seed, or to restore a wallet using an existing seed? Electrum gives three options here. Remember, Electrum uses their own algorithm to generate the seed phrase, and it is not compatible with BIP39.
- Create a new seed ← Select this option
- I already have a seed
- Reminder - Electrum uses its own algorithm to generate the seed phrase. However, Electrum supports importing a BIP39 seed phrase, and creating your wallet from it.
- Use a master key
- This option is similar to selecting `Import Bitcoin addresses or private keys` in the previous step. This allows importing a master public key or master private key. The master public key is for watch-only wallets, you will not be able to spend the funds. The master private key will allow funds to be sent.
Segwit vs Legacy?. This choice is about address formats. Segwit was a network upgrade, called a hard fork, that changed the address format for bitcoin addresses. As of Dec 2020, around 70% of transactions on the Bitcoin blockchain use Segwit. However, not all network participants have upgraded their wallets, so there are cases where a legacy wallet address is needed in order to complete a transaction.
- Segwit ← Select this option if you want to future-proof your wallet
- Legacy ← Select this option if you will be using a service that has not updated their wallets.
- Key Takeaway - In most cases, Segwit is the preferred choice. Also consider creating two wallets - one segwit, one legacy
Securing your wallet and verifying your seed phrase
Electrum is going to display your 12-word seed phrase. Your seed phrase is the most important step in this process - backing it up is essential. Section 5 - How to Securely Backup Your Seed Phrase covers all the methods to safely backup your seed phrase.
Important: When you are backing up a multisig wallet, make sure you also backup all the master public keys! The master public keys are needed to restore the wallet!
- Your 12-word seed phrase will be displayed on the screen. In the next step, Electrum will ask you to type your seed phrase to continue. This is done to make sure you backup your seed phrase.
- Write your seed phrase down on paper. Keep in mind that storing your seed phrase long term on paper is not safe. The goal of writing your seed phrase on paper is to be able to safely back it up, then destroy the paper
- Optional: Electrum allows extending your seed phrase by adding additional words. If you want to do this, the words added must be random. Read How to generate a seed phrase to get started.
- After writing your seed phrase on paper, click/tap next and type in your seed phrase. Any misspellings, typos, or typing the words in the wrong order and you will have to start over.
Electrum will now be showing your Master Public Key. Before moving on, let's talk about your Master Public Key, and why it's so important for multi-sig wallets.
- Every participant in a multi-sig wallet needs to share their Master Public Key with each other. This allows Electrum to generate the wallet, to know who the participants are, and who it needs signatures from.
- In the following steps, you will be adding the Master Public Key for each of the other key holders. If this sounds confusing, consider the following example:
- Ally, Benji, and Cory are creating a multi-sig wallet. Each of them has a signing key. To authorize funds to be sent, 2 out of 3 need to agree to send funds.
- Communicate with the other keyholders, and share your Master Public Key. Electrum has 3 options available in the app: QR Code, Copy, and Share. You will need the Master Public Keys before moving on to the next step.
- After you have received each keyholder's Master Public Key, copy and paste it into the text box. Repeat this process for each Master Public Key you need to add.
- It's time to create your password. Electrum encrypts your wallet file, and your password is needed to unlock it. If you forget your password, Electrum cannot reset it for you, so back up your seed phrase - it is the only way to regain access to your funds.
- Your password should be unique to this wallet, never reuse passwords.
- Secure passwords are hard for both a human and a computer to crack.
- Consider using a password generator or password manager
- Learn about what makes a strong password
Awesome! You successfully created a multi-sig wallet in Electrum. Before putting any funds in your wallet, make sure you backup your seed phrase.
Go to Section 5 and securely back up your seed phrase.
Recommended Action: After you securely back up your seed phrase, it is important to destroy the paper you wrote your seed phrase on.
Create a new wallet in Electrum by importing bitcoin address or private key
Open the Electrum Wallet app. The interface is no-frills, opening up to a screen that is the beginning of the create wallet process.
- Click/tap on next to create a new wallet
- By default, Electrum will name the first wallet created `default_wallet`. If you want to give your first wallet a different name, tap on the wallet icon - this will bring you to a screen listing all wallets. At the bottom of the screen, tap on `New` to create a new wallet. Electrum will now prompt you to name your wallet.
- If you have previously created a wallet in Electrum, the app will open asking for the password of the last used wallet. Tap on the wallet icon - this will bring you to a screen listing all wallets. At the bottom of the screen, tap on `New` to create a new wallet
- What kind of Wallet do you want to create? Electrum will list the 4 types of wallets that it can create.
- Standard Wallet
- Wallet with two-factor authentication
- Multi-signature wallet
- Import Bitcoin addresses or private keys ← Select this option
- Import Bitcoin Addresses. Electrum supports adding both addresses and adding private keys.
- Your wallet will not have a seed phrase that can be used to backup your wallet. This type of wallet is designed for specialized use cases - if you aren't sure if this is the kind of wallet you want to create, you likely should be creating a standard wallet
- Scan the QR code, copy/paste, or input the addresses or keys you want to use with this Wallet in the text box.
- You can add as many as you want!
- When done, click on next
- It's time to create your password. Electrum encrypts your wallet file, and your password is needed to unlock it. If you forget your password, Electrum cannot reset it for you.
- Your password should be unique to this wallet, never reuse passwords.
- Secure passwords are hard for both a human and a computer to crack.
- Consider using a password generator or password manager
- Learn about what makes a strong password
Awesome! You successfully created a new wallet by importing bitcoin addresses and private keys in Electrum.
4. Verify your seed phrase
Electrum will ask you to verify your seed phrase during the wallet creation steps (depending on which approach you chose) - please check the instructions in the Securing your wallet and verifying your phrase section.
Electrum is going to display your 12-word seed phrase. Your seed phrase is the most important step in this process - backing it up is essential. Section 5 - How to Securely Backup Your Seed Phrase covers all the methods to safely backup your seed phrase.
- Your 12-word seed phrase will be displayed on the screen. In the next step, Electrum will ask you to type your seed phrase to continue. This is done to make sure you backup your seed phrase.
- Write your seed phrase down on paper. Keep in mind that storing your seed phrase long term on paper is not safe. The goal of writing your seed phrase on paper is to be able to safely back it up, then destroy the paper
- Optional: Electrum allows extending your seed phrase by adding additional words. If you want to do this, the words added must be random. Read How to generate a seed phrase to get started.
- After writing your seed phrase on paper, click/tap next and type in your seed phrase. Any misspellings, typos, or typing the words in the wrong order and you will have to start over. Electrum uses a virtual keyboard for this step, you will not be able to use Android's built-in keyboard. The purpose of this is to prevent keyloggers from obtaining your seed phrase.
WARNING: When you follow the steps to find your recovery phrase, you will be writing the recovery phrase on a piece of paper. It is very important that you back up the recovery phrase on a more reliable medium, and then destroy that piece of paper. Paper is vulnerable to accidental loss, theft, and damage. It is not the safest method of backing up your recovery phrase.


Before you put funds in your wallet, you need to create a safe backup of your seed phrase. Your seed phrase is the only way to restore access to your funds if you lose access to your wallet.
You are now ready to proceed to Section 5. Securely back up your seed phrase and securely back up your funds.
Recommended Action: After you securely back up your recovery phrase, it is important to destroy the paper you temporarily wrote your recovery phase on.
5. Securely back up your seed phrase
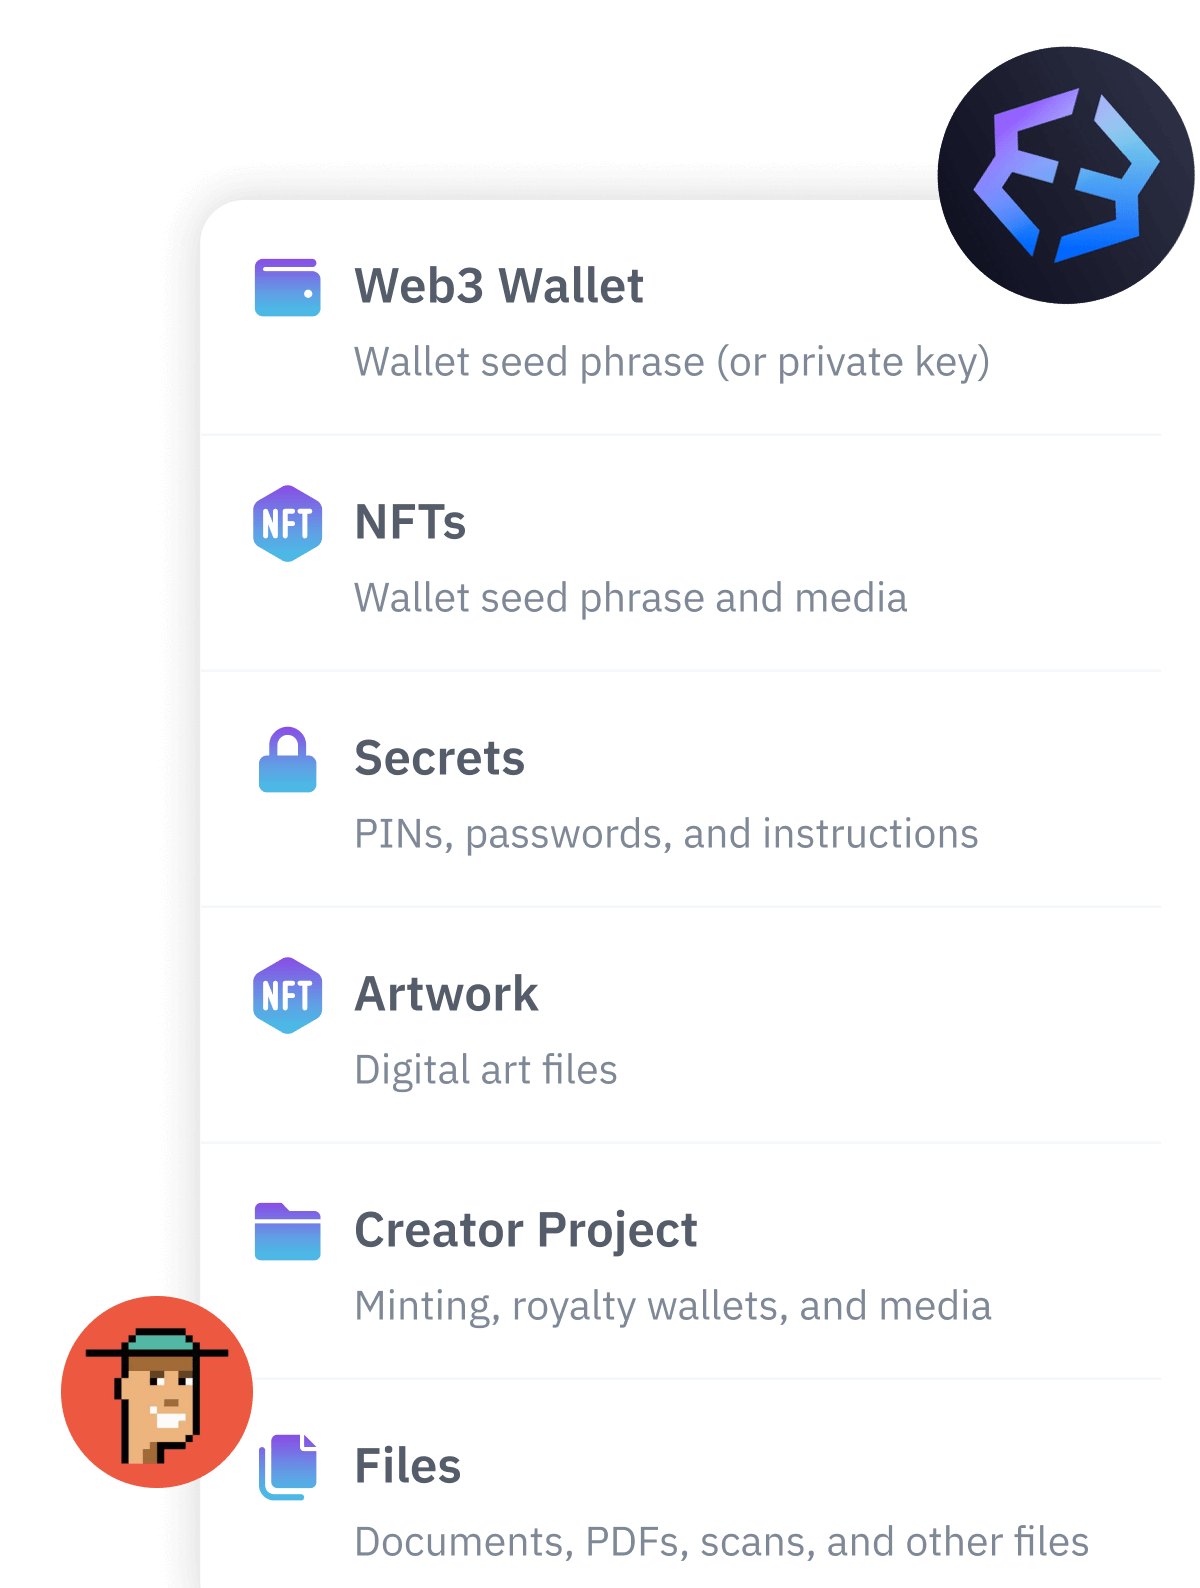
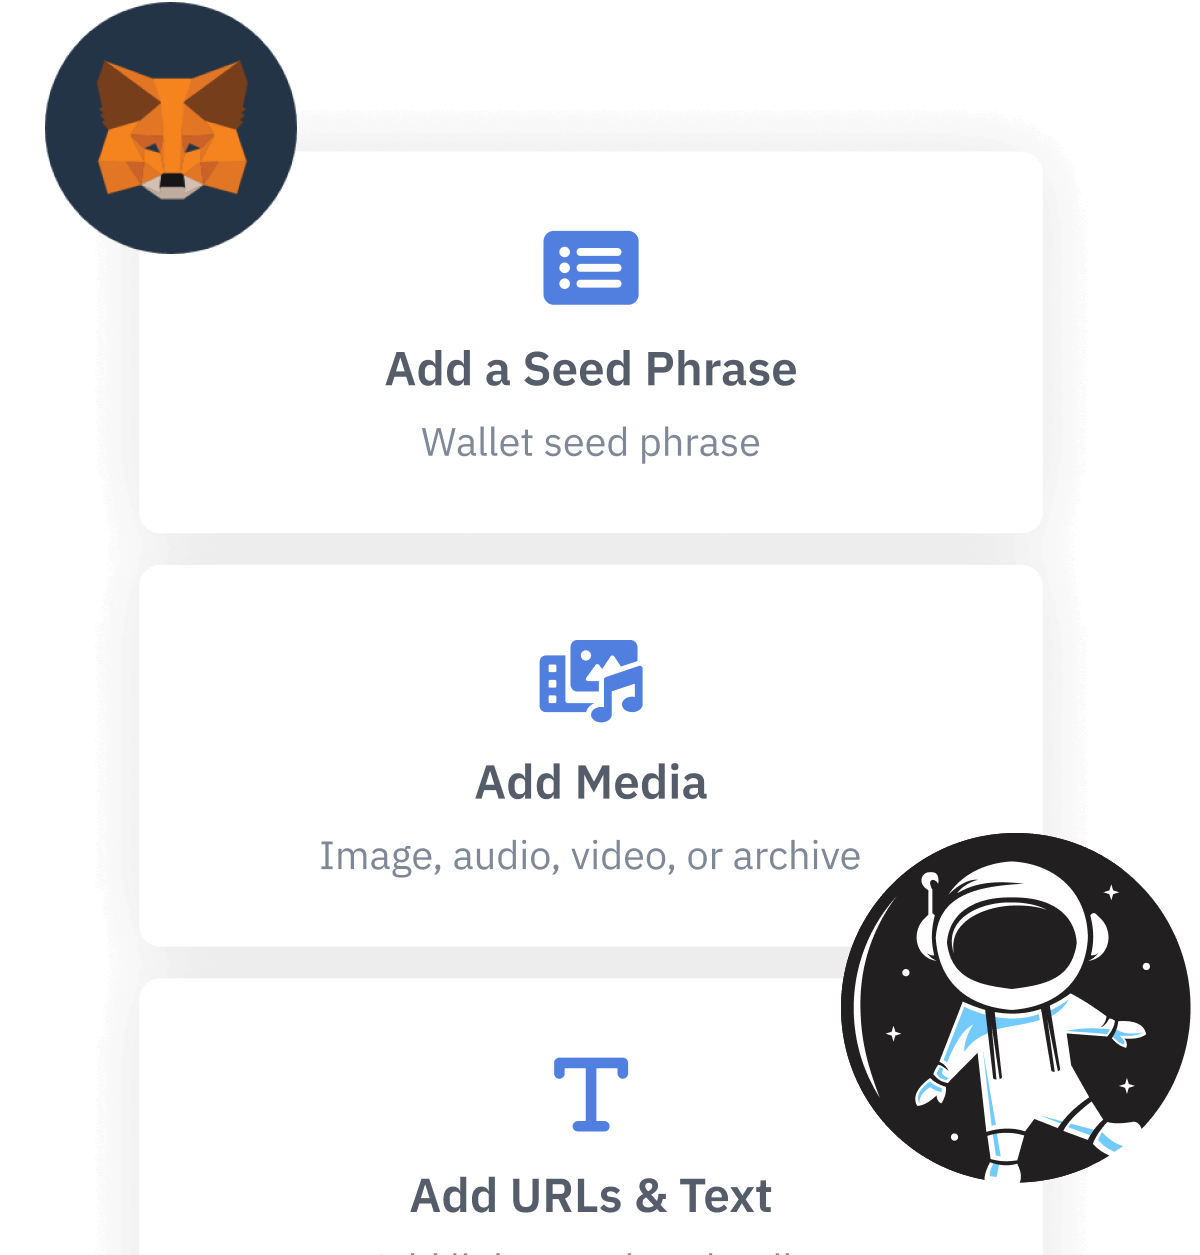
If you used Vault12 to pre-generate your recovery phrase, your recovery phrase is already securely backed up in your digital vault.
Your recovery phrase is the master key to all of your cryptocurrency funds. Electrum Wallet uses BIP39, which is the current industry best practice for generating recovery phrases. The majority of modern wallets today use BIP39. This means your Electrum seed phrase can be used to access your funds across many different wallets.
Securely backing up your recovery phrase is the most important step in creating a new wallet. To emphasize how important this is, consider how someone with your recovery phrase could access your funds without you knowing.
Imagine a bad actor has your recovery phrase, and you have your Electrum Wallet locked down with 2FA, IP address whitelisting, blocked tor access, and all the other security features. The attacker could simply open any wallet application, and import your recovery phrase. The attacker now has access to all of your funds.
We want you to have a secure backup, so this never happens to you.
Nine out of ten wallet providers only mention one way to backup your recovery phrase - by writing the recovery phrase on paper. Wallet providers only mention this paper backup method because it is easy for beginners to do. Paper backups are simply not that secure.
We did extensive research and compiled the best ways to backup your recovery phrase. We cover all the most well-known options, including next-generation options like how to back up your recovery phrase in Vault12.
Once you have safely backed up your seed phrase, you can initialize your wallet using any BIP39 compatible wallet. In the next section, you will learn how you can initialize your wallet using your seed phrase.
6. Initialize or import recovery phrase
If you are following this guide from the beginning, and you created your wallet using the default approach, using the app to `Create a Wallet`, then congratulations! You are ready to start using your wallet.
You are ready to start using your Electrum wallet.
If you followed one of our guides for pre-generating a more secure seed phrase, for instance using Vault12, and you want to use that seed phrase with your wallet - this section is for you!
In this section, you will learn how to initialize your wallet using only your recovery phrase. There are 3 main reasons to generate your wallet using this method:
- You lost access to your wallet, and you need to regain access to your wallet and your funds.
- You want to access your wallet and funds using a different wallet app.
- You want the best security, and you generated a recovery phrase using an advanced method.
Let's get started.
Electrum Wallet makes the process simple to initialize a wallet from the seed phrase. The process is already baked into the `Create New Wallet` workflow. When you create a new wallet in Electrum, there is an entire step dedicated to the seed phrase.
- You might remember this step if you have created a wallet in Electrum before. Electrum asks you to make a selection
- Create a new seed phrase
- I already have a seed phrase ← Select this option to initialize wallet from your seed phrase
- Electrum will now ask you to input your seed phrase. Remember, Electrum uses its own algorithm for generating seed phrases.
- If you created your wallet in Electrum, input your seed phrase as normal and continue the process of creating your wallet.
- If you have a BIP39 seed phrase, you need to tell Electrum in this step. Look for the settings field. On Electrum Android, the setting option can be found by locating the settings wheel icon above the `Enter Your Seed Phrase` textbox.
- In the options pop-up, check the BIP39 checkbox and press okay
- Input your seed phrase and continue the process of setting up your wallet
- Except for this step, the process for Initializing an Electrum Wallet from the seed phrase is identical to creating a new wallet. Continue the process by going to Section 3 Create and set up and following the guide for the type of wallet you are creating:
- To create a new standard wallet in Electrum Wallet
- To create a new wallet with 2FA in Electrum Wallet
- To create a new Multi-sig wallet in Electrum Wallet
Review the information in Section 5 Securely back up your seed phrase about securely backing up your seed phrase - there is a whole bunch of useful information there! With security, there is always more to learn


7. Further Reading
In the world of cryptocurrency, knowledge is your best friend. The power of being your own bank comes with responsibilities - you do not need permission to store, send, or receive funds. In this case, knowledge really is power - especially the power to protect your funds from unauthorized access.
Digital Wallet providers will almost always have their own user documentation, and sometimes they may even have a user community where you can ask questions.
Check out these resources about Electrum Wallets:
.

Vault12
Vault12 is the pioneer in crypto inheritance and backup. The company was founded in 2015 to provide a way to enable everyday crypto customers to add a legacy contact to their cry[to wallets. The Vault12 Guard solution is blockchain-independent, runs on any mobile device with biometric security, and is available in Apple and Google app stores.


Vault12 Product Demo
Get The Vault12 App Onto Your Phone