Overview
How to set up your Digital Vault.
How to get the Vault12 Guard app, create your own Digital Vault, and assign trusted Guardians to guard your Vault.
Vault12 is a powerful yet straightforward way to safeguard all of your digital assets, including cryptocurrencies, non-fungible tokens (NFTs), 2FA backup codes, master passwords, device PIN codes, IDs and medical records, and even documents with trade secrets, audio, or video. With the Vault12 Guard app, you can secure your digital valuables with your choice of trusted Guardians.
This guide will take you through the following steps to help you set up your Digital Vault:
- Download and install the Vault12 Guard app.
- Initialize your Vault.
- Assign Guardians.
Download and Install
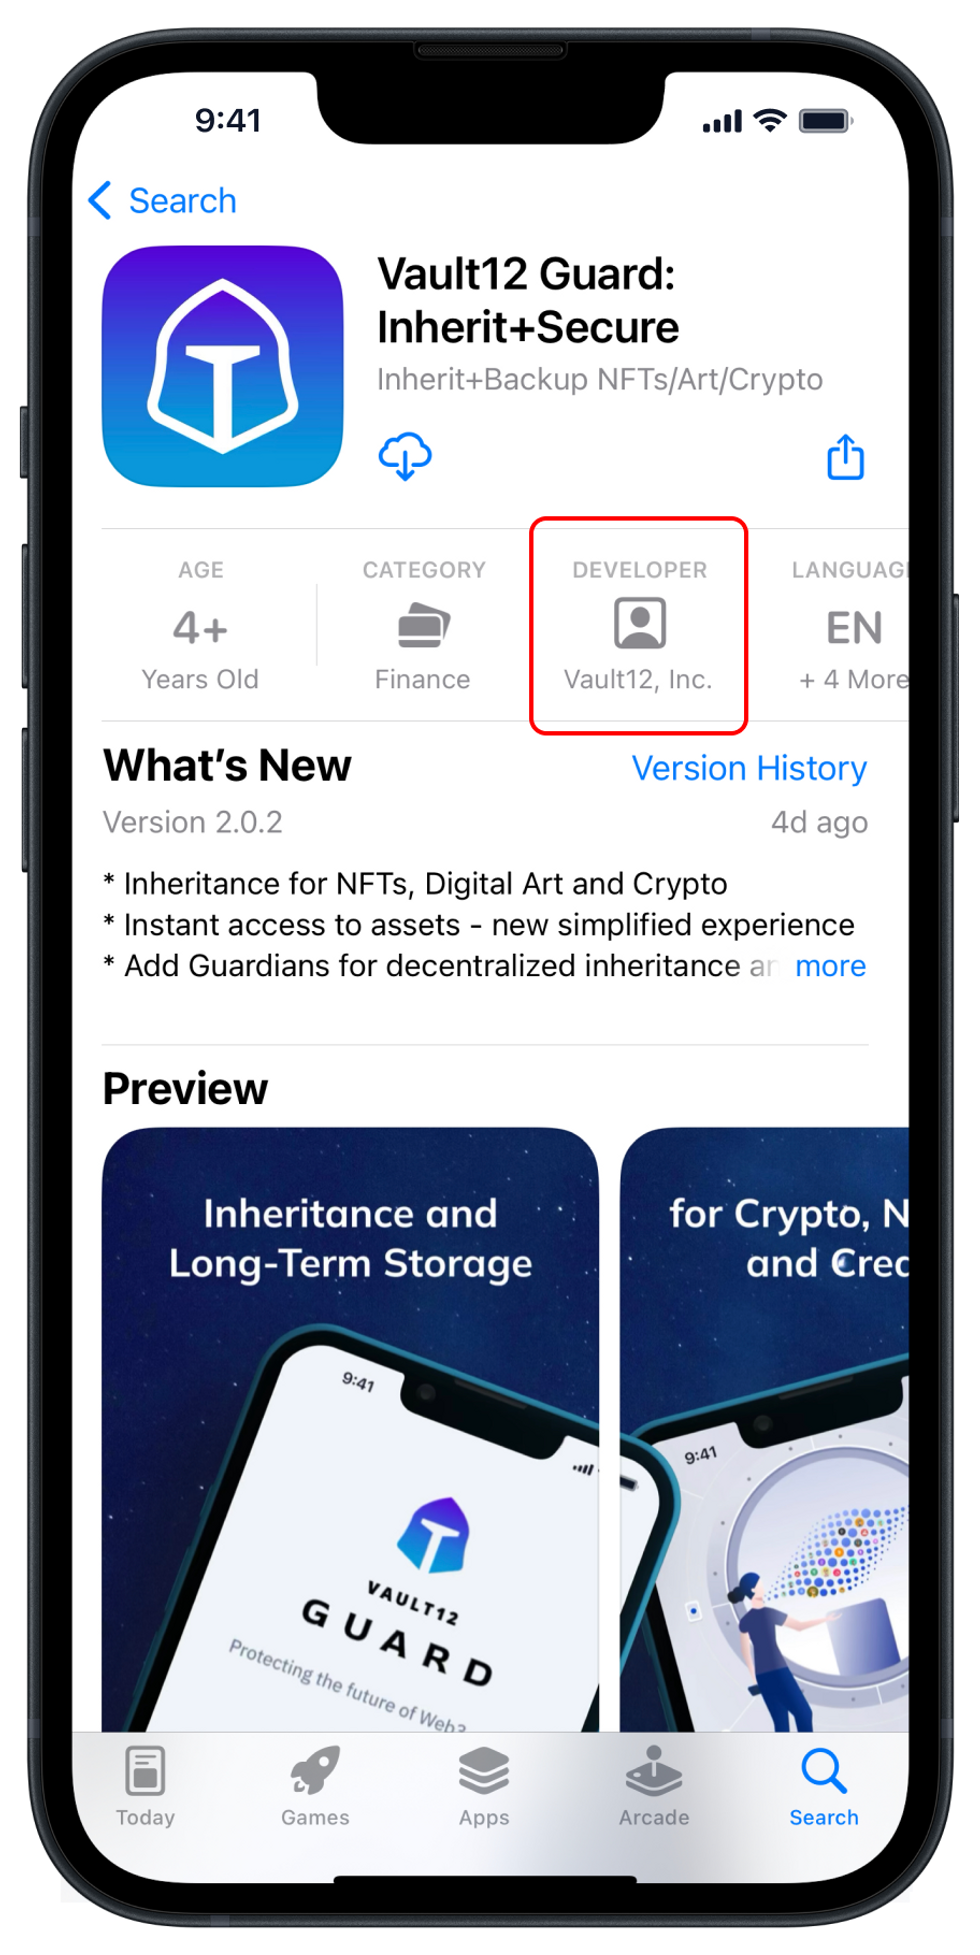
To download and install the Vault12 Guard app, click the link to a corresponding App store or scan QR with your smartphone from the screen.
Always ensure you download the correct app - the Developer should be listed as "Vault12, Inc."


Configure your Vault12 Vault
Once the app has been successfully installed, you can choose between 3 options:
- Create a new Vault.
- Join someone else's Vault as a Guardian.
- Restore an existing Vault (with the text link below the buttons).

Vault creation is easy
On the next screen, the app offers the ability to Sign in with "Face ID" biometrics for a fast, effortless app experience. By clicking "Continue," you accept the linked Terms of Service and Privacy Policy.

Then Vault creation begins and... it's ready! That was super-easy, with just a few clicks. However, you should "Continue" through several more steps to assign your Guardians and attain a higher level of protection.

Your Vault's Main Screen
Now you can see your Vault's main screen. From top to bottom:
- Notifications 🔔 are in the upper right corner.
- Swipe through tabs showing helpful articles.
- Choose from 3 main action buttons:
- Add assets to your Vault (e.g. "Add a Web3 Wallet").
- "Add Guardians" to your Vault - this is the most important next step for asset protection: add Guardians who will be empowered to help you recover your Vault in case of phone loss.
- "Set up inheritance" - A unique feature that Vault12 Guard offers to you: enable your decentralized crypto inheritance solution.

Your Vault's bottom navigation bar
To navigate the Vault, simply use the navigation bar at the bottom to switch between different screens. Make sure to stop by the "My Guardians" screen, where you can easily manage your existing Guardians or add Guardians to your account. Adding Guardians is simple - just select the "Add Guardians" button and move to the next section.


How to add Guardians to your Vault
After you have created your Vault, you are ready to assign Guardians, who will be able to help you recover your Vault in case of accidents like phone loss. Your circle of Guardians usually consists of:
- trusted people from your network of family or friends, like your spouse/partner, a close friend, or parent; and/or
- additional devices with the Vault12 Guard app installed and that are under your full control, such as:
- a tablet with iOS or Android,
- an additional or backup smartphone,
- your Macbook with M-series processors,
- even an older iPod touch could become a tool useful for backup.
Think about who your Guardians should be. Keep in mind that for maximum resilience, your Guardians and the devices that they use should appear online regularly, for automatic backup safety checks. Unlike an offline backup like a paper copy that you can't easily check, Vault12 Guard automatically and routinely checks the availability of your configured backup devices, and signals if it recommends re-verification of any Guardians' devices that were out of duty (offline) for an extended time.
Eventually, you need at least 3 Guardians to complete the recommended setup scheme. However, don't hesitate to start adding Guardian candidates immediately. You can add more Guardians later, or change the Guardians that you designated earlier, one by one and painlessly, if you later realize that they are not the best fit, or if you decide to change/upgrade one of your additional guarding devices (like an iPad).
2-of-3 Guardians is the default setup
There is an "Advanced" button on the Guardians setup screen, but it is highly recommended to stick with the default settings for your first Vault creation:
- 3 total Guardians are recommended, with confirmations from 2 out of those 3 Guardians to recover your Vault. This gives you resilience in case one of your Guardians fails to respond.
The simplest Guardian configuration to begin using is 1 trusted Person (e.g., spouse) and 2 spare devices under your control (e.g., iPad and Macbook). In this case, you are still in control of recovery if the trusted person fails to respond, because your 2 spare devices that are configured as Guardians can be used to satisfy the 2-of-3 confirmations to restore your Vault. Further, based on this 2-of-3 confirmation setup, none of your individual Guardians or devices exposes you to risk if just one of them is compromised or fails. This type of setup offers the perfect balance of control, convenience, safety, and fault tolerance.

Choose a Vault subscription
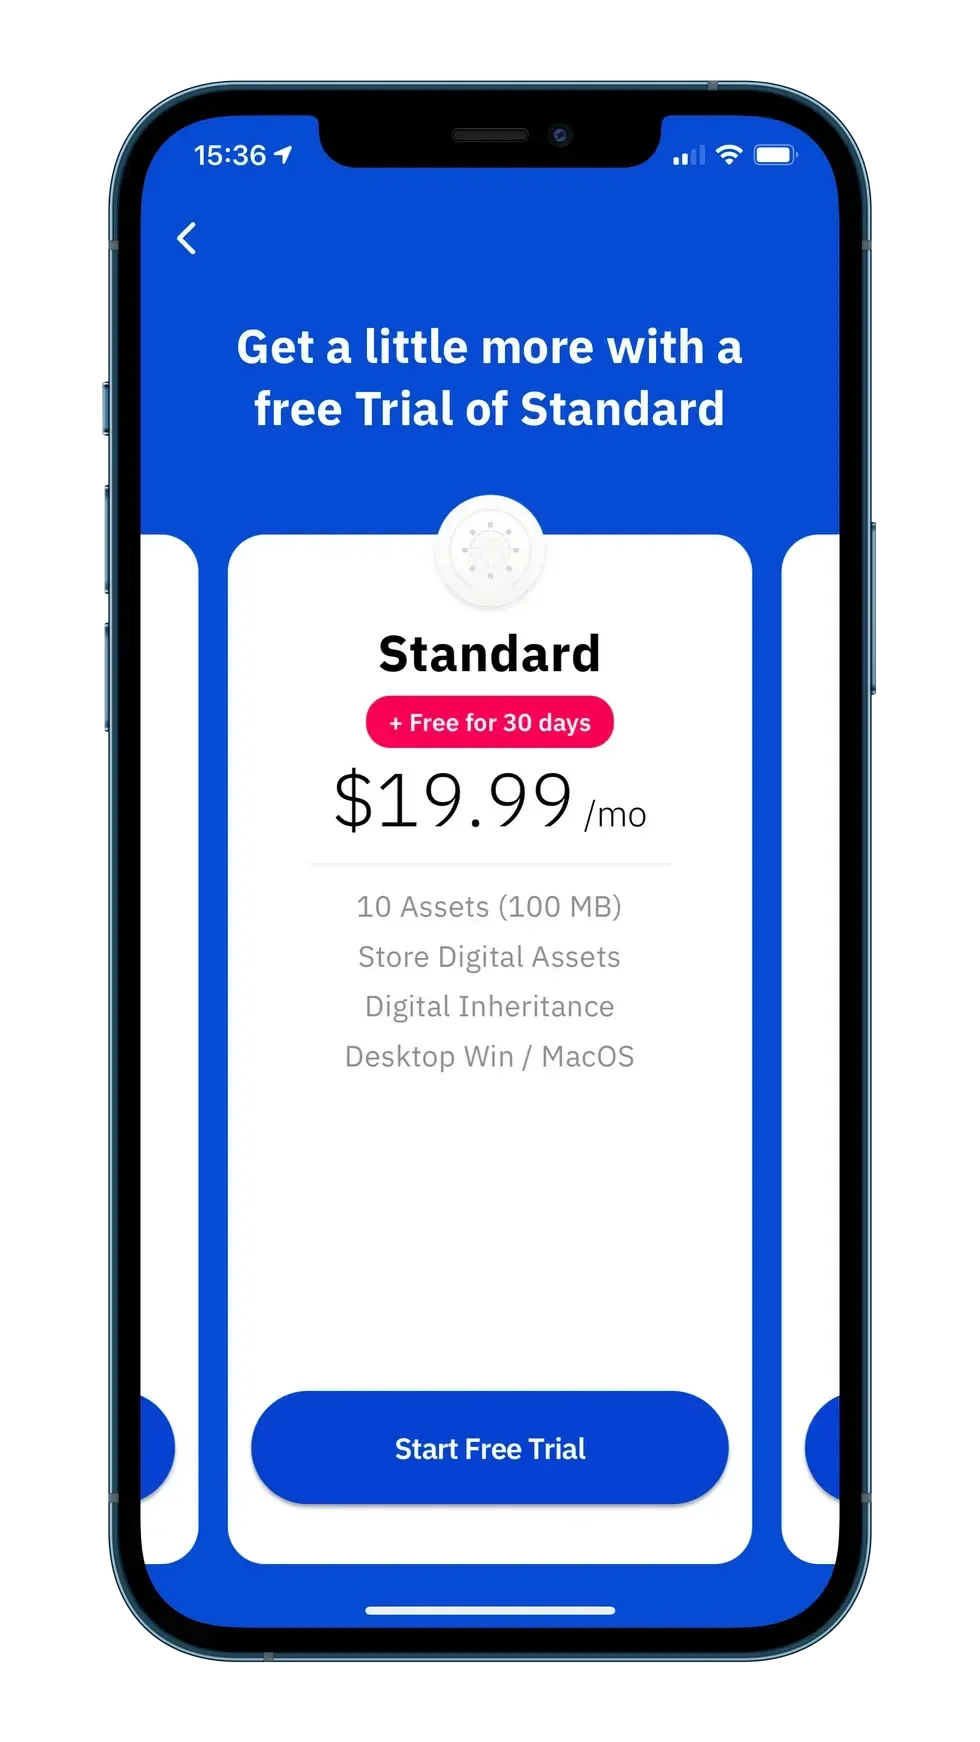
Now that your Vault is configured with basic information and a full set of Guardians, it requires a Vault12 Guard app subscription, and you will be asked to choose a trial plan.
Trials are free for the first 30 days with no payment method commitment, so feel free to enroll in a trial without concerns.
If you choose to keep using the Vault12 Guard platform to protect your assets after the Trial period, you will need to activate one of the subscription plans that includes a Vault. You can review what is included in each plan on the Vault12 download page.

Your Vault Guardians can be people or devices
As mentioned above, there are two ways to add new Guardians:
- Invite trusted people from your inner circle, or
- Enroll trusted devices.
In the app, the steps to enroll either a trusted person or a trusted device are equivalent - you identify the Guardian Name, choose a type, and then "pair" the Vault12 Guard apps on your Vault owner’s device and on the Guardian's device. The difference is only in how you choose to do it: either locally with your own spare device in your hands, or together with a live Guardian (either locally or remotely).
It is recommended to get familiar with the process of setting up a Guardian device first by enrolling your own spare device as a Guardian. It will be much more fun to enroll one of your family or friends as a Guardian after you are familiar with the process, and can confidently walk them through the steps.

Adding a Vault12 Guardian: high-level view
In a nutshell, to add a Guardian, the Vault owner sends the Guardian an invitation link to join their Vault, and then the Guardian confirms acceptance of the invitation by opening that link in the Vault12 Guard app.
In this example:
- Enter the Guardian Name, e.g., “Jason Sands” if it is a person, or “Dana’s iPad” in case of your spare device. Later, when you are using your Vault, you will distinguish between your Guardians using the name that you enter here.
- After entering the Guardian's name, choose one of the “Person” or "Spare device" options, and then press "Continue." This choice doesn’t affect how the Guardian device works, it only helps you to keep in mind which Guardians are devices that are controlled by you directly, and which of your Guardians are other people.

Invite a Guardian with an invitation link
The next screen offers a choice of how to invite your Guardian to join your Vault: either “Send a message” or “Scan a code.”
“Send a message” allows you to share an invitation link from an installed app on your phone to an app on the Guardian’s device. The sharing process is standard, and the options that you see will depend on what is installed on your phone.
Just hit “Share Message” or Copy/Paste the invite link to the messenger or communication method of your choice, and send it to the new Guardian or to your spare device.

Accept an invitation to Guard a Vault
The Guardian should open the invitation link on her/his device. If they have already installed the Vault12 Guard app, then when they click on the invitation link, the Vault12 Guard app will open and will present a screen asking the Guardian to confirm that they intend to guard the Vault.
If the Vault12 Guard app is not already installed, then the first time the user clicks on the invitation link, they will be encouraged to install the Vault12 Guard app. Later, after successfully installing the app, they should click on the invite link again so that the Guard app opens and presents the Guardian with the confirmation screen described.
The app will also ask for permission to "Allow Notifications," which will support timely interactions between the Guardian and the Vault Guard app in the future.

Add a Guardian by scanning a QR code
The "Scan a code" alternative is useful for even faster adding of Guardians. It can be used when a Vault12 Guard app is already installed on both devices.
In this case, the Guardian device's Guard app displays a QR code, and the Vault owner can scan it with their main device's Guard app.
This QR-code-scanning process can be performed on “air-gapped” devices without being connected to a network, which is a slightly more secure channel of communication. However, this setup type requires slightly more effort, so is not recommended for first-time onboarding.

Confirm your Guardians
If your Guardian accepted their invitation and joined the Vault, their status will be reflected in the Guardians screen of your Vault owner's app. After you have successfully enrolled your first Guardian, you are good to go to add other friends, family, or spare devices as Guardians to reach the recommended count of 3 Guardians total, as shown in the screenshot.

If a Guardian's status is still pending
Suppose something did not go smoothly with adding a Guardian the first time, and the Guardian's status remains as "Pending". In that case, you can tap inside the details of that specific Guardian to easily re-invite or replace them.

Next steps after setting up your Vault12 Vault
Vault12 Guard makes it easy to set up and use a Digital Vault. With Vault12, you can secure your digital assets with trusted Guardians, making it easier to recover your vault in case of device accidents. Start protecting your digital valuables today with Vault12 Guard.
Now that you have a Vault, you can do the following:
- Add assets including cryptocurrency seed phrases and other types of digital assets.
- Generate a cryptocurrency seed phrase.
- Assign a beneficiary Guardian to inherit your digital assets.
Table of Contents
- Download and Install
- Configure your Vault12 Vault
- Vault creation is easy
- Your Vault's Main Screen
- Your Vault's bottom navigation bar
- How to add Guardians to your Vault
- 2-of-3 Guardians is the default setup
- Choose a Vault subscription
- Your Vault Guardians can be people or devices
- Adding a Vault12 Guardian: high-level view
- Invite a Guardian with an invitation link
- Accept an invitation to Guard a Vault
- Add a Guardian by scanning a QR code
- Confirm your Guardians
- If a Guardian's status is still pending
- Next steps after setting up your Vault12 Vault


